Bulk data enters EvTrack through one consistent import wizard. Every supported entity type imports the same way: download the CSV template, fill it, upload, review and run.
Before you start: you need list/administration rights for the entity you are importing, and your source data in a spreadsheet you can save as CSV.
Supported imports
| Entity | Where |
|---|---|
| Personnel | the Import button on the Personnel list - supports a photo ZIP alongside the CSV |
| Users | the Import button on the Users list |
| Visitor registrations | the Import button on the visitor registration list |
| Group members | from a group leader’s members table (import wizard) |
| Watchlist entries | from a watchlist (see Watchlist) |
| Locations | the Import button on the Locations list |
| Card pools | from a card pool’s edit page (bulk card ranges) |
Step 1: Open the wizard
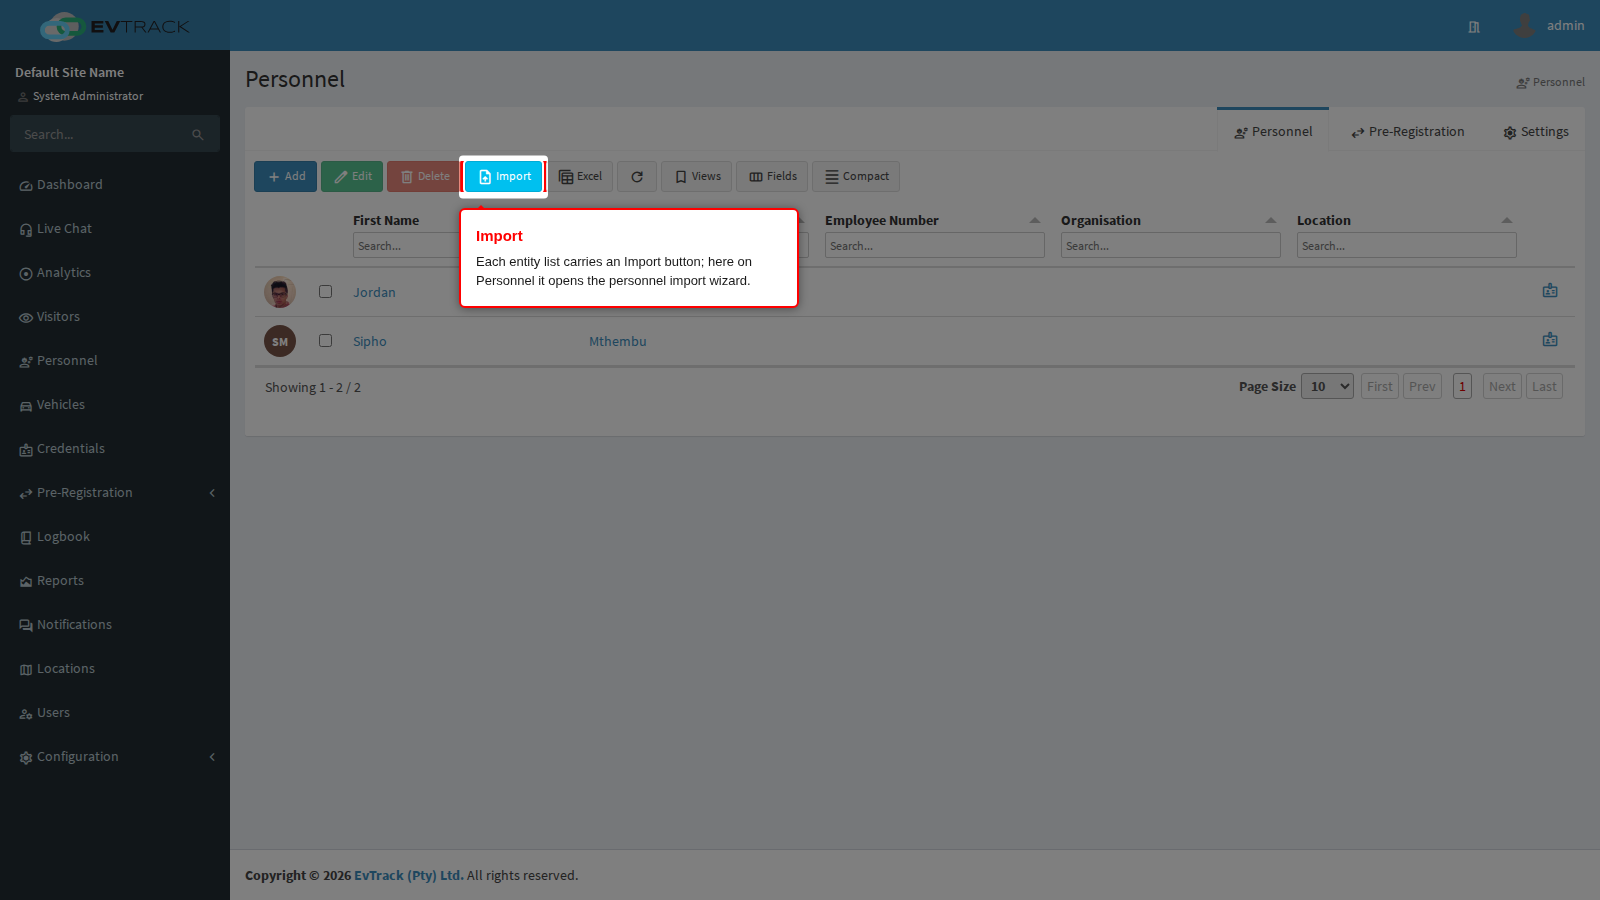
Open the entity’s list page and click its Import button in the toolbar - for example, click Personnel in the left sidebar, then click Import above the table. The import wizard opens.
Group members are the exception. They are imported against the group leader they belong to, so their wizard is opened from the leader rather than from a list page: click Import Members in the Group Members panel, either while processing the leader’s registration or on the leader’s edit page. Both routes open the same wizard and return you to the screen you started from.
Step 2: Download the template
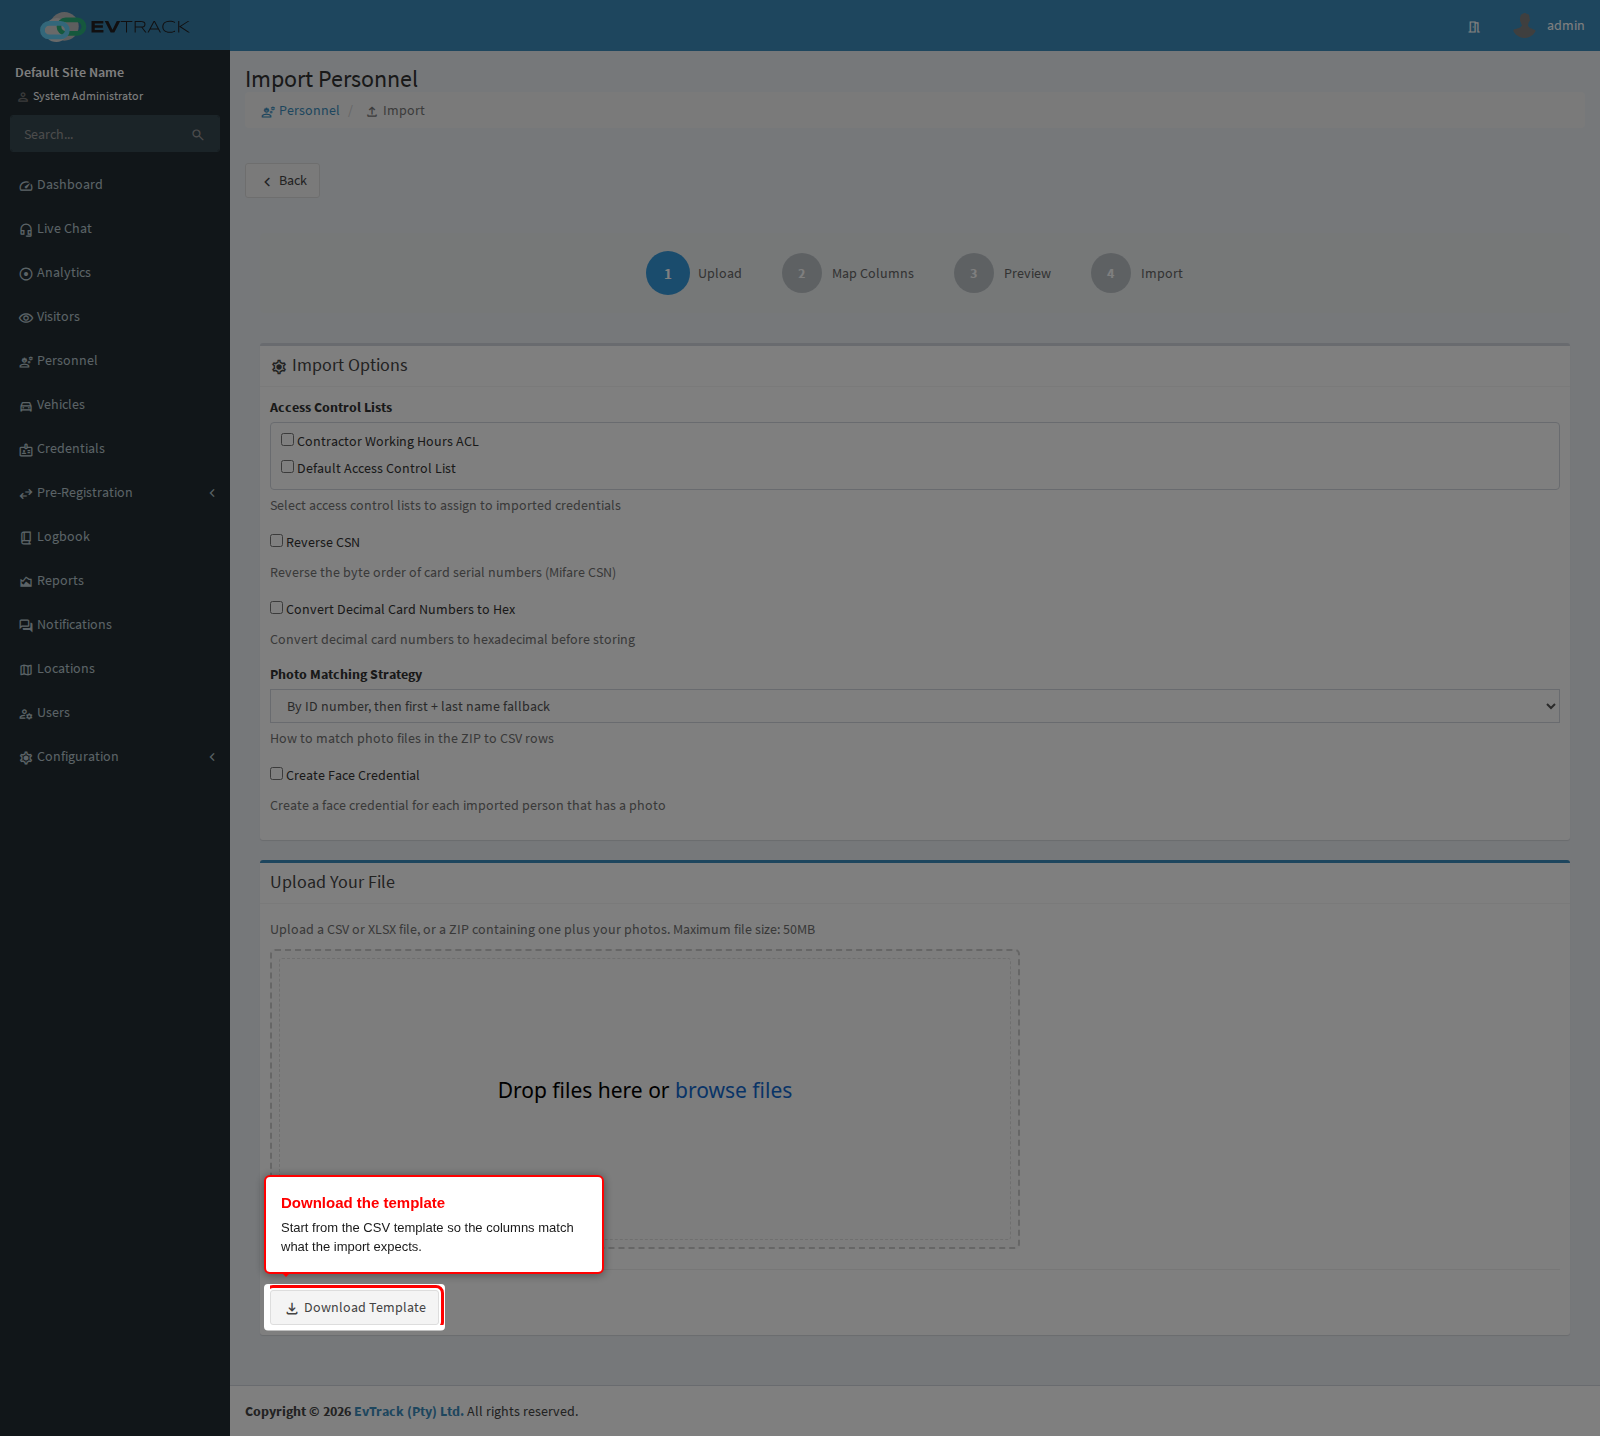
Click Download Template. Each entity type provides its own CSV template with the expected columns - start from it rather than hand-building a file. Fill it with one row per record and keep the header row intact.
Step 3: Upload the file
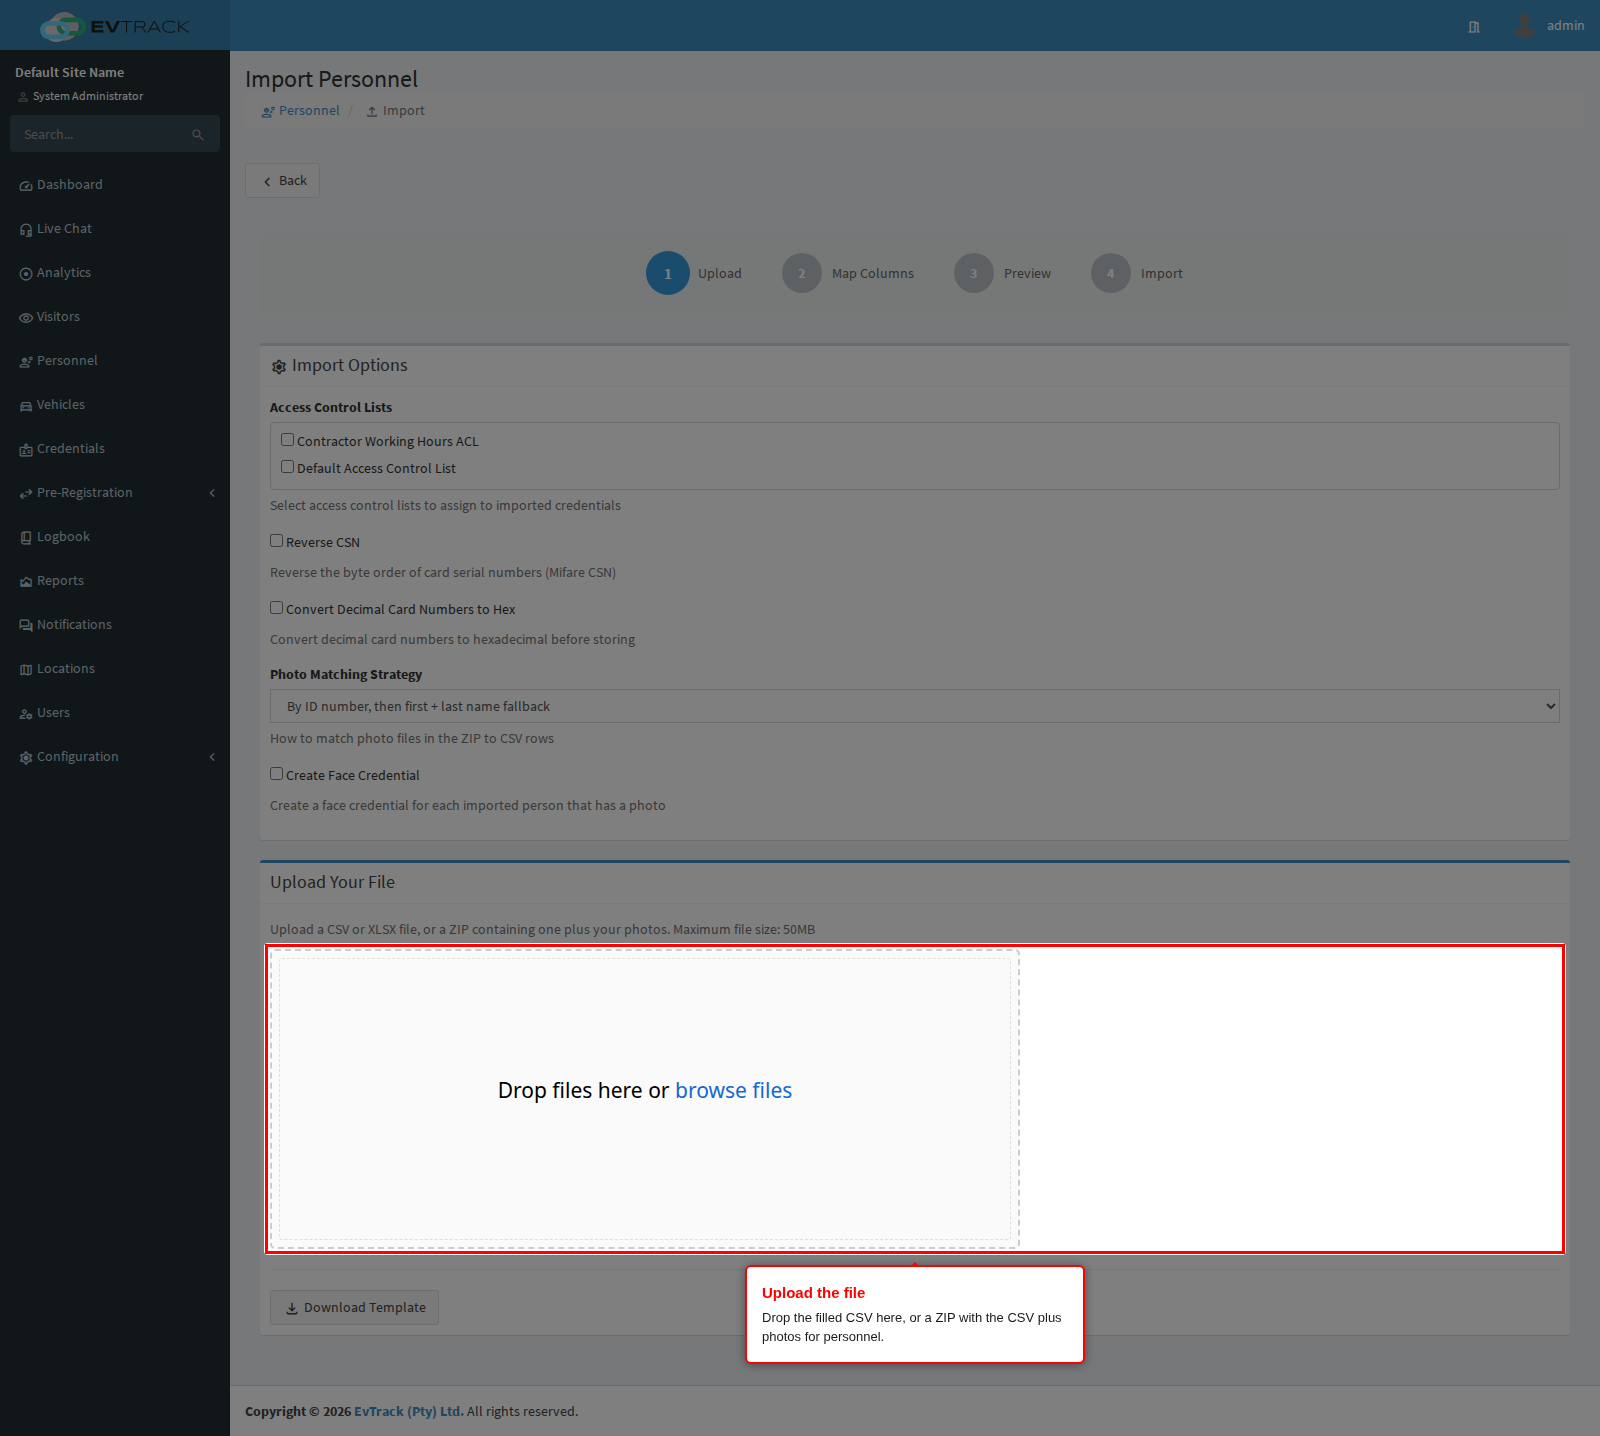
Drop the filled CSV into the upload area (or click it to browse). For personnel you can instead upload a ZIP containing the CSV plus photo files. Once a file is read, the wizard shows the row count and unlocks the next step.
Step 4: Map, preview and run
Continue through the wizard: confirm the column mapping (columns matching the template are mapped automatically), preview the parsed rows, then run the import. Each row reports success or failure individually - a failed row never blocks the rest.
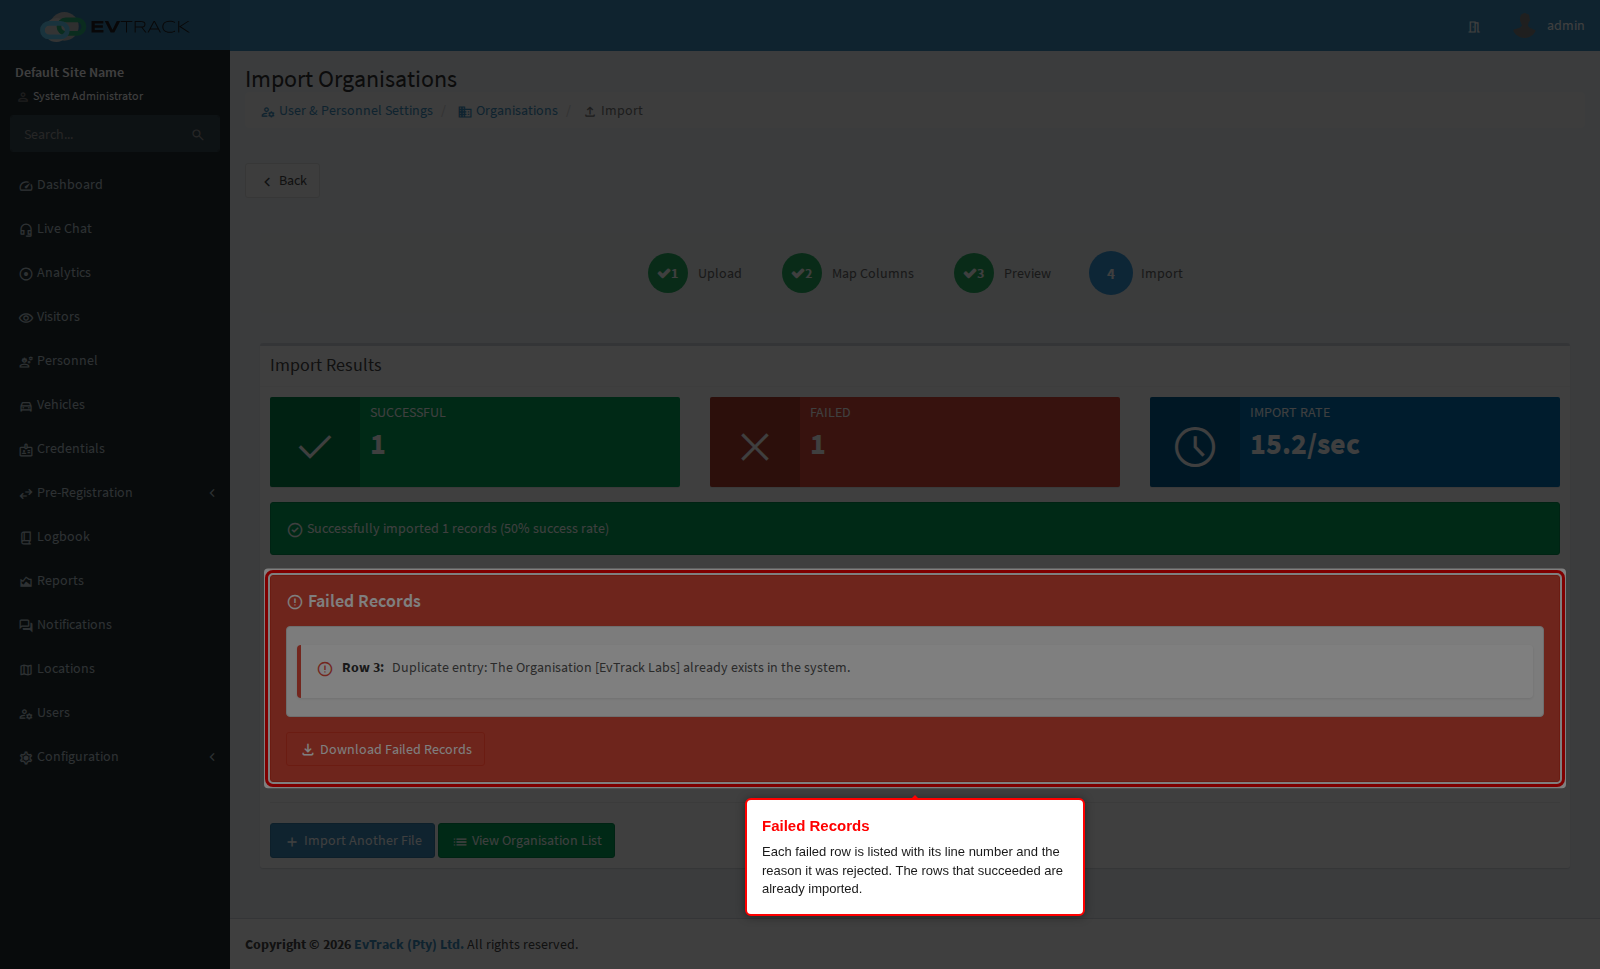
End state: the wizard shows a summary with Successful, Failed and Import Rate. Failed rows are listed underneath with the row number and the reason.
Correcting failed rows and uploading again
A partly failed import is the normal case on a first run, not a problem. The rows that succeeded are already in - re-running the whole file would only produce duplicates. The wizard is built around correcting just the failures and sending those back.
The panel lists the first ten failures on screen. Download Failed Records gives you all of them as a file.
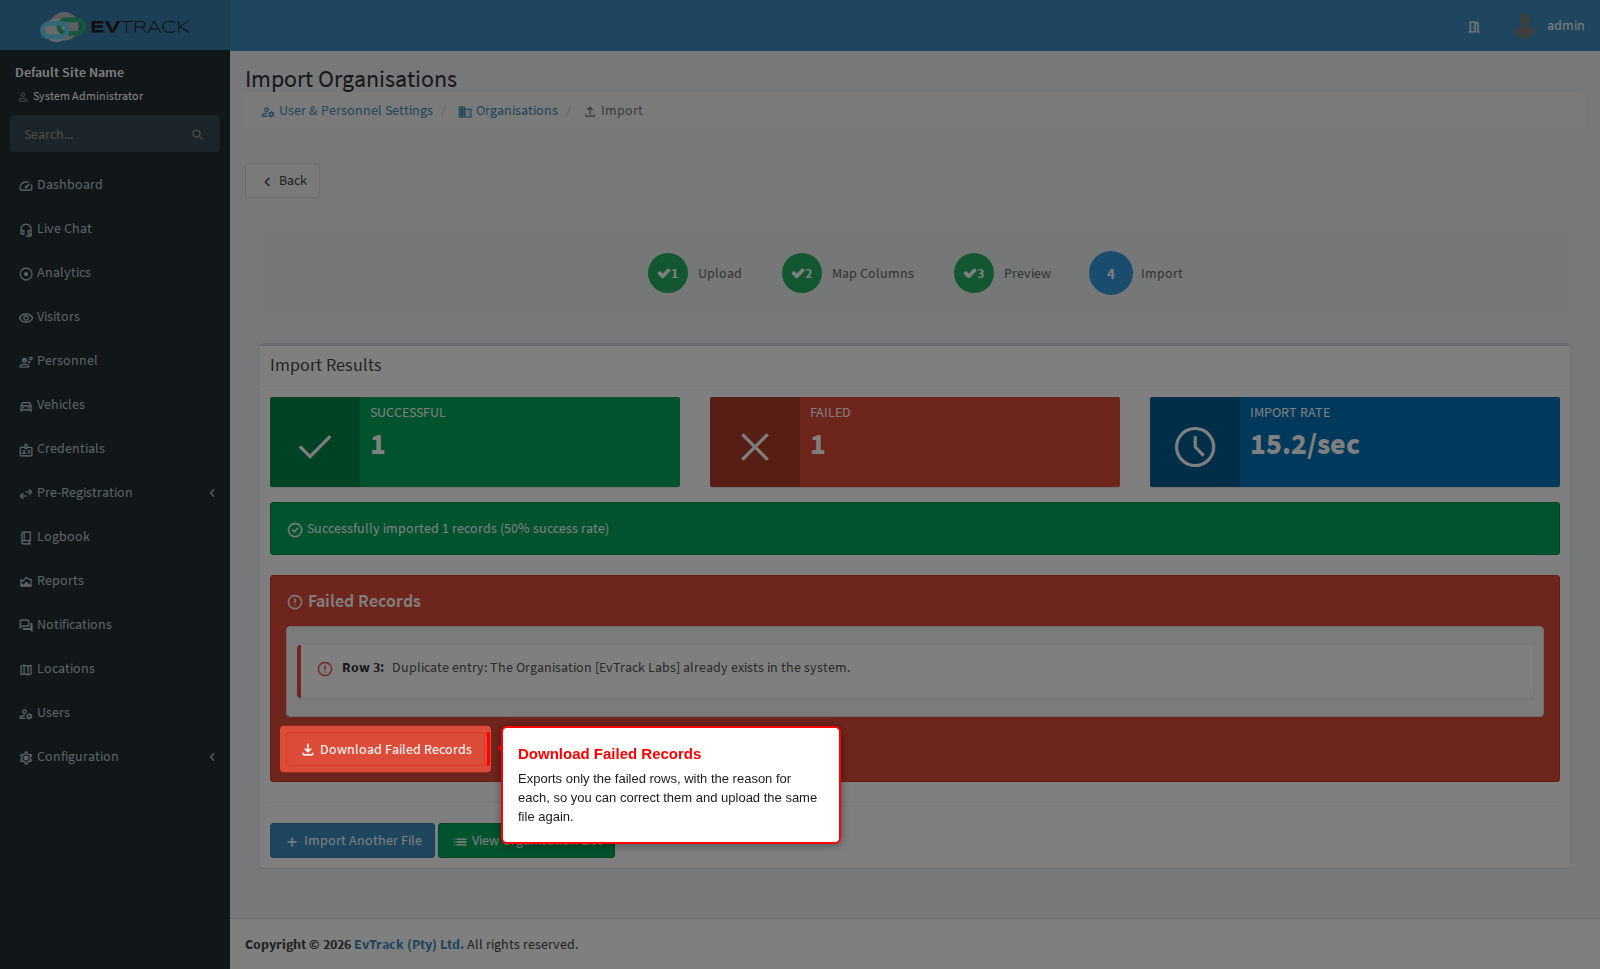
The lifecycle, end to end:
- Run the import. Good rows are created immediately. A failed row changes nothing.
- Download Failed Records. You get a spreadsheet containing only the rows that failed, with every column exactly as you supplied it.
- Read the reason. Three extra columns are added on the right, each name starting with a
#: #Error Summary (what went wrong with the row), #Field Errors (which specific field, and why) and #Row Number (the line in your original file, so you can cross-check). The names appear in your own language; the#in front of each one does not change. - Correct the rows in place. Edit the values in the same file. Leave the
#columns alone - you do not need to delete them. - Upload the corrected file through the same wizard. The
#columns are recognised as notes and ignored, so they are never mistaken for real data. Your own columns map as they did the first time. - Repeat if anything still fails. Each pass carries only what is left.
Things worth knowing about the downloaded file:
- It opens cleanly in Excel. Accented and non-Latin names survive, so a name is never mangled into symbols on the way out and back in again.
- Values that begin with
=,+,-or@get a leading apostrophe. Spreadsheets treat those characters as the start of a formula, so the apostrophe tells Excel to show the value as text instead of trying to calculate it. This is why a phone number saved as+27831234560appears as'+27831234560. Leave it as it is - the apostrophe is removed for you when you upload the file again, and the value goes in exactly as you typed it. - Only failures are included. Successful rows are never in the file, so uploading it cannot create anything twice.
- A row that keeps failing is telling you something. A duplicate error usually means the record already exists and does not need importing at all.
Validation Mode: what happens to an incomplete row
Import Options sits beside the upload area on the first step of the wizard. Validation Mode decides what the import does with a row that is missing a required field:
- Strict Mode - the row is skipped entirely. Nothing is created, and the row is listed under Failed Records so you can correct it and re-upload. Choose this when the import must produce only complete, usable records.
- Import All Mode - the row is imported anyway and saved with the status Draft, with the fields it is missing recorded against it for review. Nothing is lost, but a draft is not a usable registration until it is completed. Choose this when getting the data in matters more than getting it right first time, for example when you are migrating from another system.
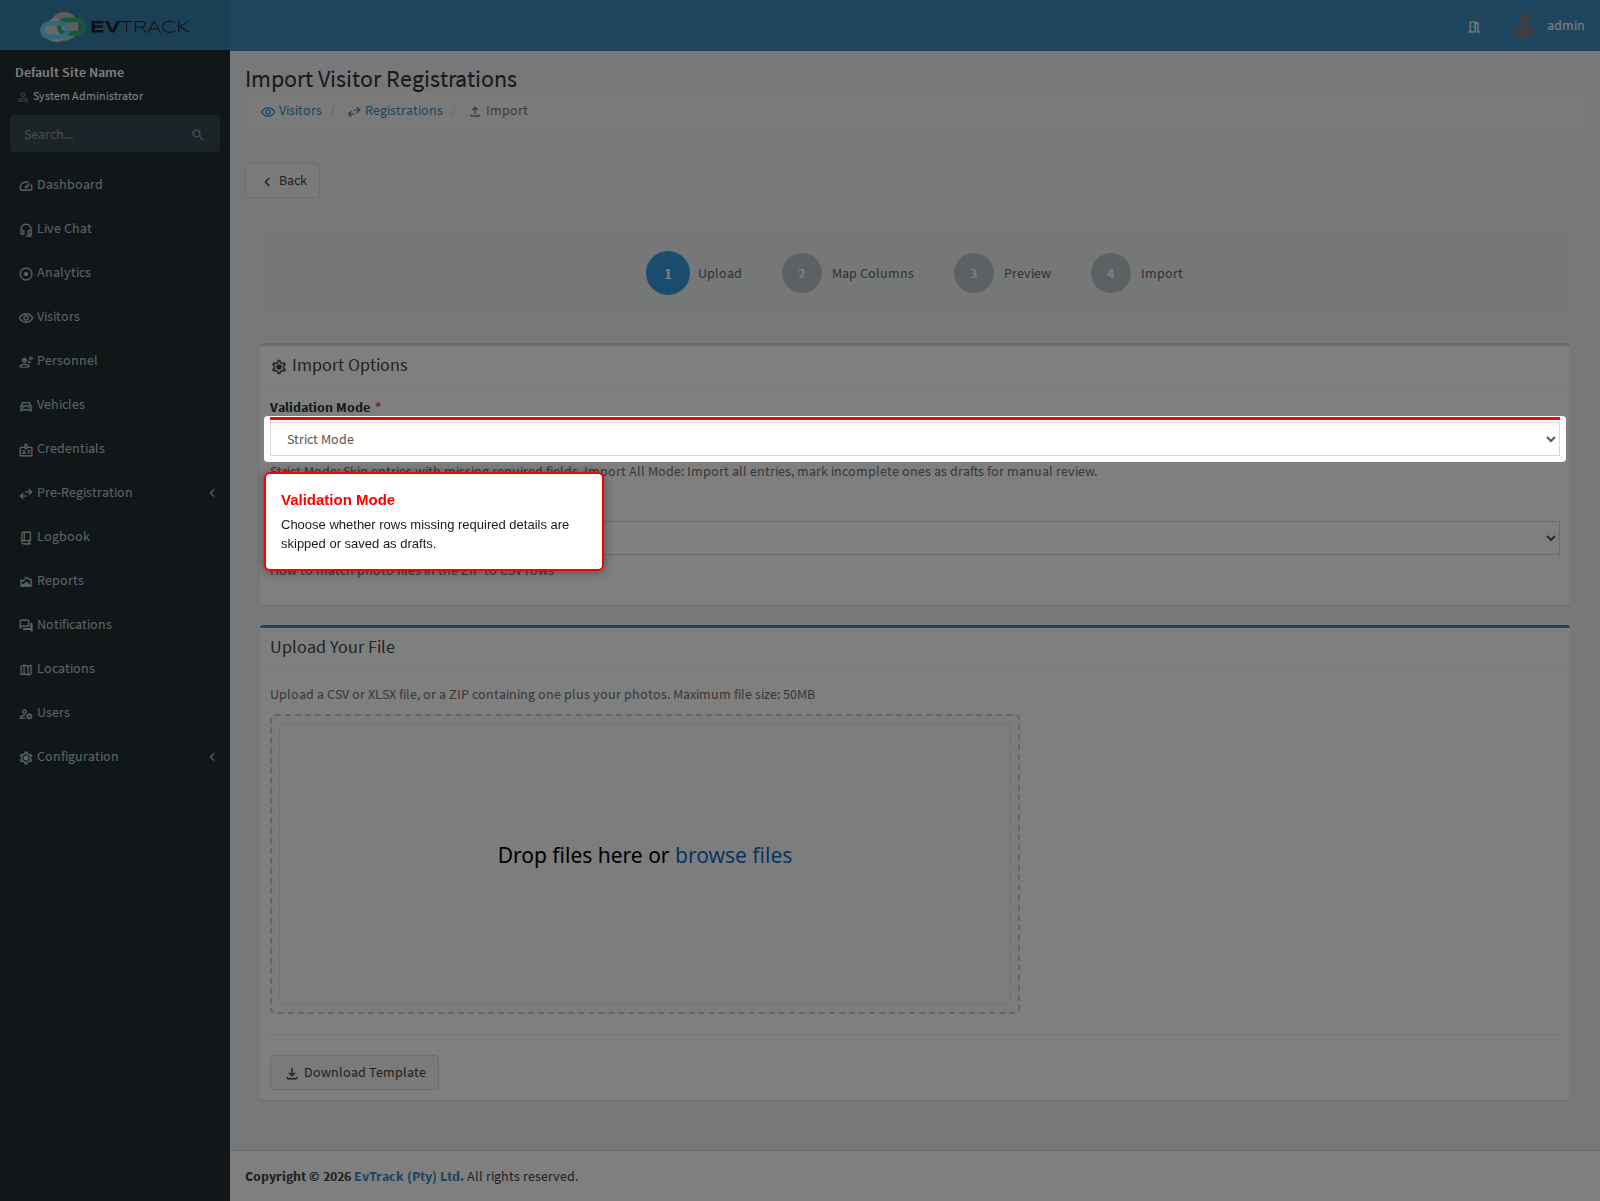
Four things about Validation Mode are worth knowing before you rely on it:
- It is only offered on the visitor registration and group member imports. The Personnel, Users, Watchlist, Locations and Card Pool wizards have no Validation Mode control at all, and always behave like Strict Mode: a row missing a required field fails.
- The supplied default is not the same on both. Visitor registrations default to Strict Mode; group members default to Import All Mode. Check the control rather than assuming.
- Import All Mode does not import literally every row. It only rescues rows whose required fields are blank. A row with a badly formatted value (a date, an email address, a yes/no column the wizard cannot read) still fails, and so does a row the system recognises as a duplicate of an existing record. Both modes reject those.
- The summary does not count drafts separately. Rows saved as drafts are included in the Successful figure, so a green summary after an Import All run does not mean every record is complete. Go and look for them.
Reviewing the drafts afterwards. Open the visitor registration list and set its status filter to Draft. Opening a draft shows an Incomplete Registration banner listing exactly which fields are missing. Fill them in and save: the registration leaves Draft on its own and joins the normal approval queue. There is no separate submit step. See Approval Workflow for what happens to it next.
Photo Matching Strategy
For the entity types that accept photos (personnel, users, visitor registrations and group members) you can upload a ZIP containing the CSV plus the image files instead of a bare CSV. Photo Matching Strategy, on the same Import Options panel, tells the wizard how to work out which image belongs to which row:
- By CSV column (photo_file) - a column in the CSV names each row’s file explicitly. The most reliable option, and the only one that copes with unpredictable filenames.
- By staff/ID number in filename - the file is named after the row’s staff or identity number.
- By first + last name in filename - the file is named after the person. Use only where names are unique.
- By UUID in filename - the file is named after the reference (UUID) the exporting system gave each record, e.g. an HR system that exported a UUID column and named the photos with it. Put that value in the UUID column: it is used only to match the photo file and is not stored on the imported record.
- By ID number, then first + last name fallback - tries the identity number and falls back to the name. This is the supplied default.
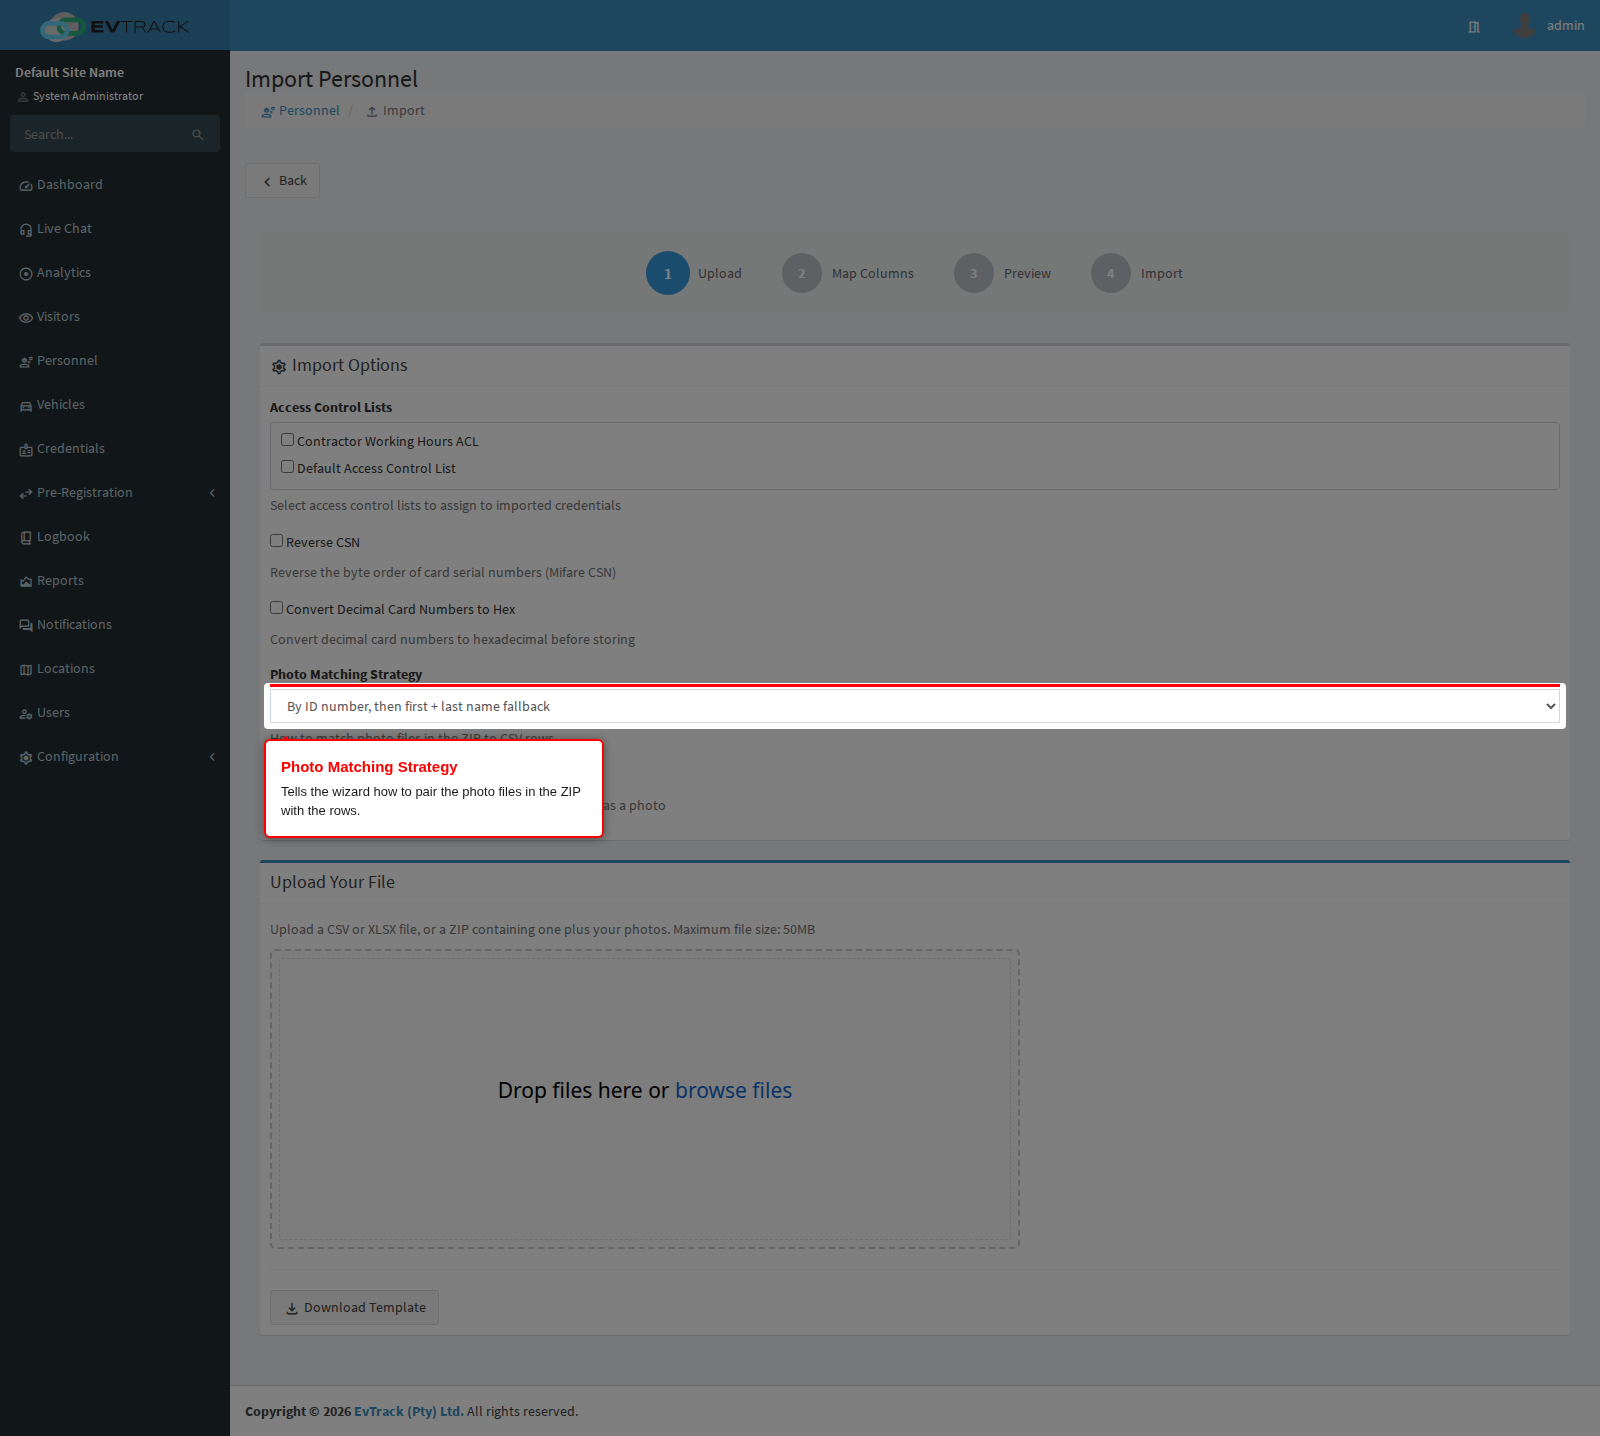
Photo matching is independent of Validation Mode. A photo that cannot be matched never makes a row incomplete and never turns it into a draft: the record is still created, and it is still counted as successful. There is no warning tile on the summary for it either, so a row whose photo did not match looks exactly like one whose photo did. If photos matter, check the records after the run and re-import the photos with the By UUID in filename strategy. Naming conventions and how to build the ZIP: Preparing a Photo ZIP.
Matching against existing records
Rows are matched against existing records to decide create vs update - existing matches are updated rather than duplicated, and match behaviour follows the entity’s duplicate-detection rules (see Configuration > System Settings > Validation).