Integration & Installation Manual
EvTrack Visitor Management with Genetec’s Security Centre For Temporary Visitor & Contractor Access Control Via QR Code or One-Time-Pin.
1. Introduction
EvTrack’s Genetec integration enables the seamless merging of EvTrack’s visitor management system with Genetec’s Unified Platform, known as Security Centre. This integration offers an automated approach to managing visitor access within physical security control. EvTrack simplifies the access control process for temporary guests, visitors, and contractors, making it particularly well-suited for sites utilizing Genetec’s Security Centre. This integration unifies video surveillance, access control, and visitor management into a single, comprehensive platform.
EvTrack’s server can be deployed either as a cloud-based or on-premise solution and communicates with the Genetec server through Genetec’s WebSDK REST API.
When a visitor arrives at the site, whether on an ad-hoc basis or with a prior registration in EvTrack, their information is captured. For ad-hoc visitors, this information is recorded using the EvTrack FrontDesk visitor kiosk, the EvTrack Guard handheld device, or the EvTrack web portal interface. Subsequently, a profile is created for them on the EvTrack server, complete with credentials, start and end dates, and access control permissions. This data is then transmitted to the Genetec server, where the appropriate credentials, cardholder details, permissions, and credentials are generated. System administrators can configure cardholder groups to match the required groups on the Genetec side.
For pre-registered visitors, credentials are established before their arrival and are pre-loaded onto both the EvTrack Server and the Genetec Server.
For pre-registered visitors, credentials are established before their arrival and are pre-loaded onto both the EvTrack Server and the Genetec Server.
2. Intended Audience
This guide is intended for use by both administrative and technical staff involved in integrating the EvTrack Visitor Management System with the Genetec Security Center system.
3. Visitor to Access Control Workflow
3.1 Step 1: Invite Visitor (Optional)
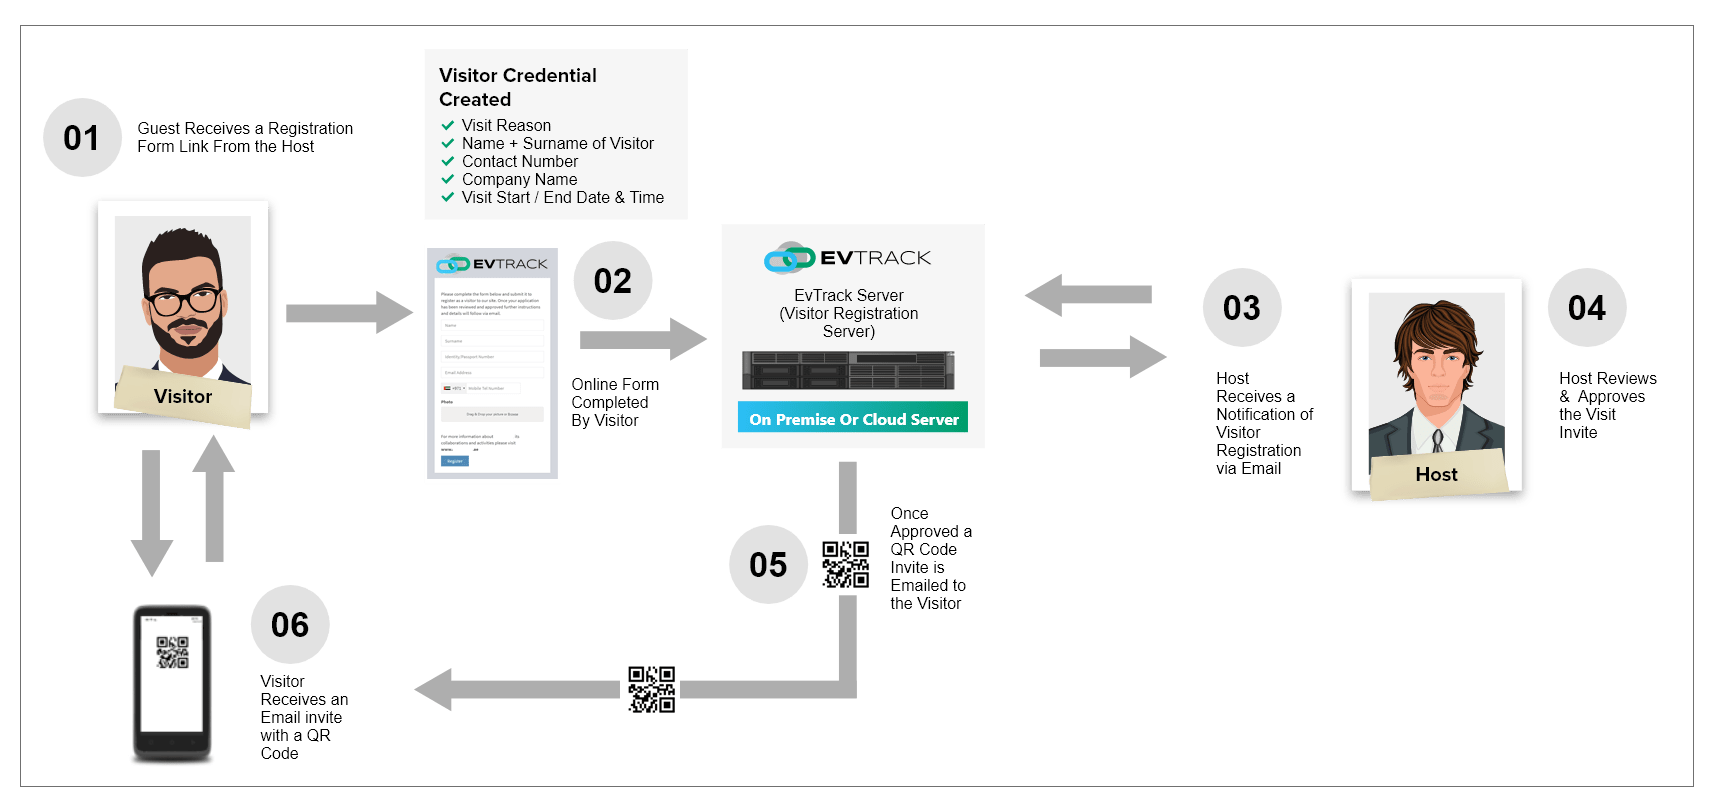
3.2 Step 2: Visitor Arrival with EvTrack Kiosk Check-In
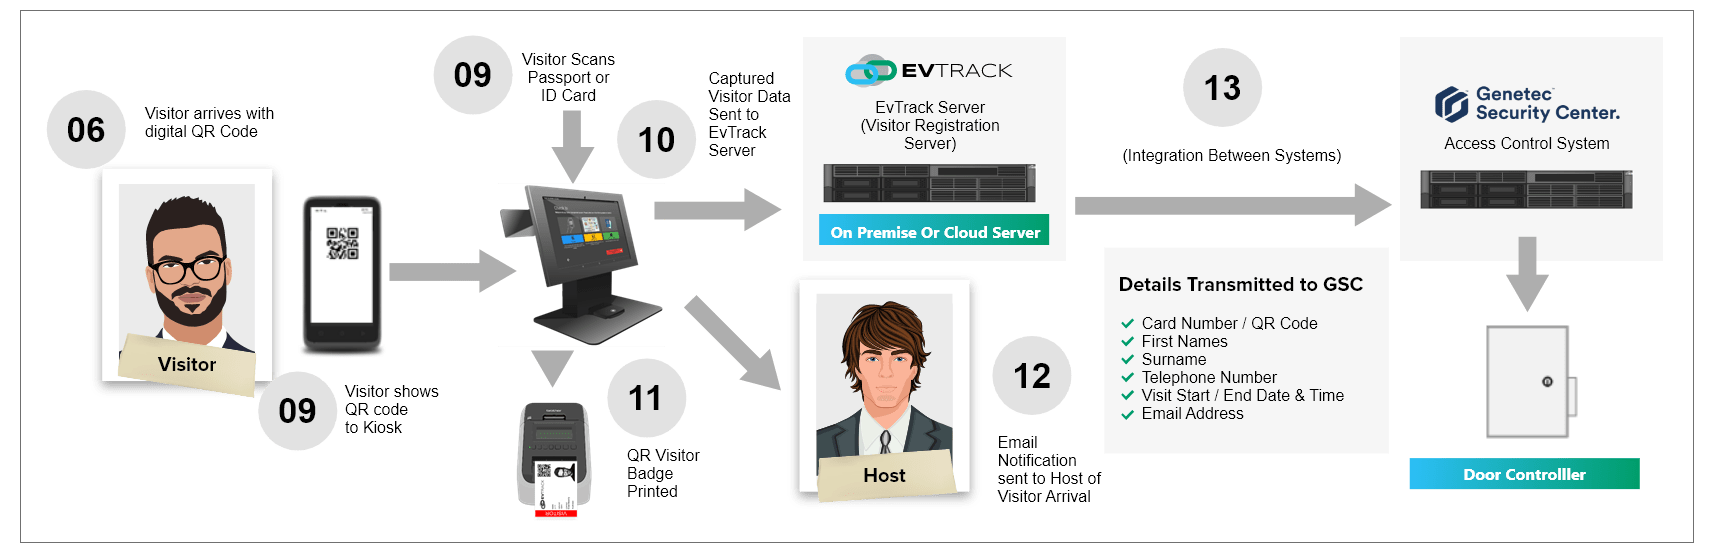
3.2 Step 3: Visitor Cardholder and QR Code Data Synchronised with Genetec
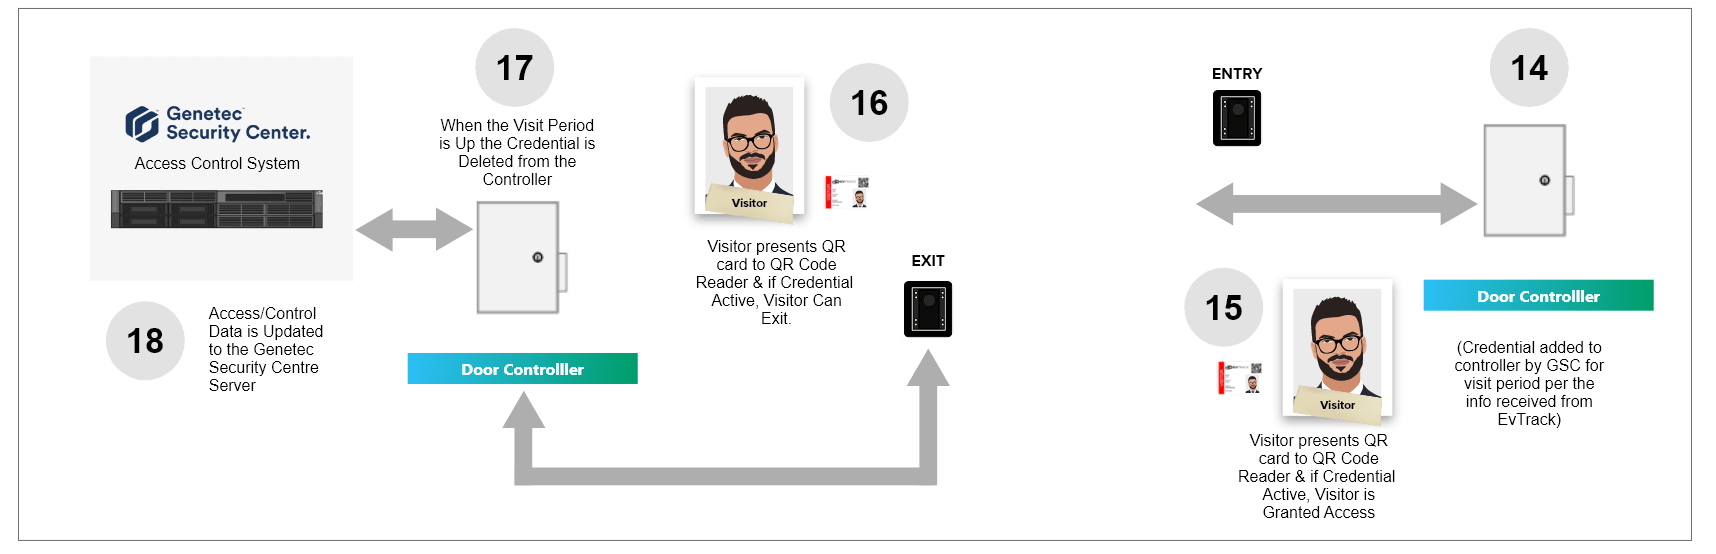
4. Prerequisites
4.1 Genetec Requirements
EvTrack supports Genetec Security Center version 5.8 and later.
4.2 Genetec Licensing
-
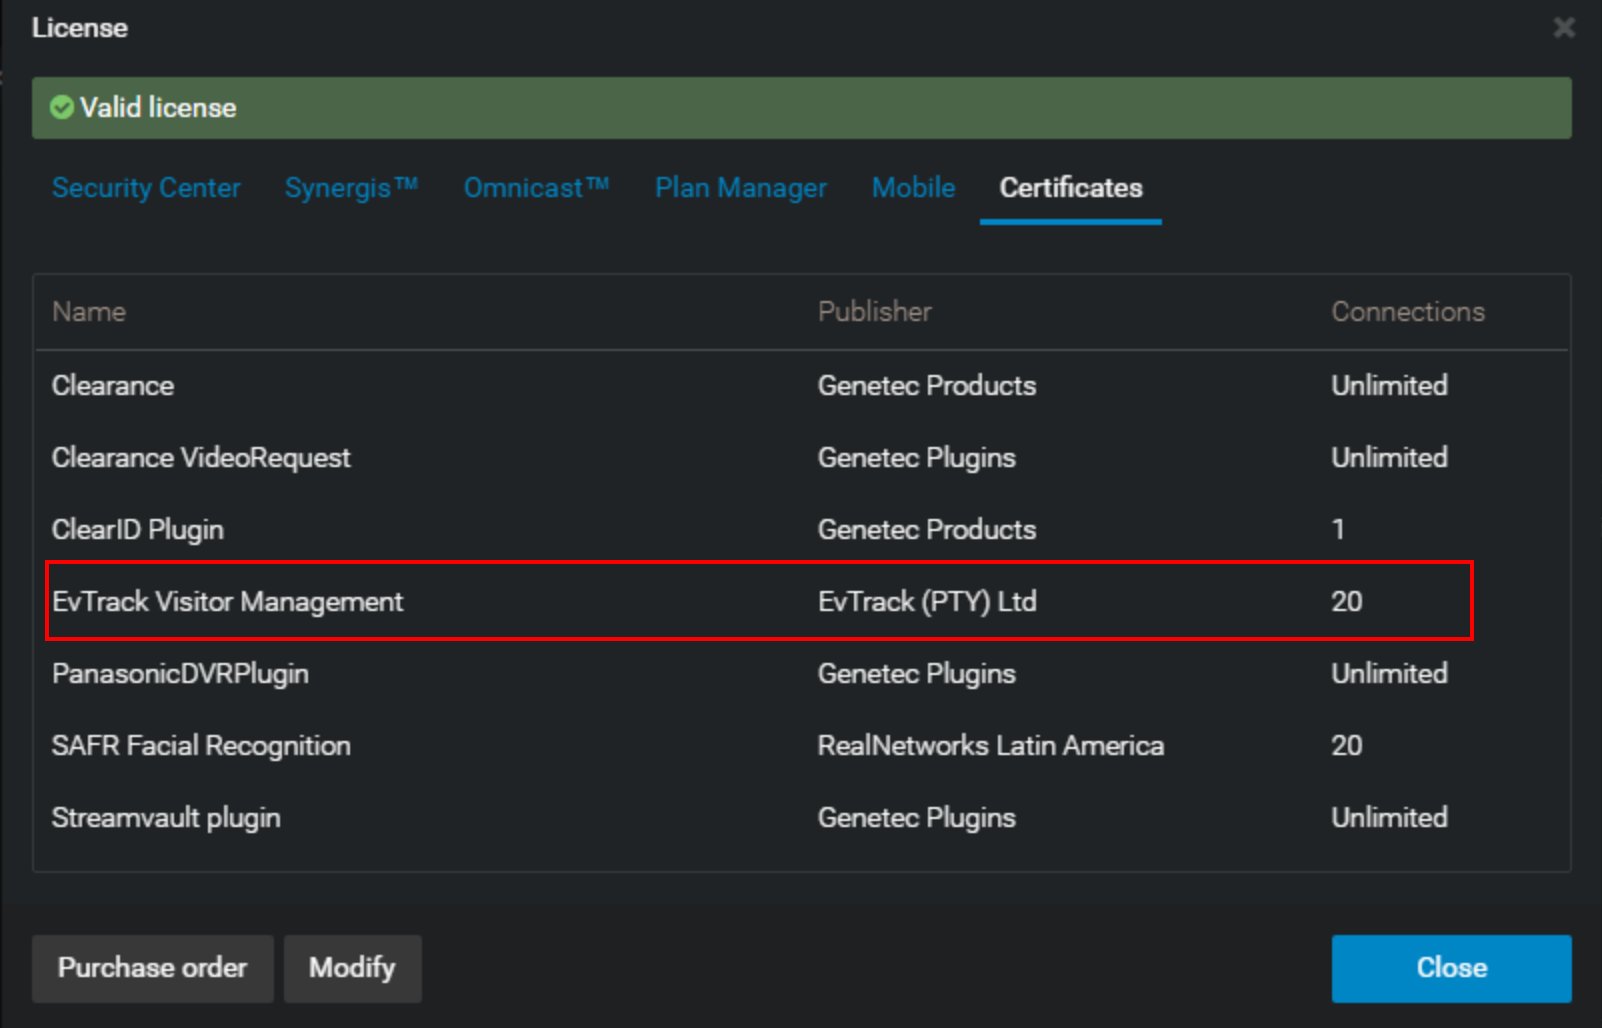
Confirm that the license includes the part number (GSC-1SDK-EvTrack-VM) and is listed as EvTrack Visitor Management. If this option is not available, please reach out to Genetec Sales and request the addition of the part number (GSC-1SDK-EvTrack-VM) to the license.
-
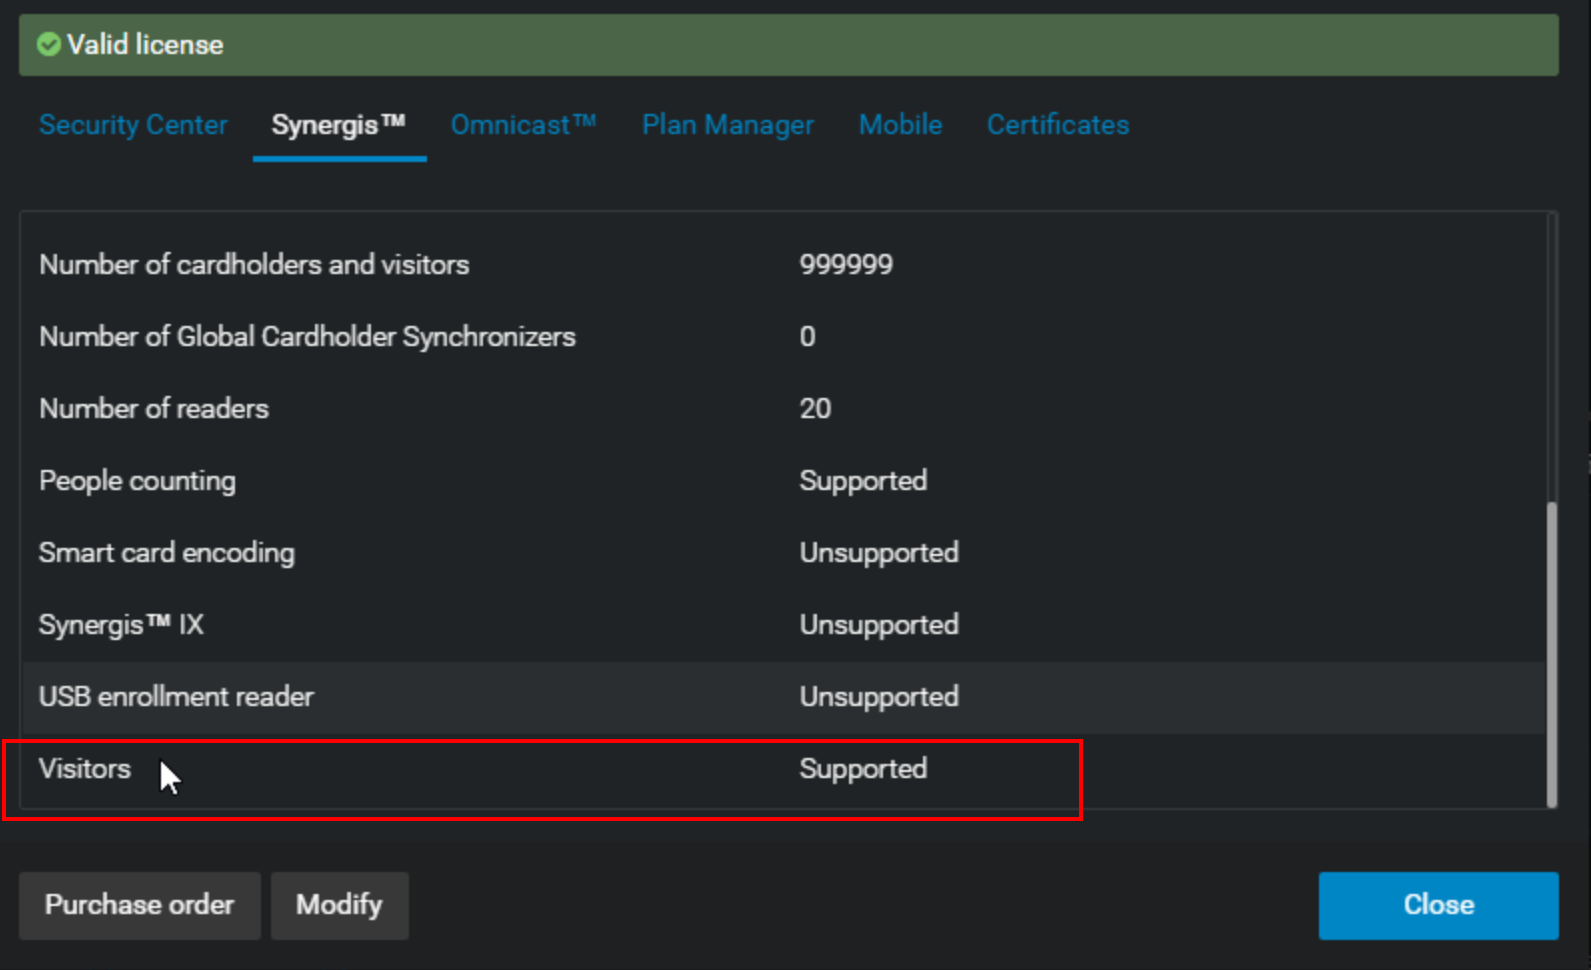
Verify that the Visitor Management Module is properly licensed, noting that this requirement applies exclusively to GSC versions 5.8 through 5.10.
-
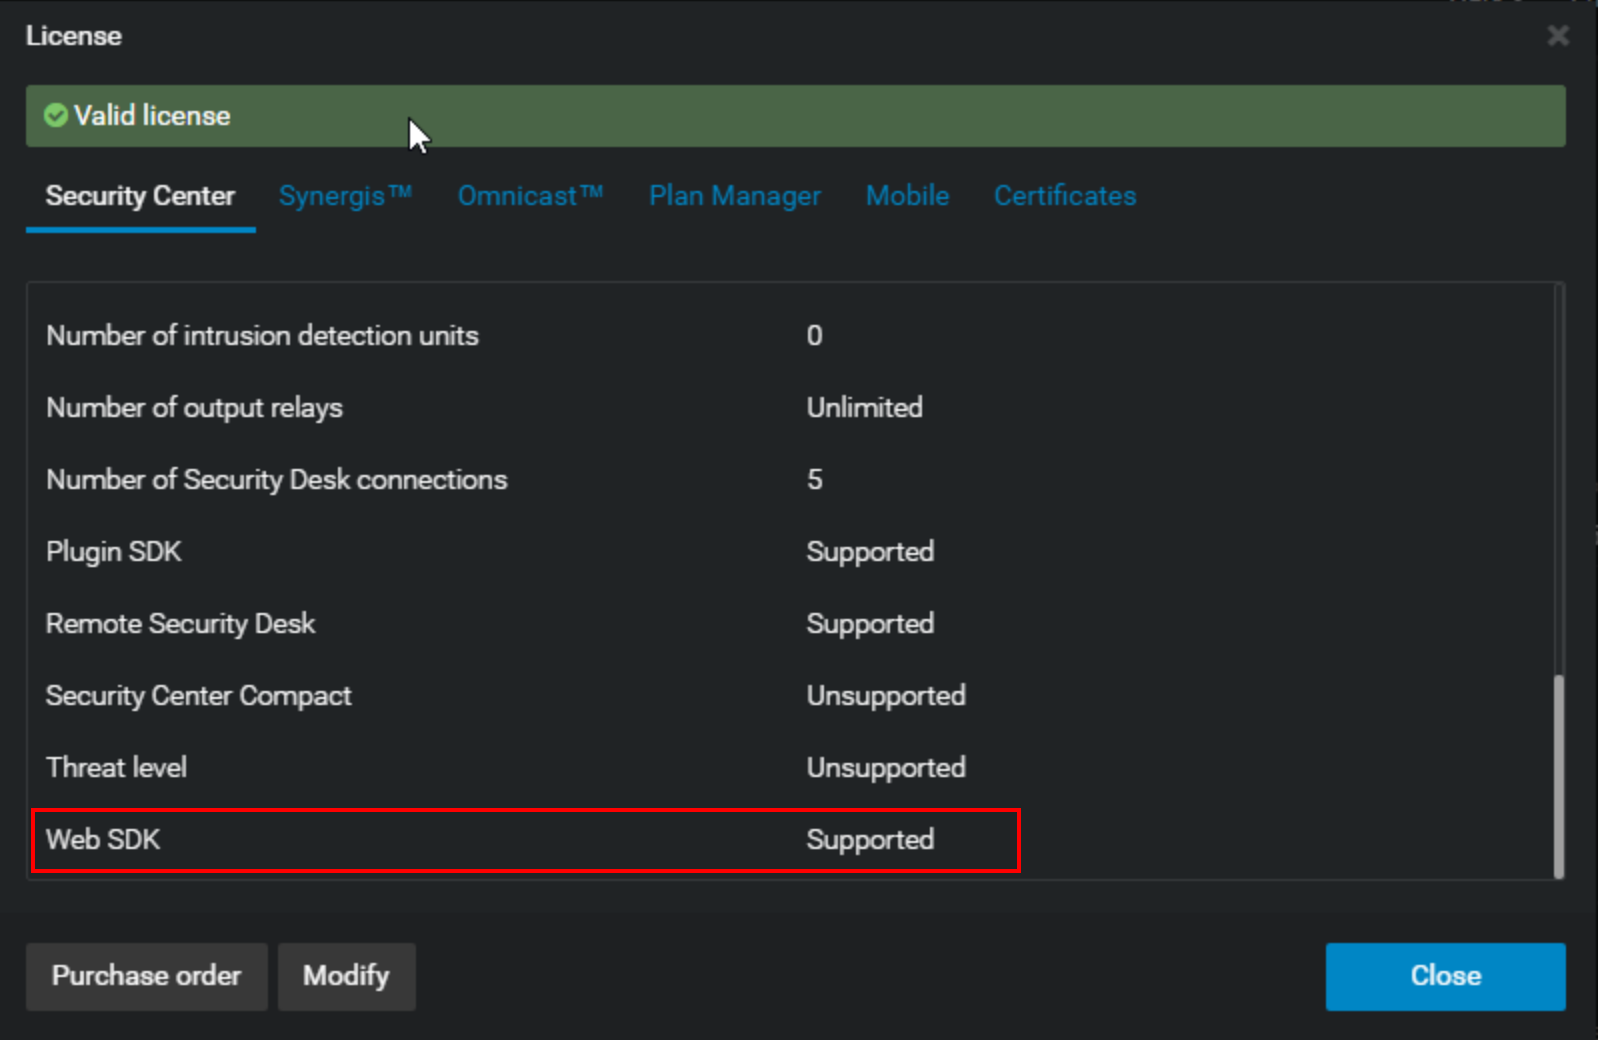
Confirm that the Genetec WebSDK is supported under the license
5. Genetec Security Center Configuration
5.1 Configure WebSDK User and Privileges
-
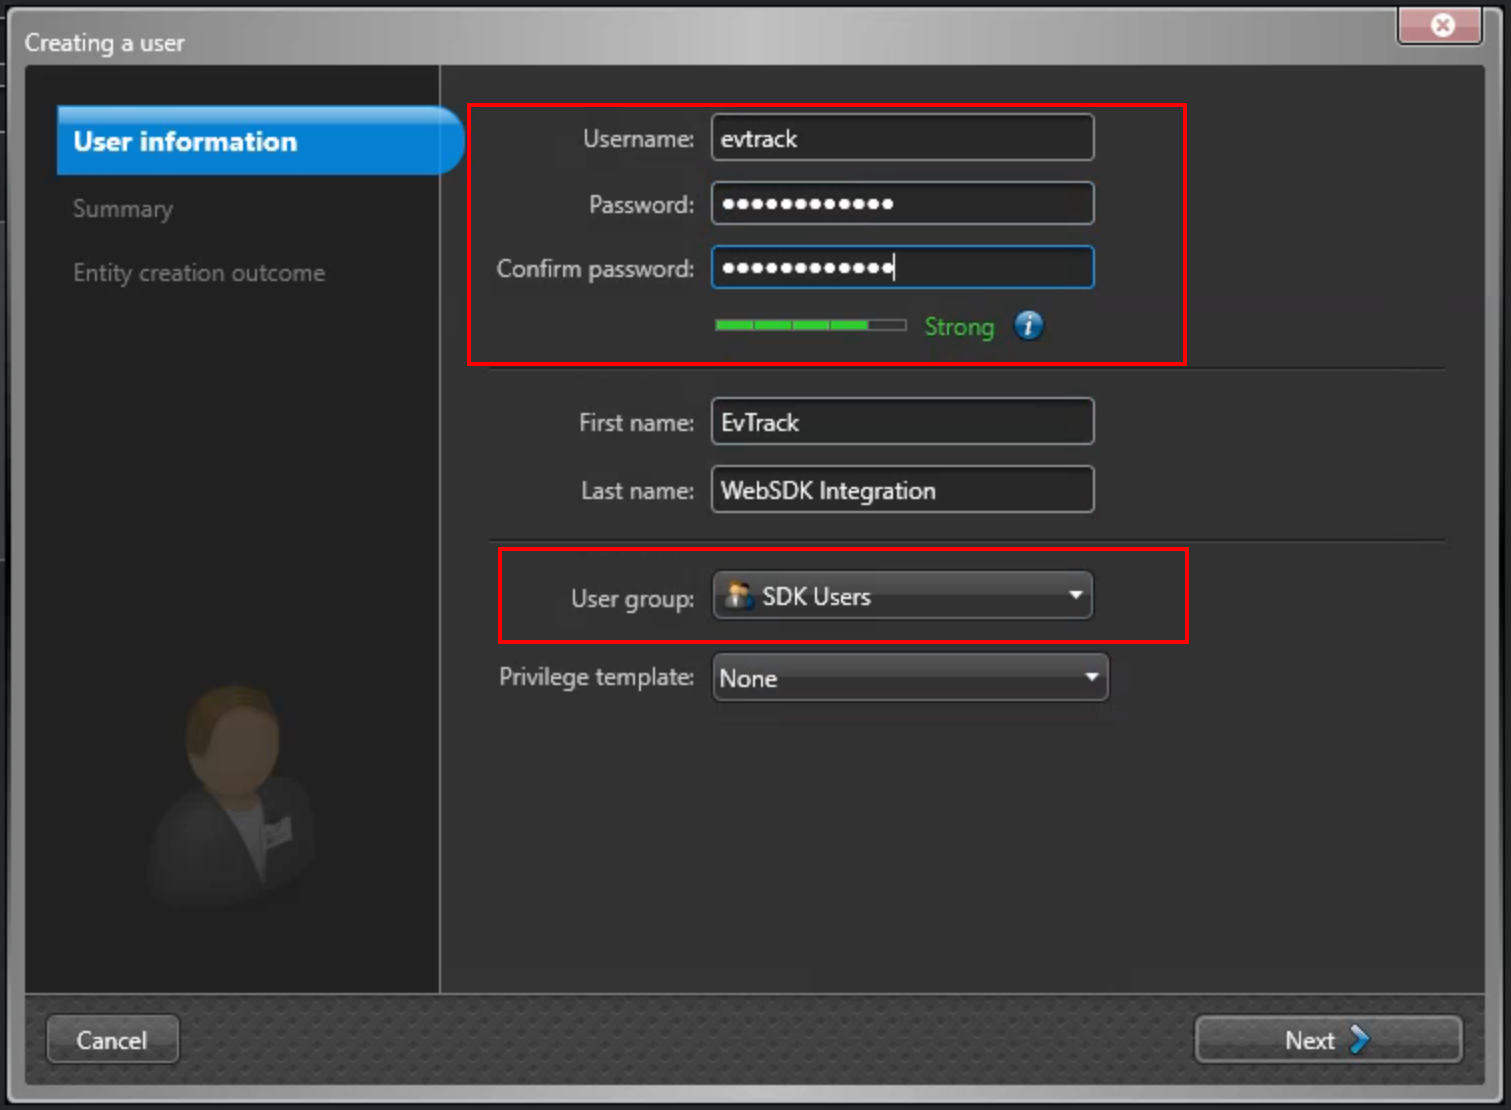
Create “evtrack” user
-
Assign Privileges
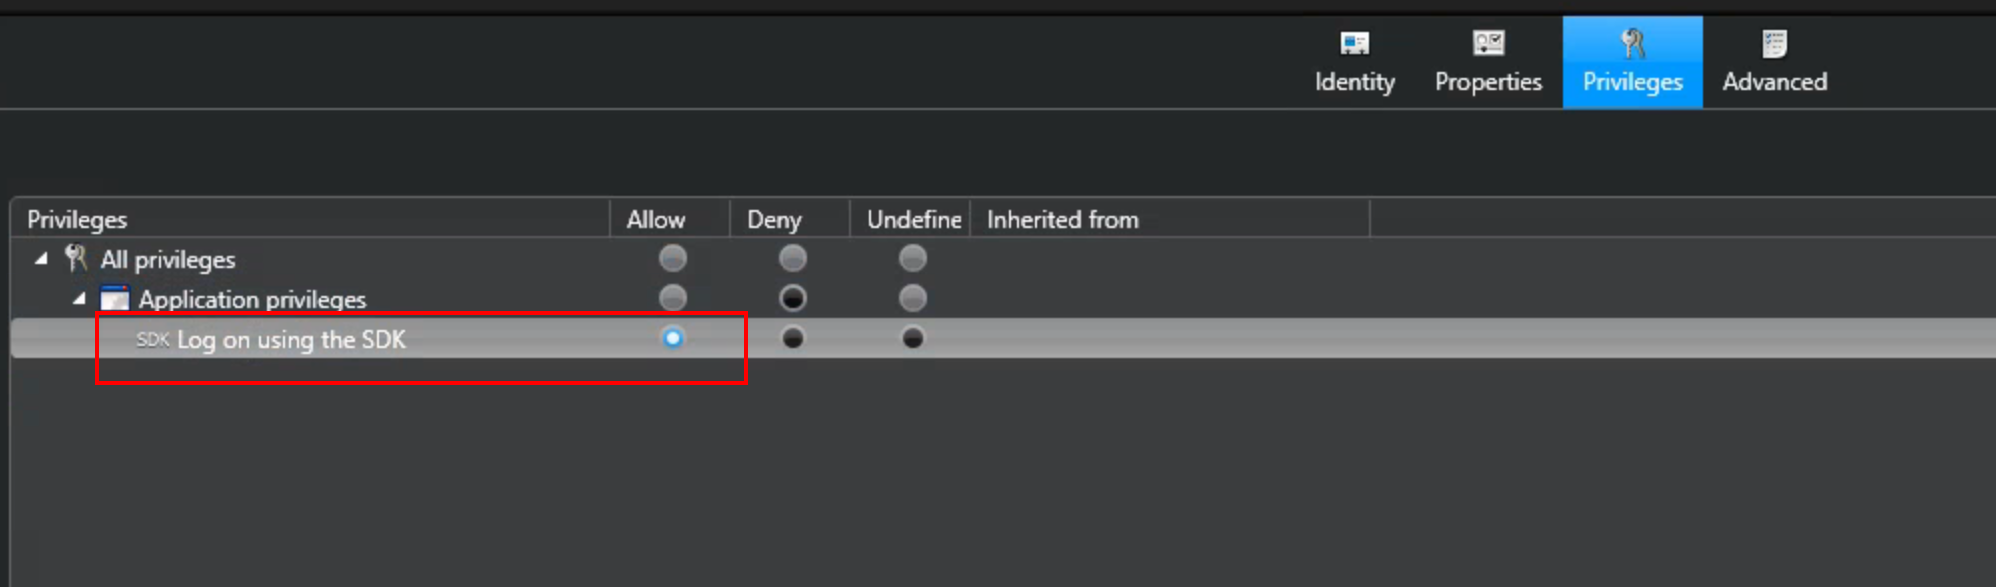

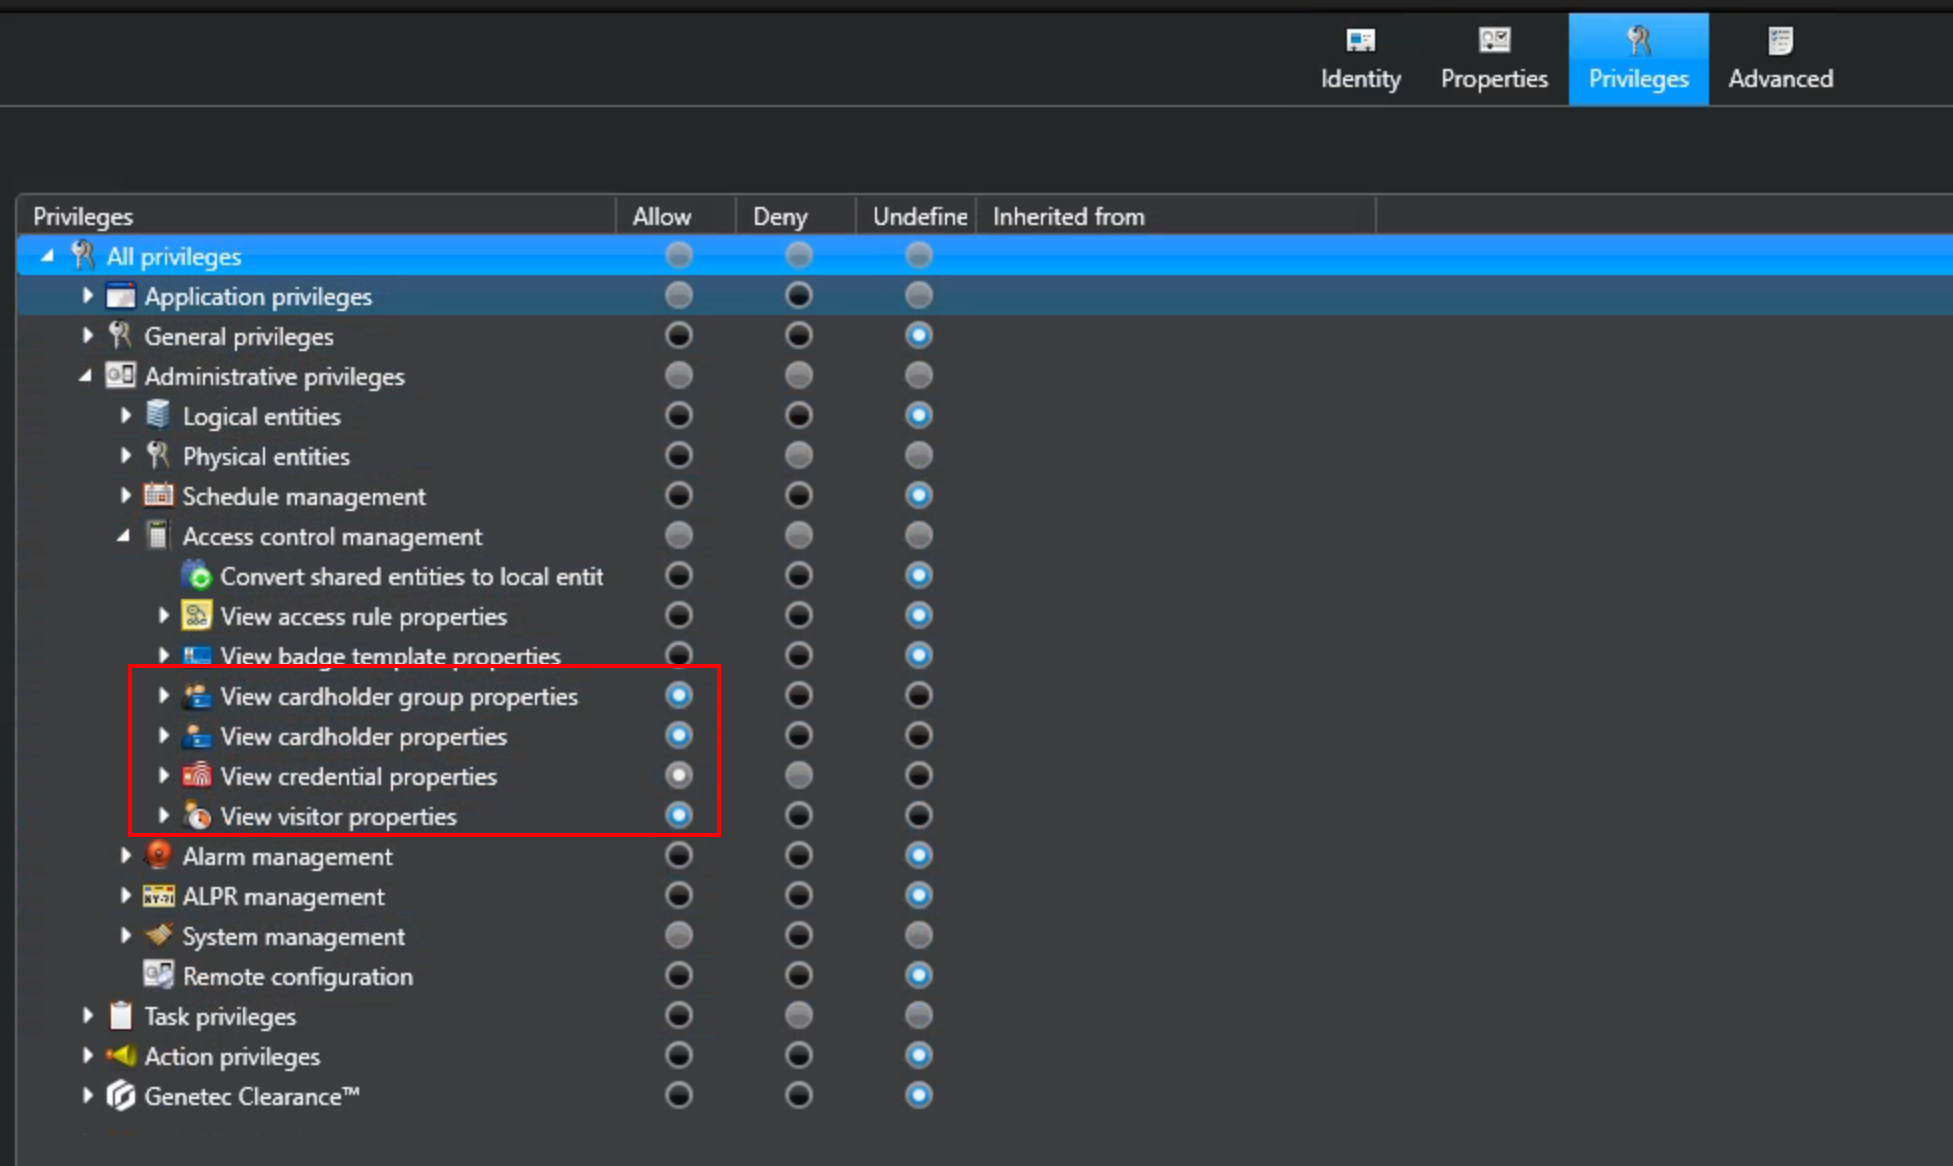
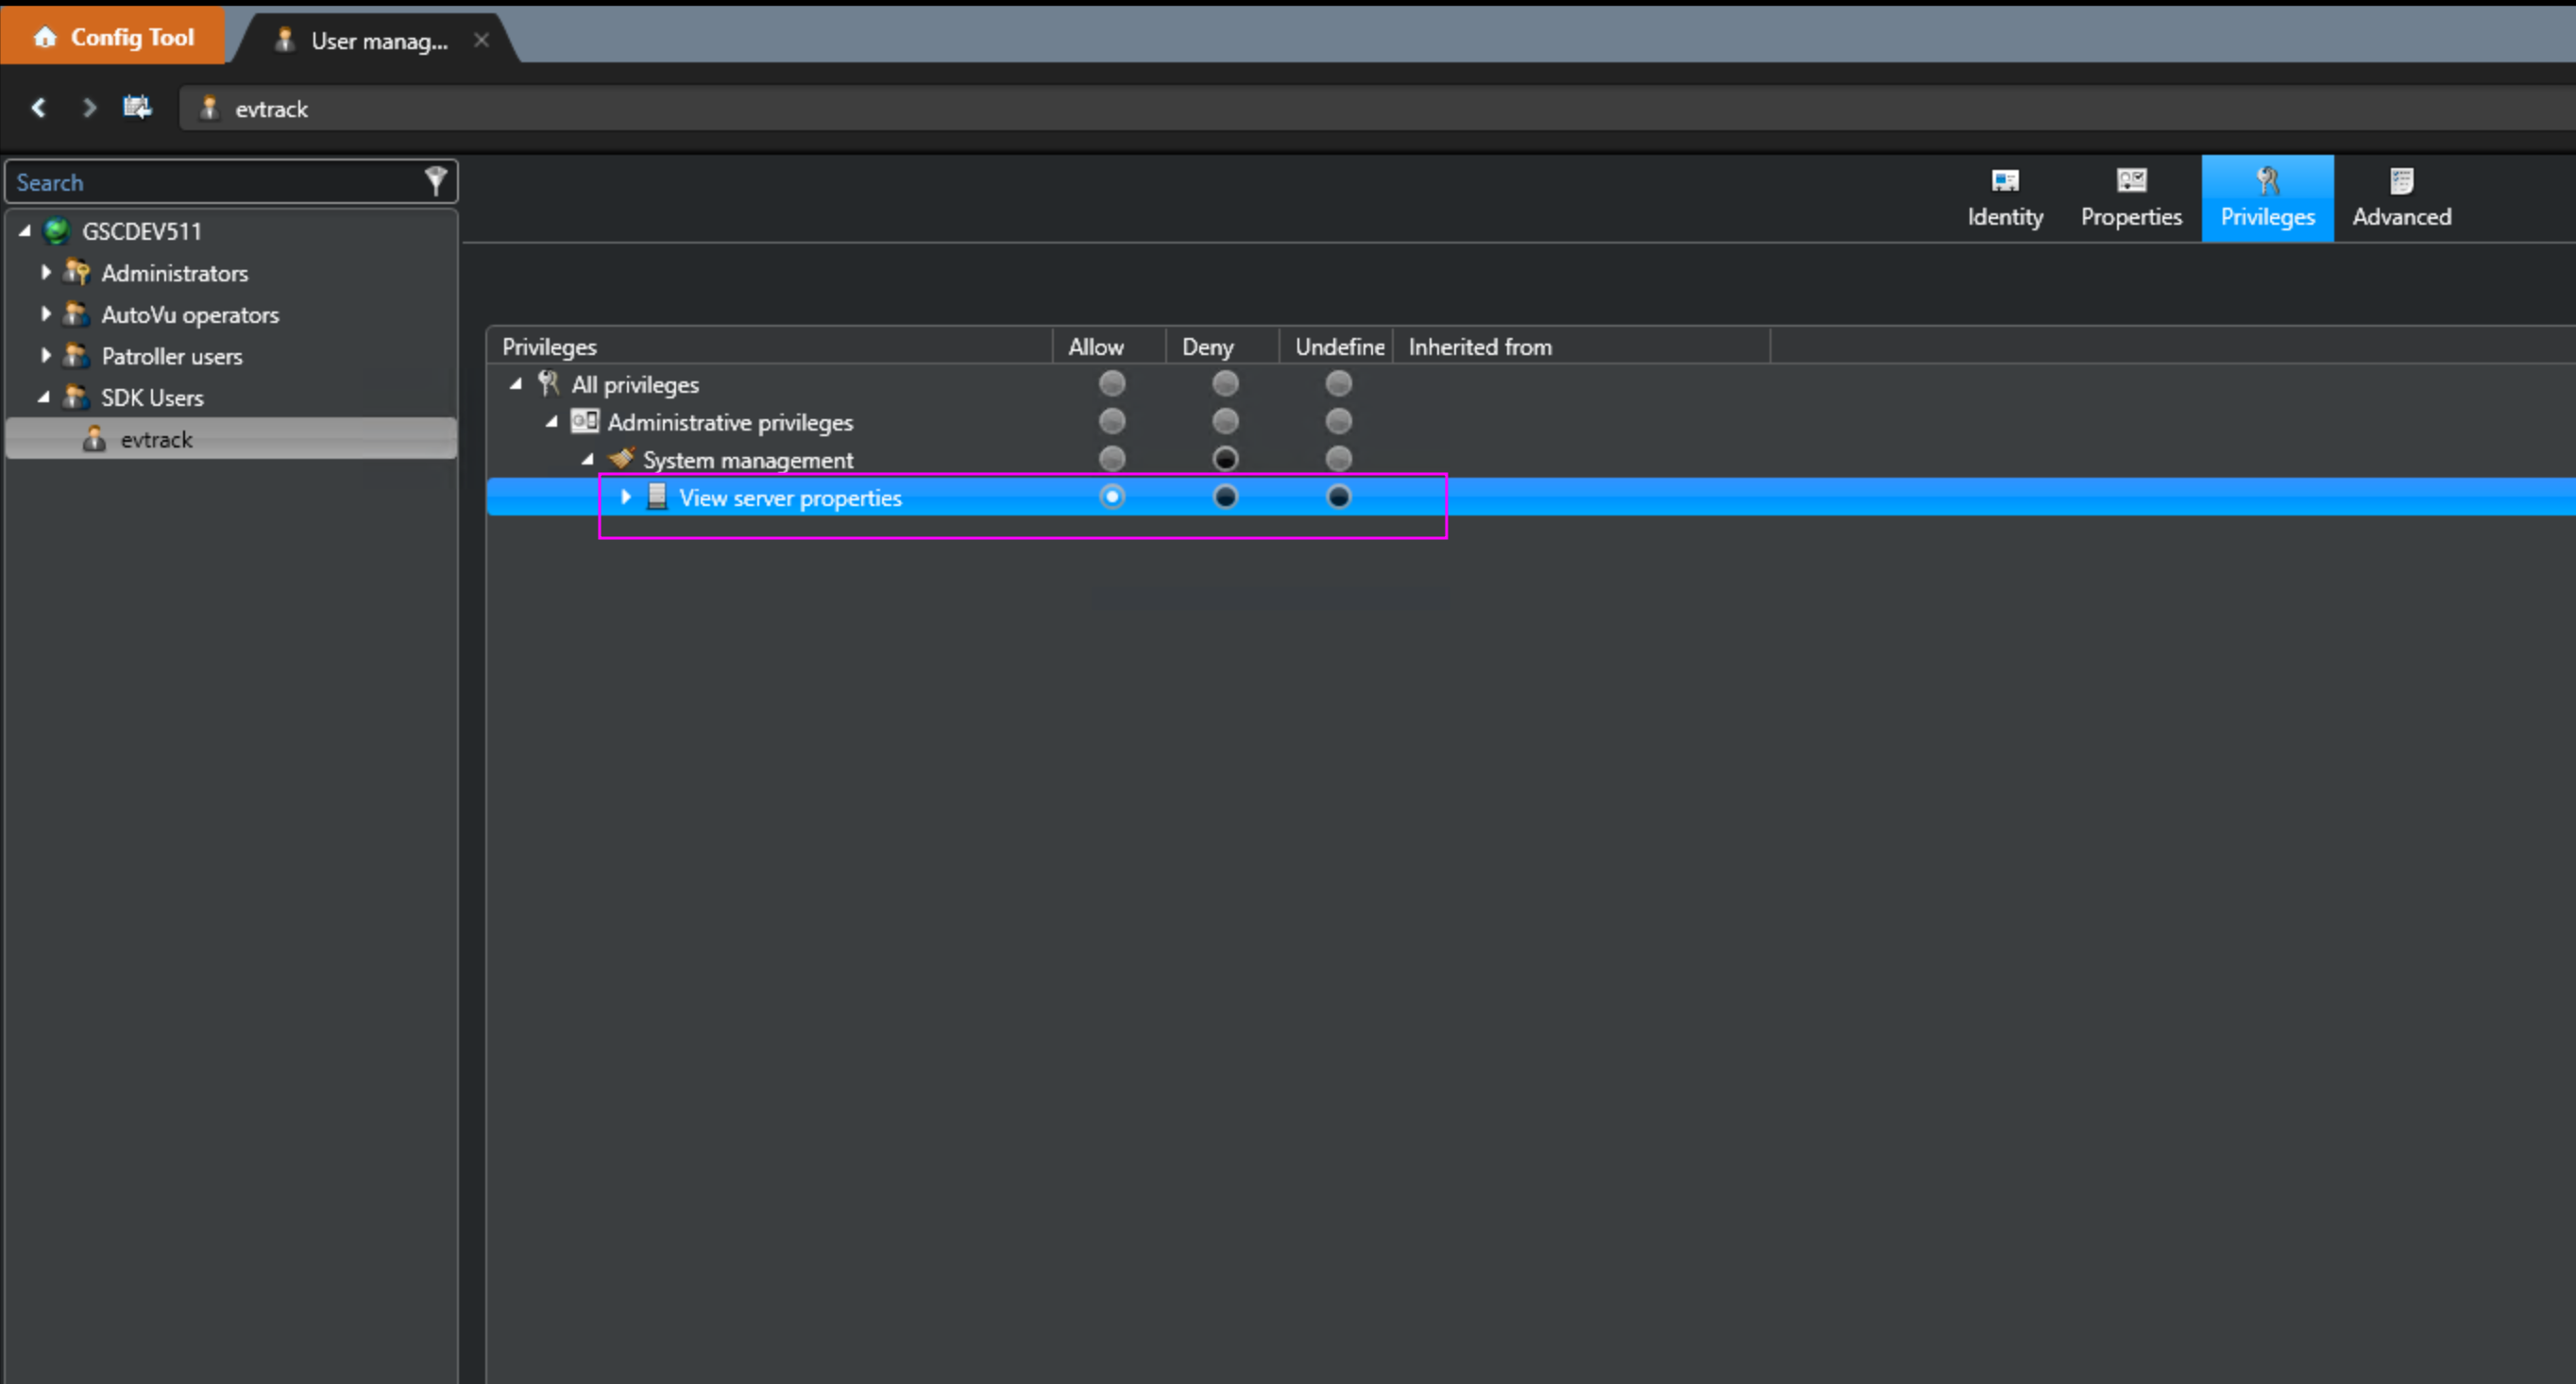
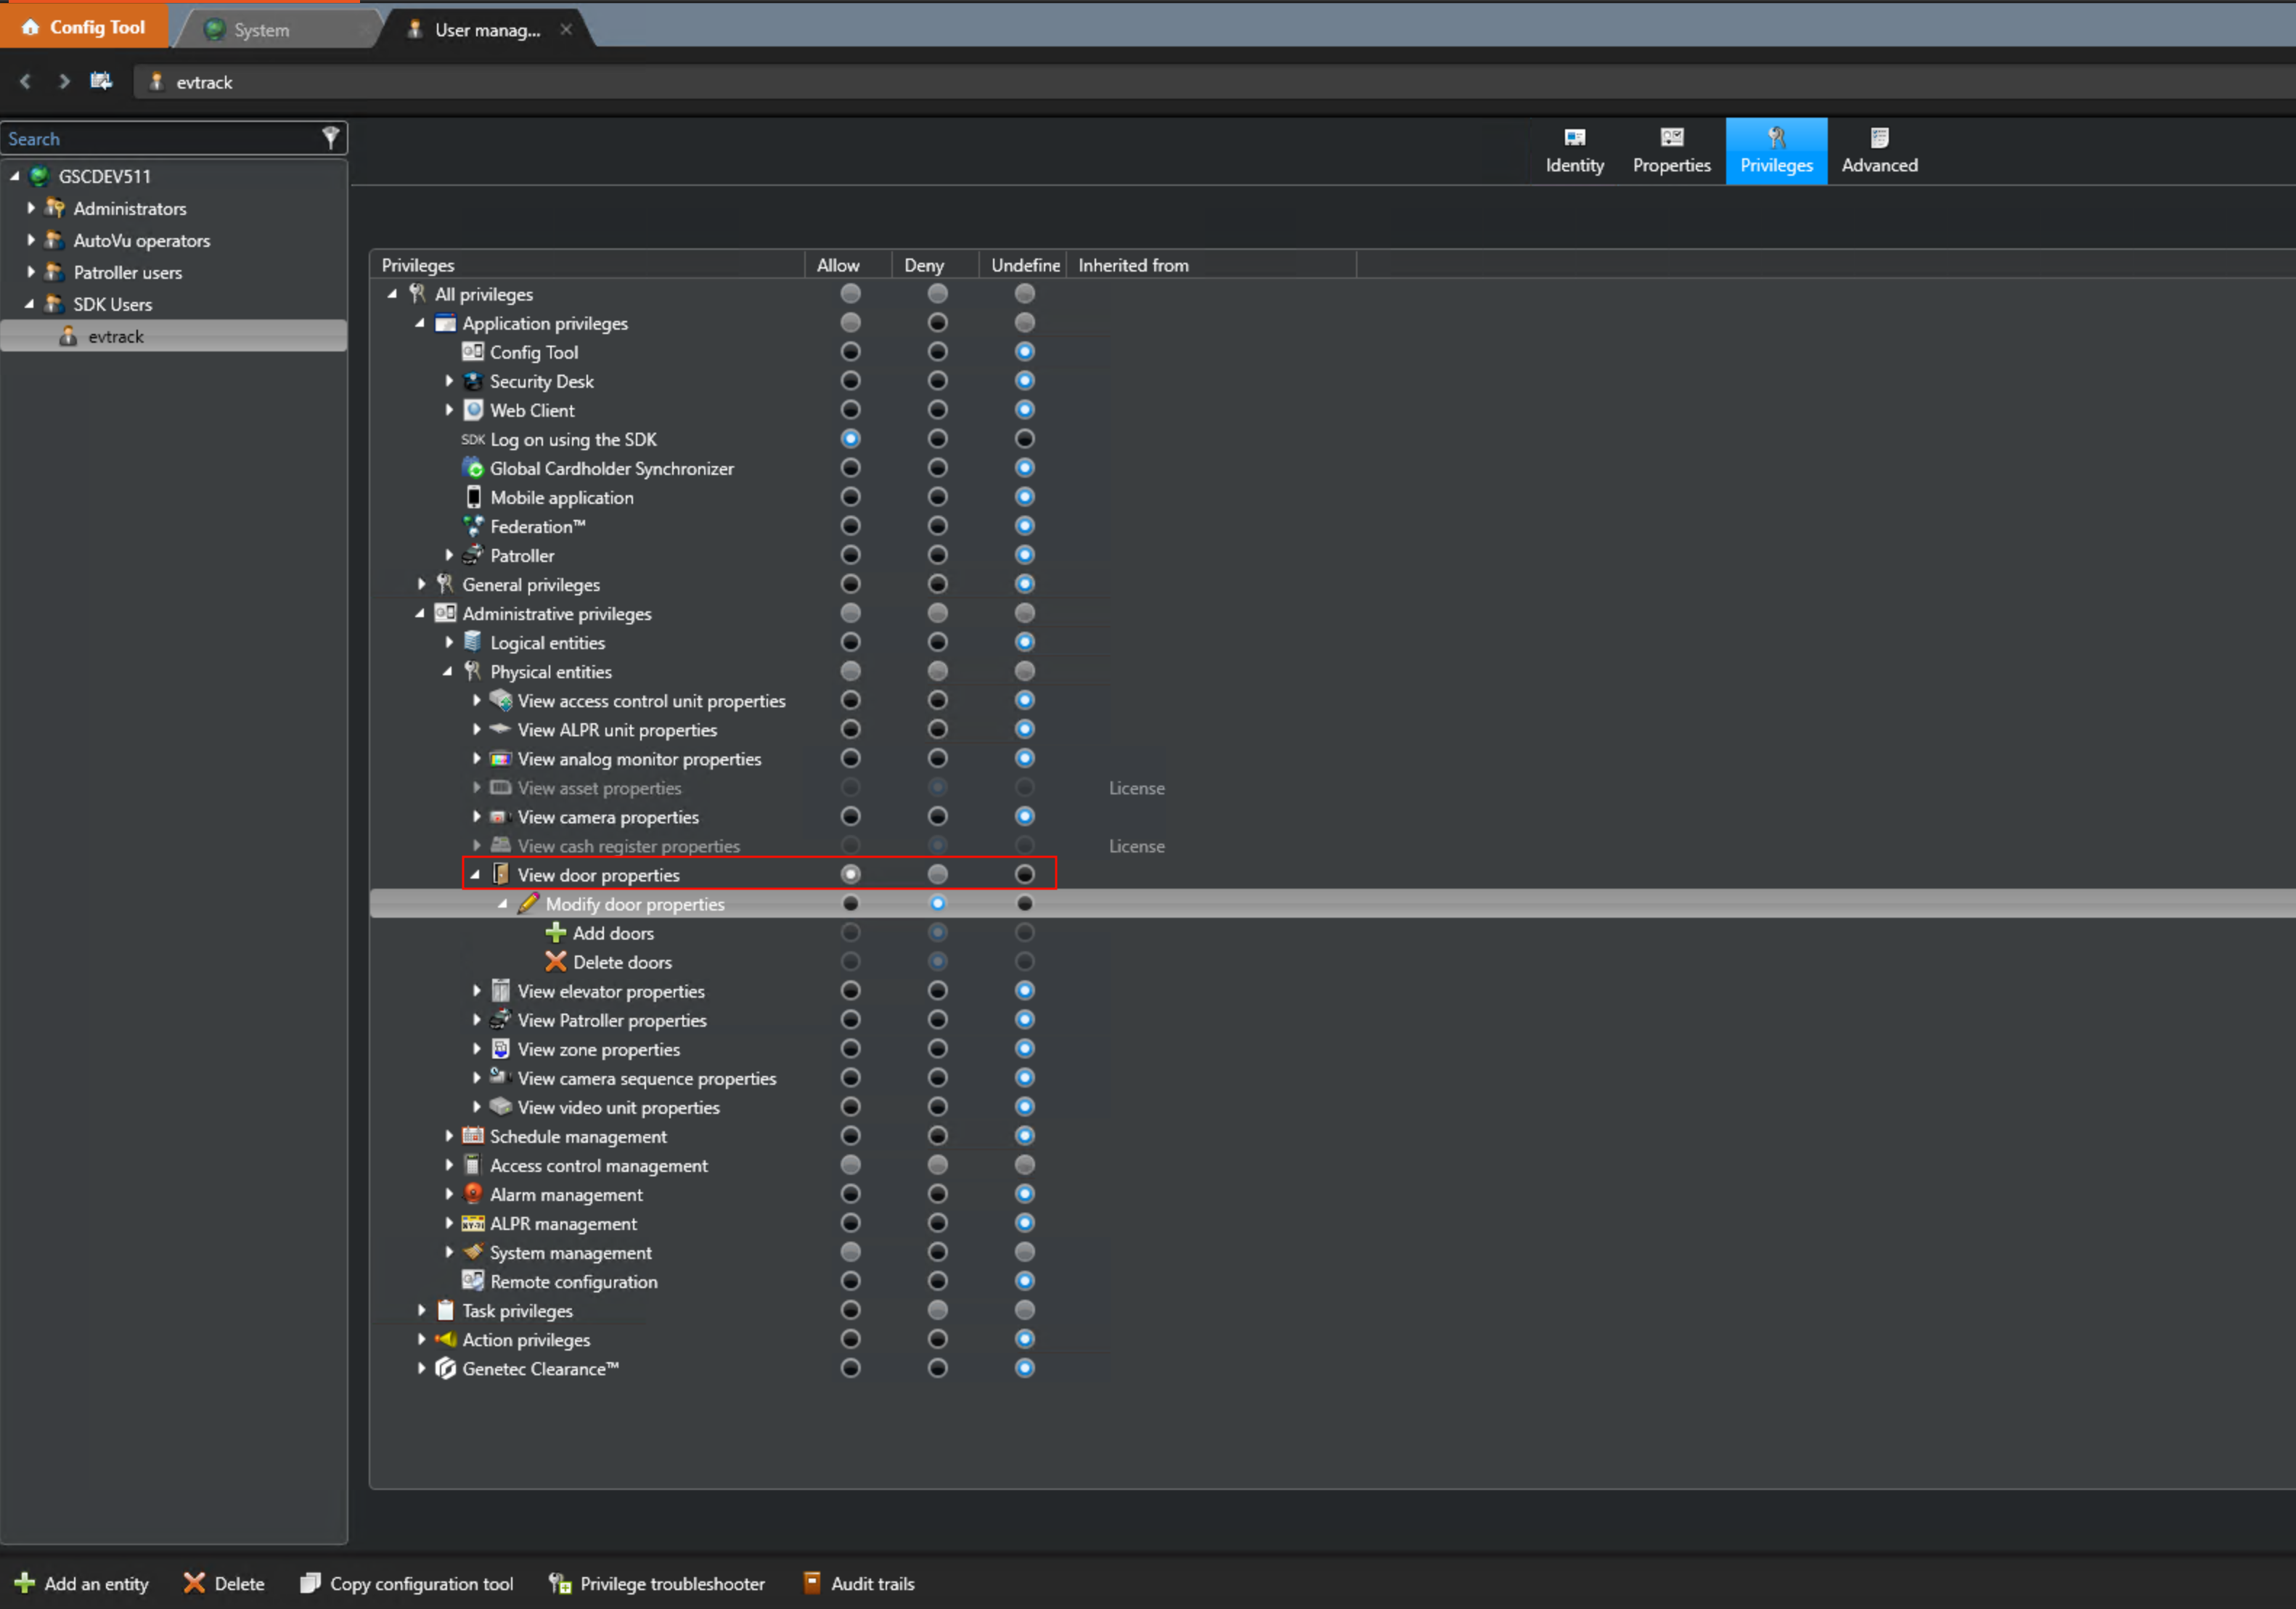
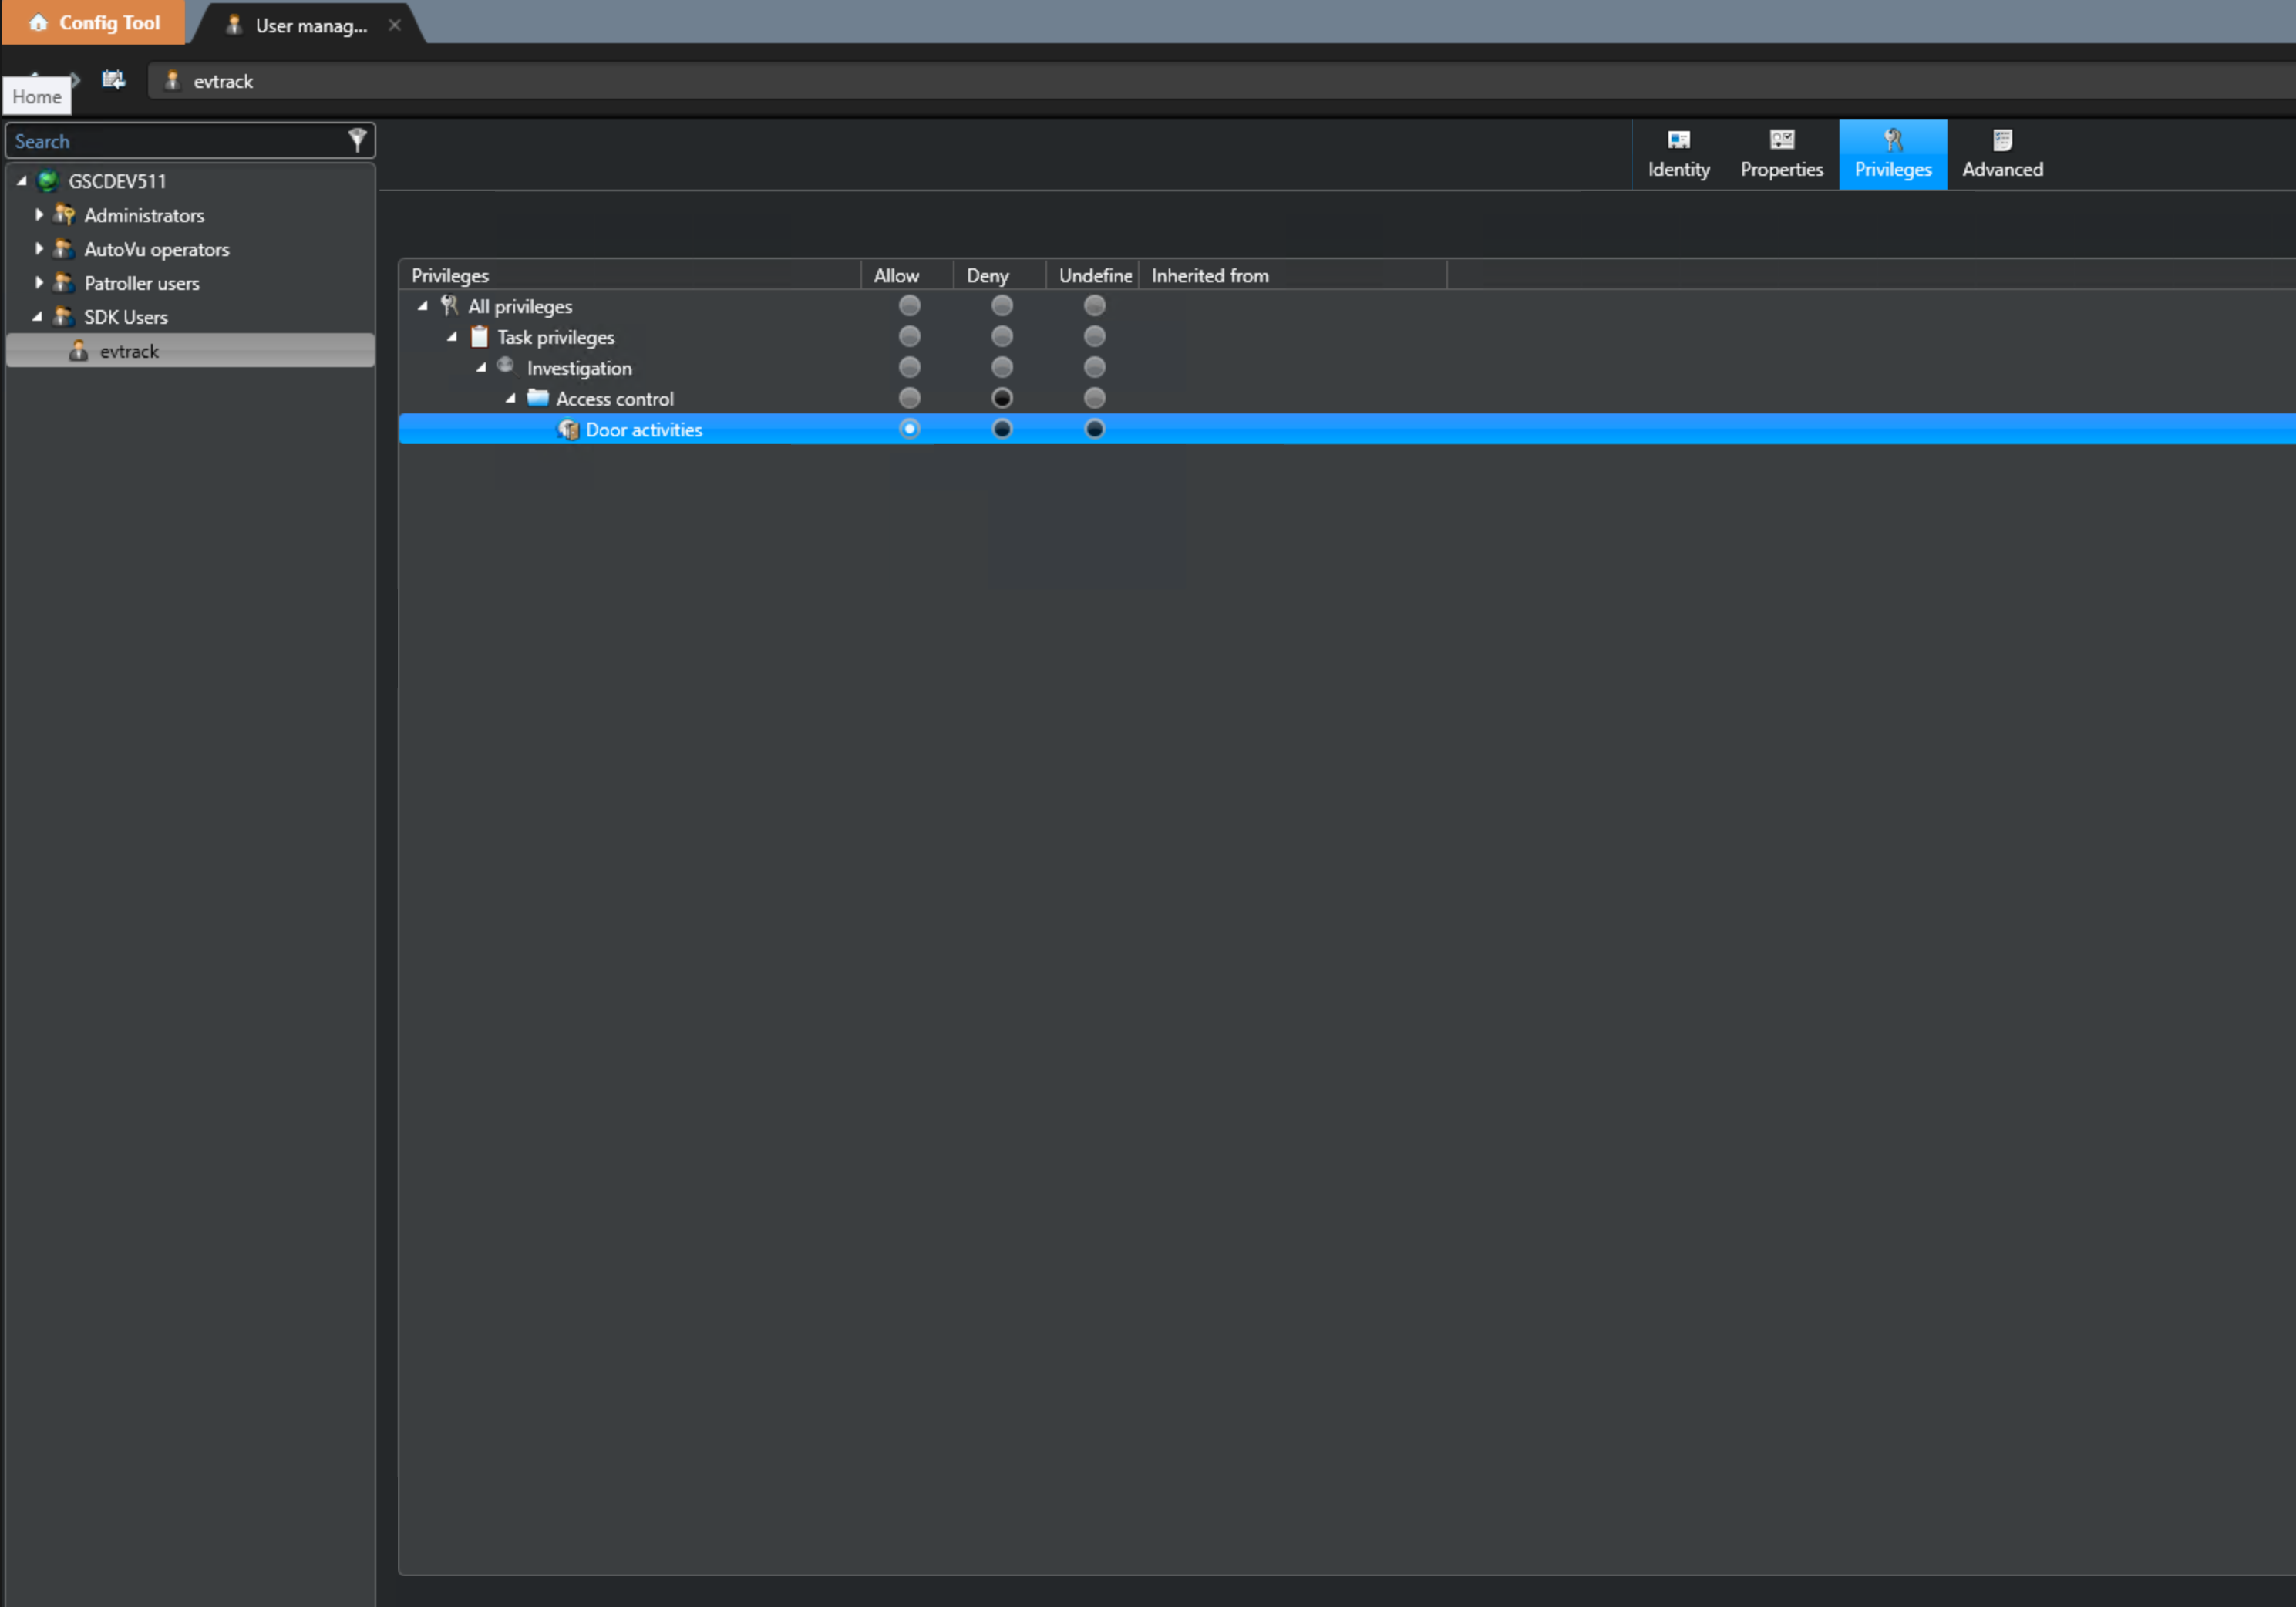
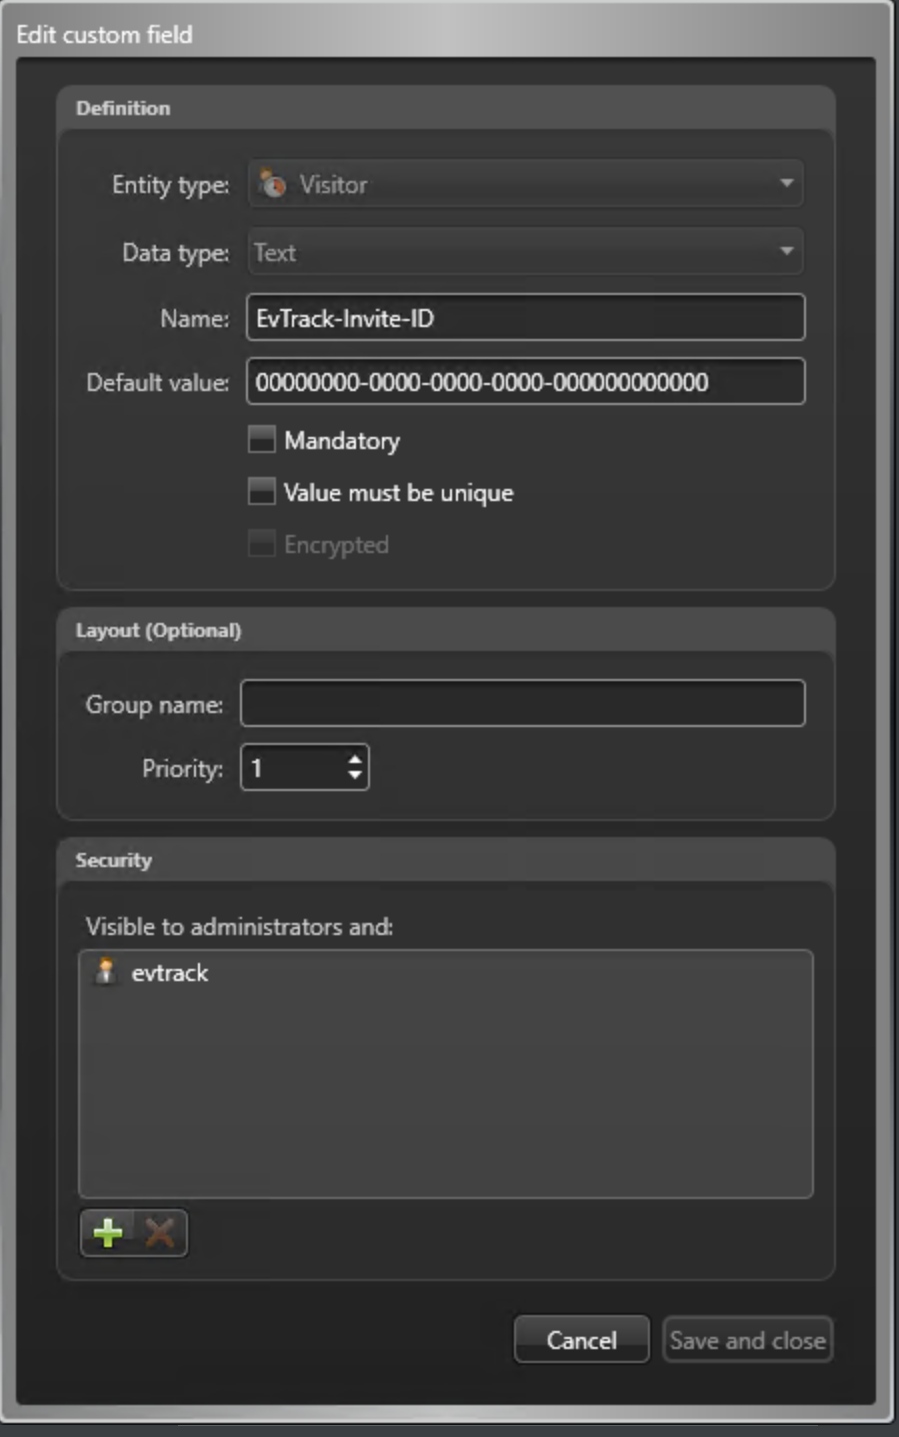
!!! If you are not using the built-in Administrator account for your WebSDK user, you must also create the following two Visitor custom fields in Genetec Security Center and grant the evtrack user visibility to them (Security Section → Visible to Administrators and evtrack):
5.2 Configure Custom Field
- EvTrack-Invite-ID
- Entity Type: Visitor
- Data Type: Text
- Name:
EvTrack-Invite-ID - Default Value:
00000000-0000-0000-0000-000000000000 - Security: Visible to Administrators and
evtrackuser
- EvTrack-Visitor-ID
- Entity Type: Visitor
- Data Type: Text
- Name:
EvTrack-Visitor-ID - Default Value:
00000000-0000-0000-0000-000000000000 - Security: Visible to Administrators and
evtrackuser
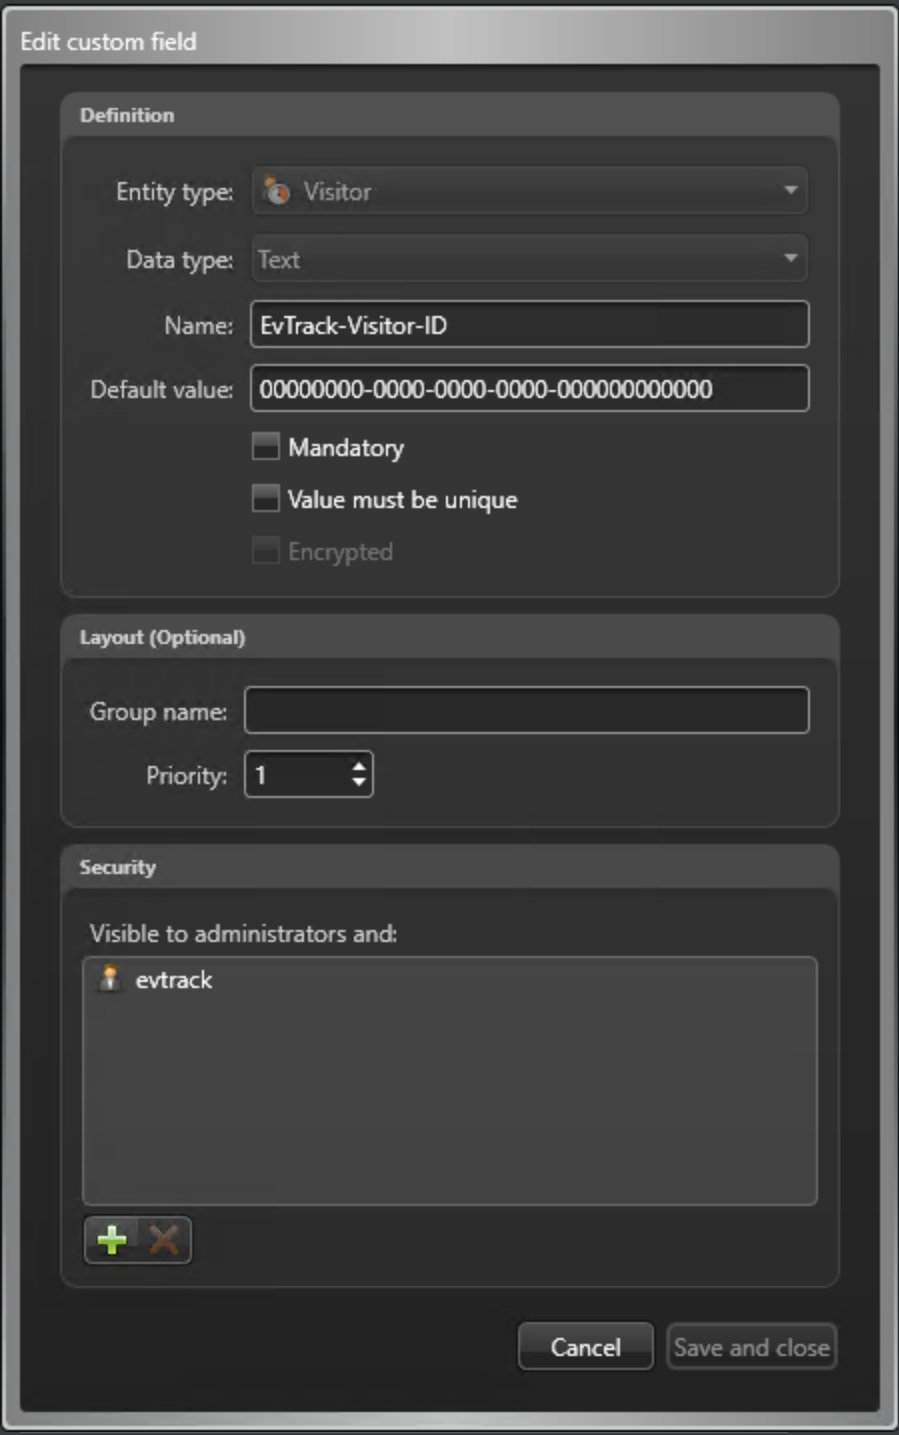
Without these fields, EvTrack will be unable to sync invitation and visitor identifiers when using a non-admin WebSDK user.
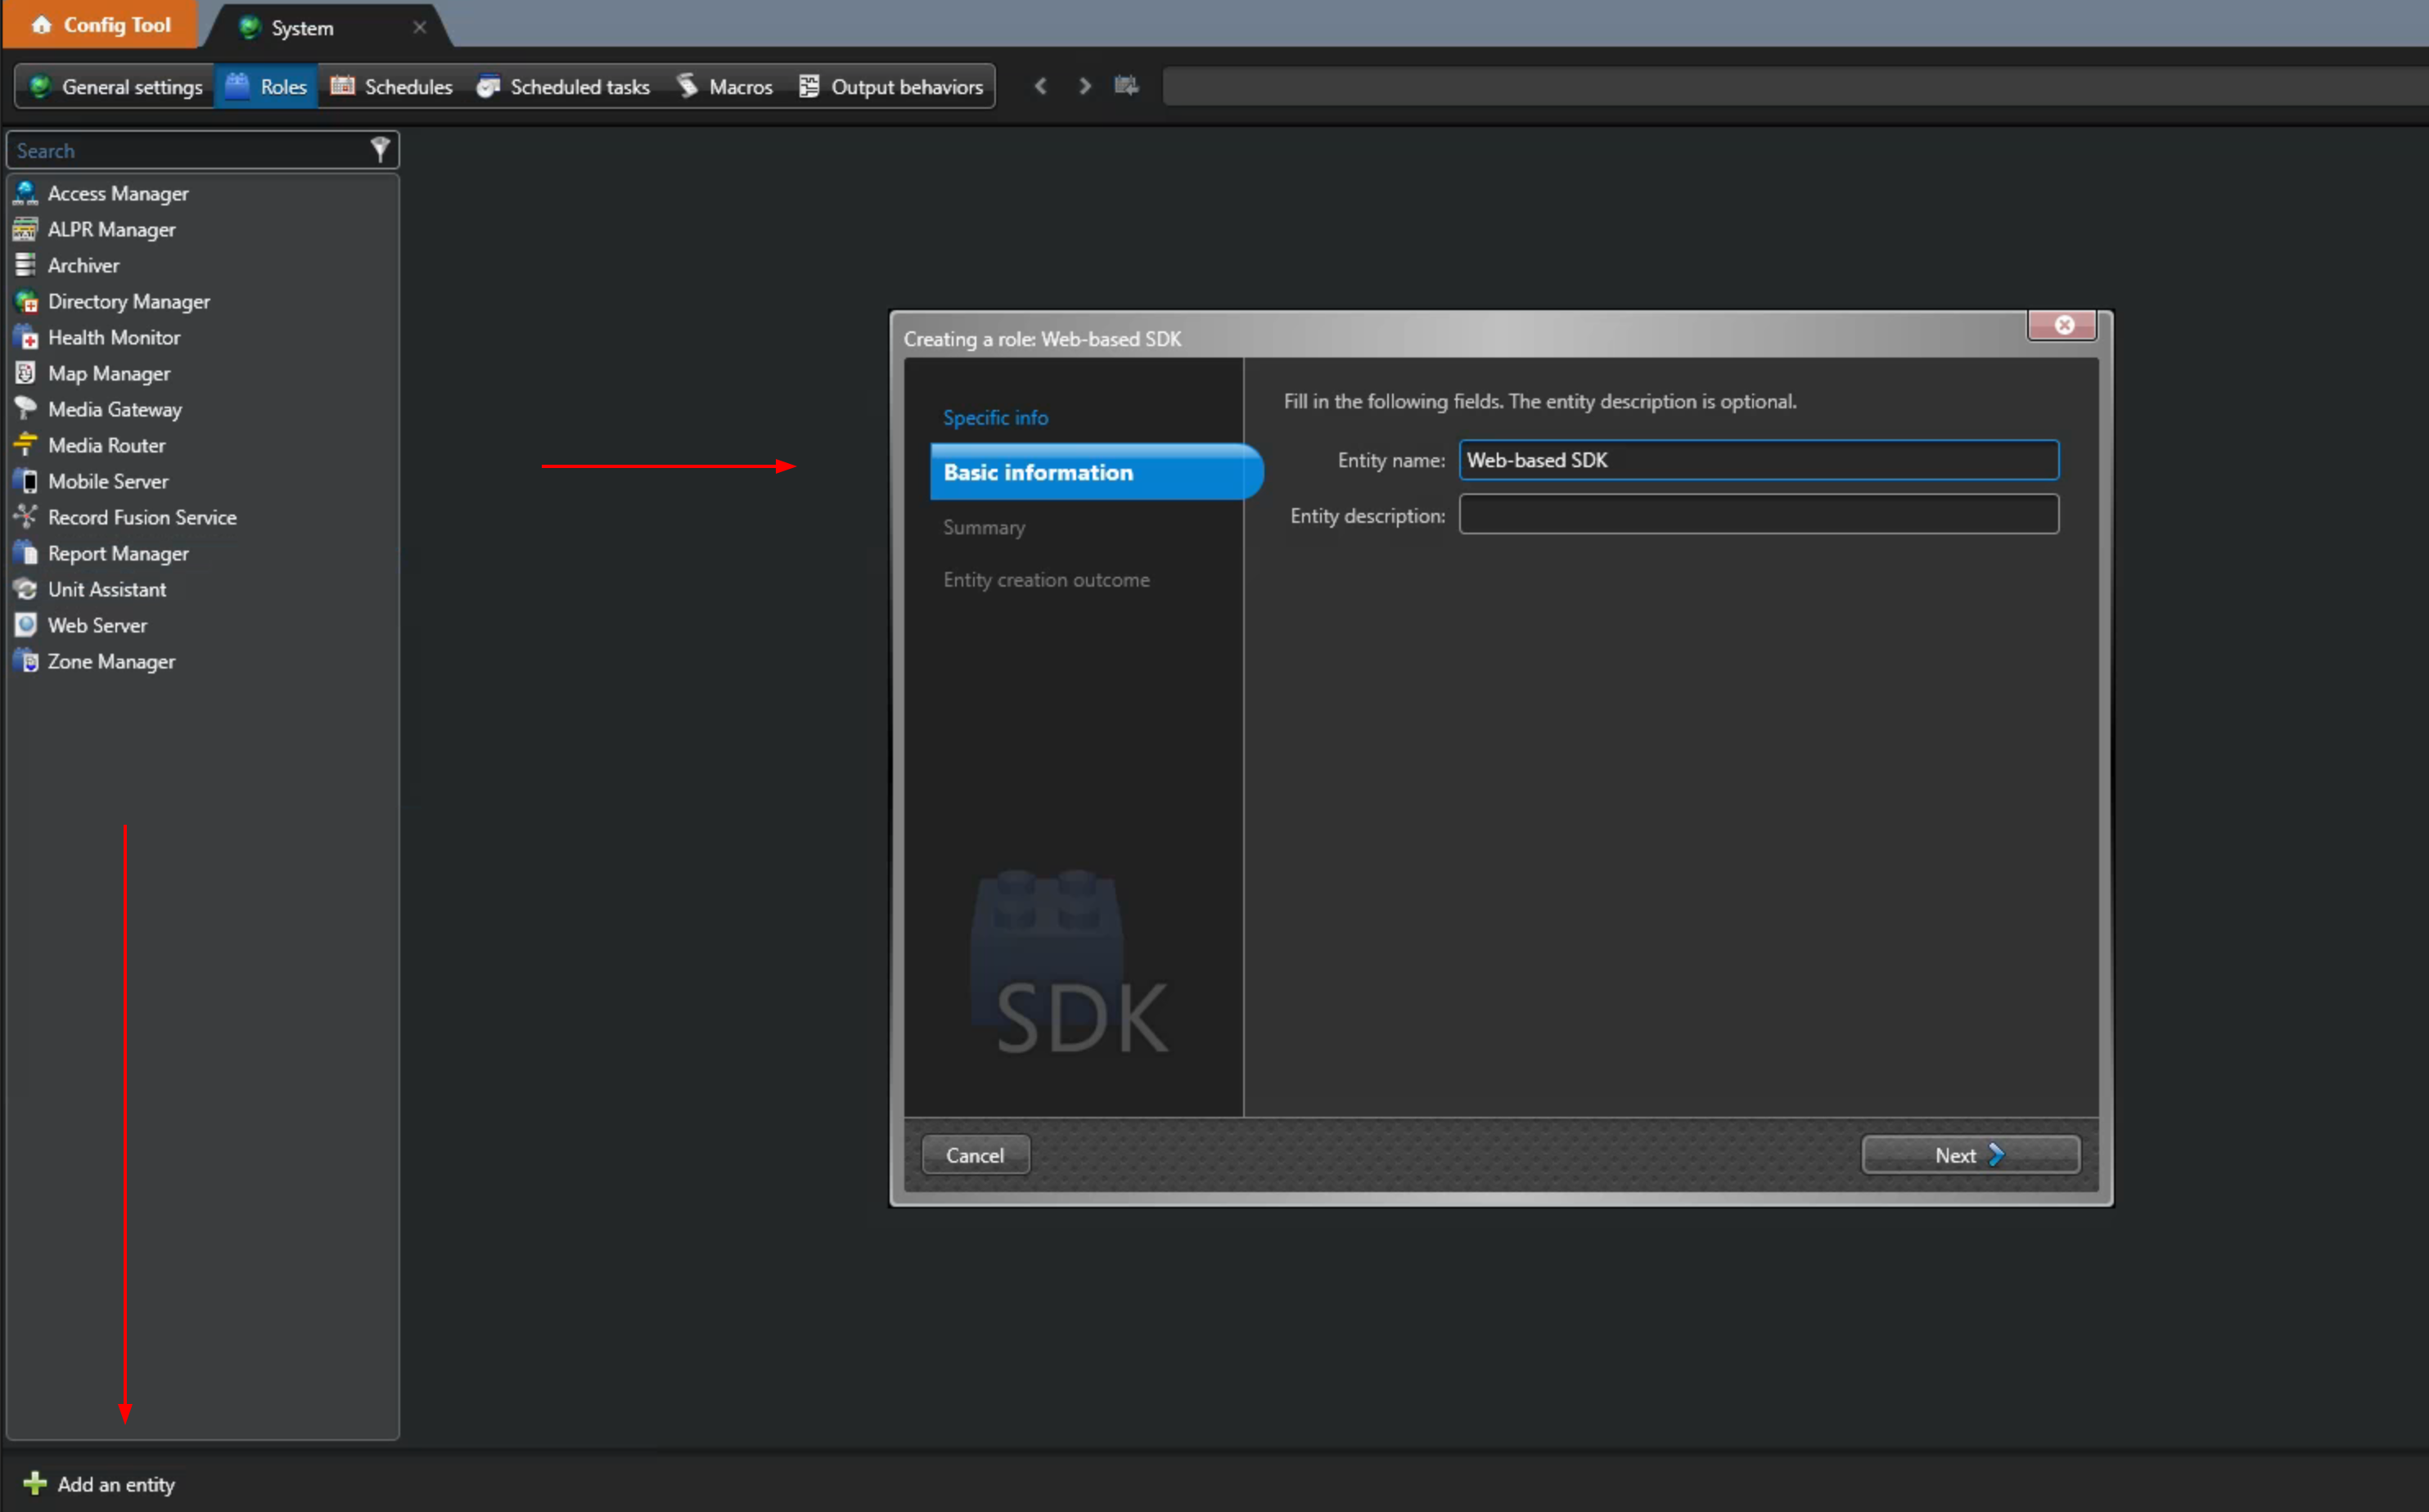
5.3 Add WebSDK Role
-
Add Role
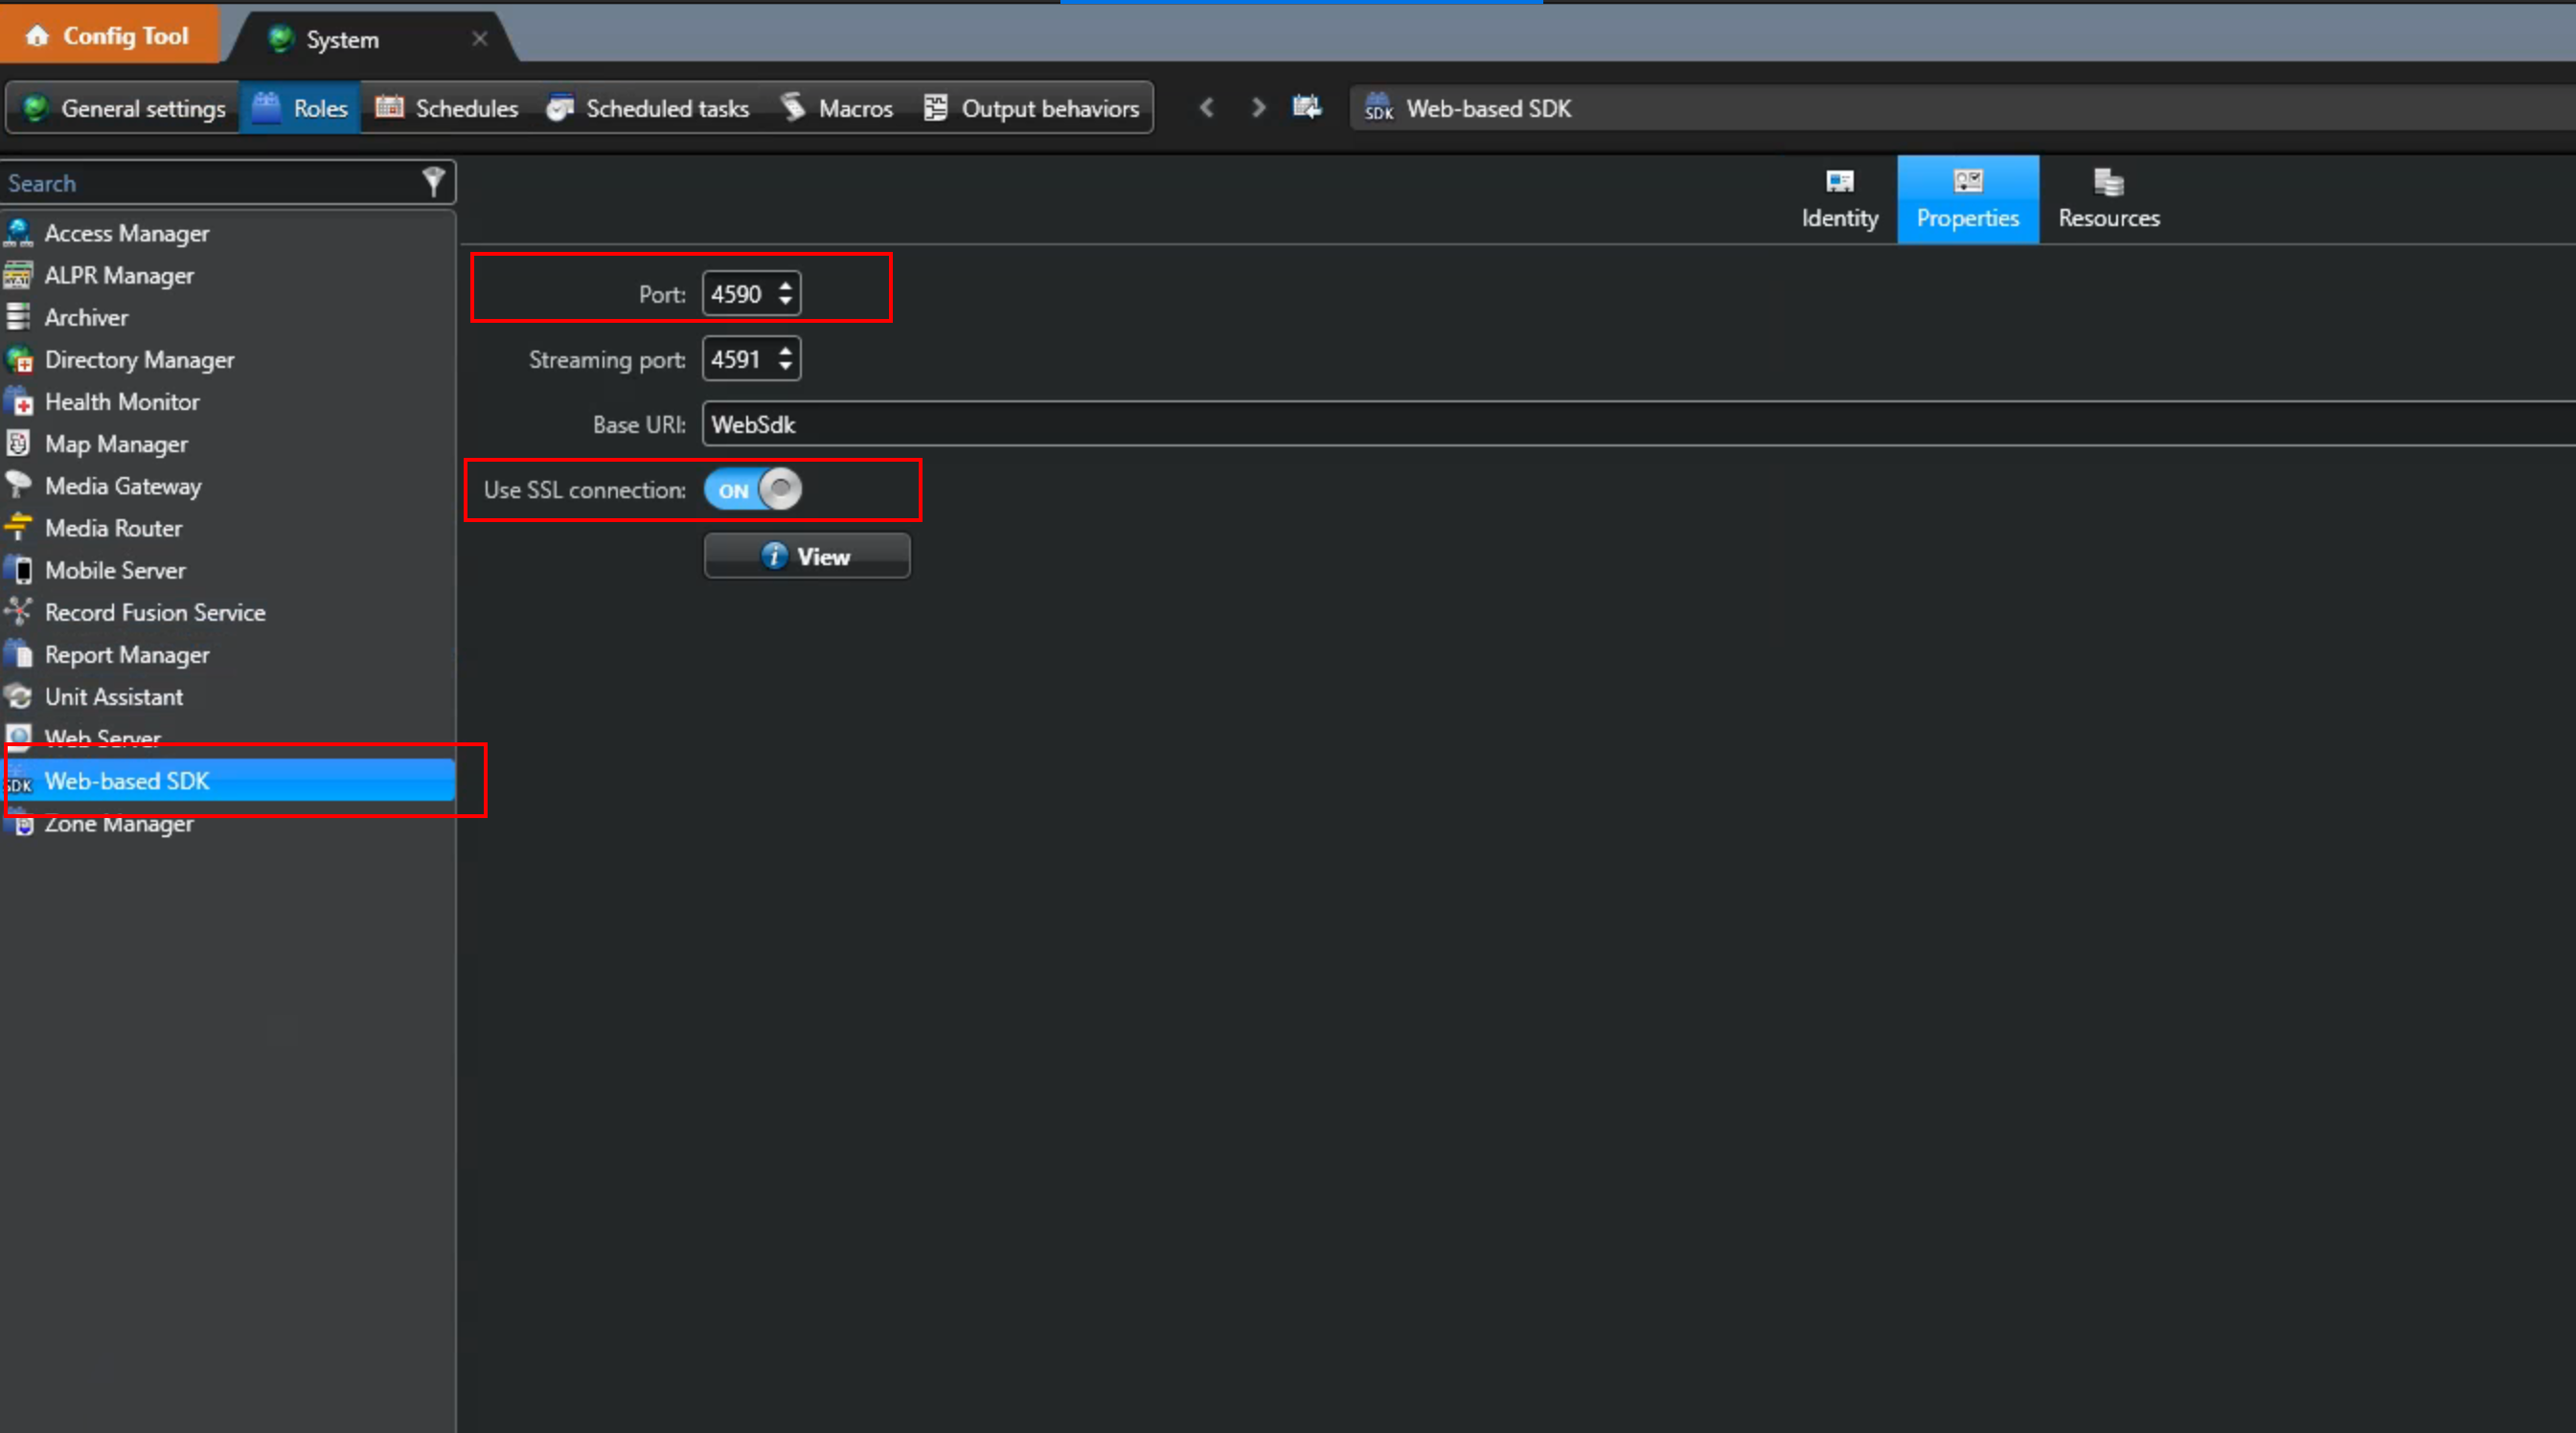
-
Confirm operation by opening a browser and going to the configured https://localhost:4590/WebSdk
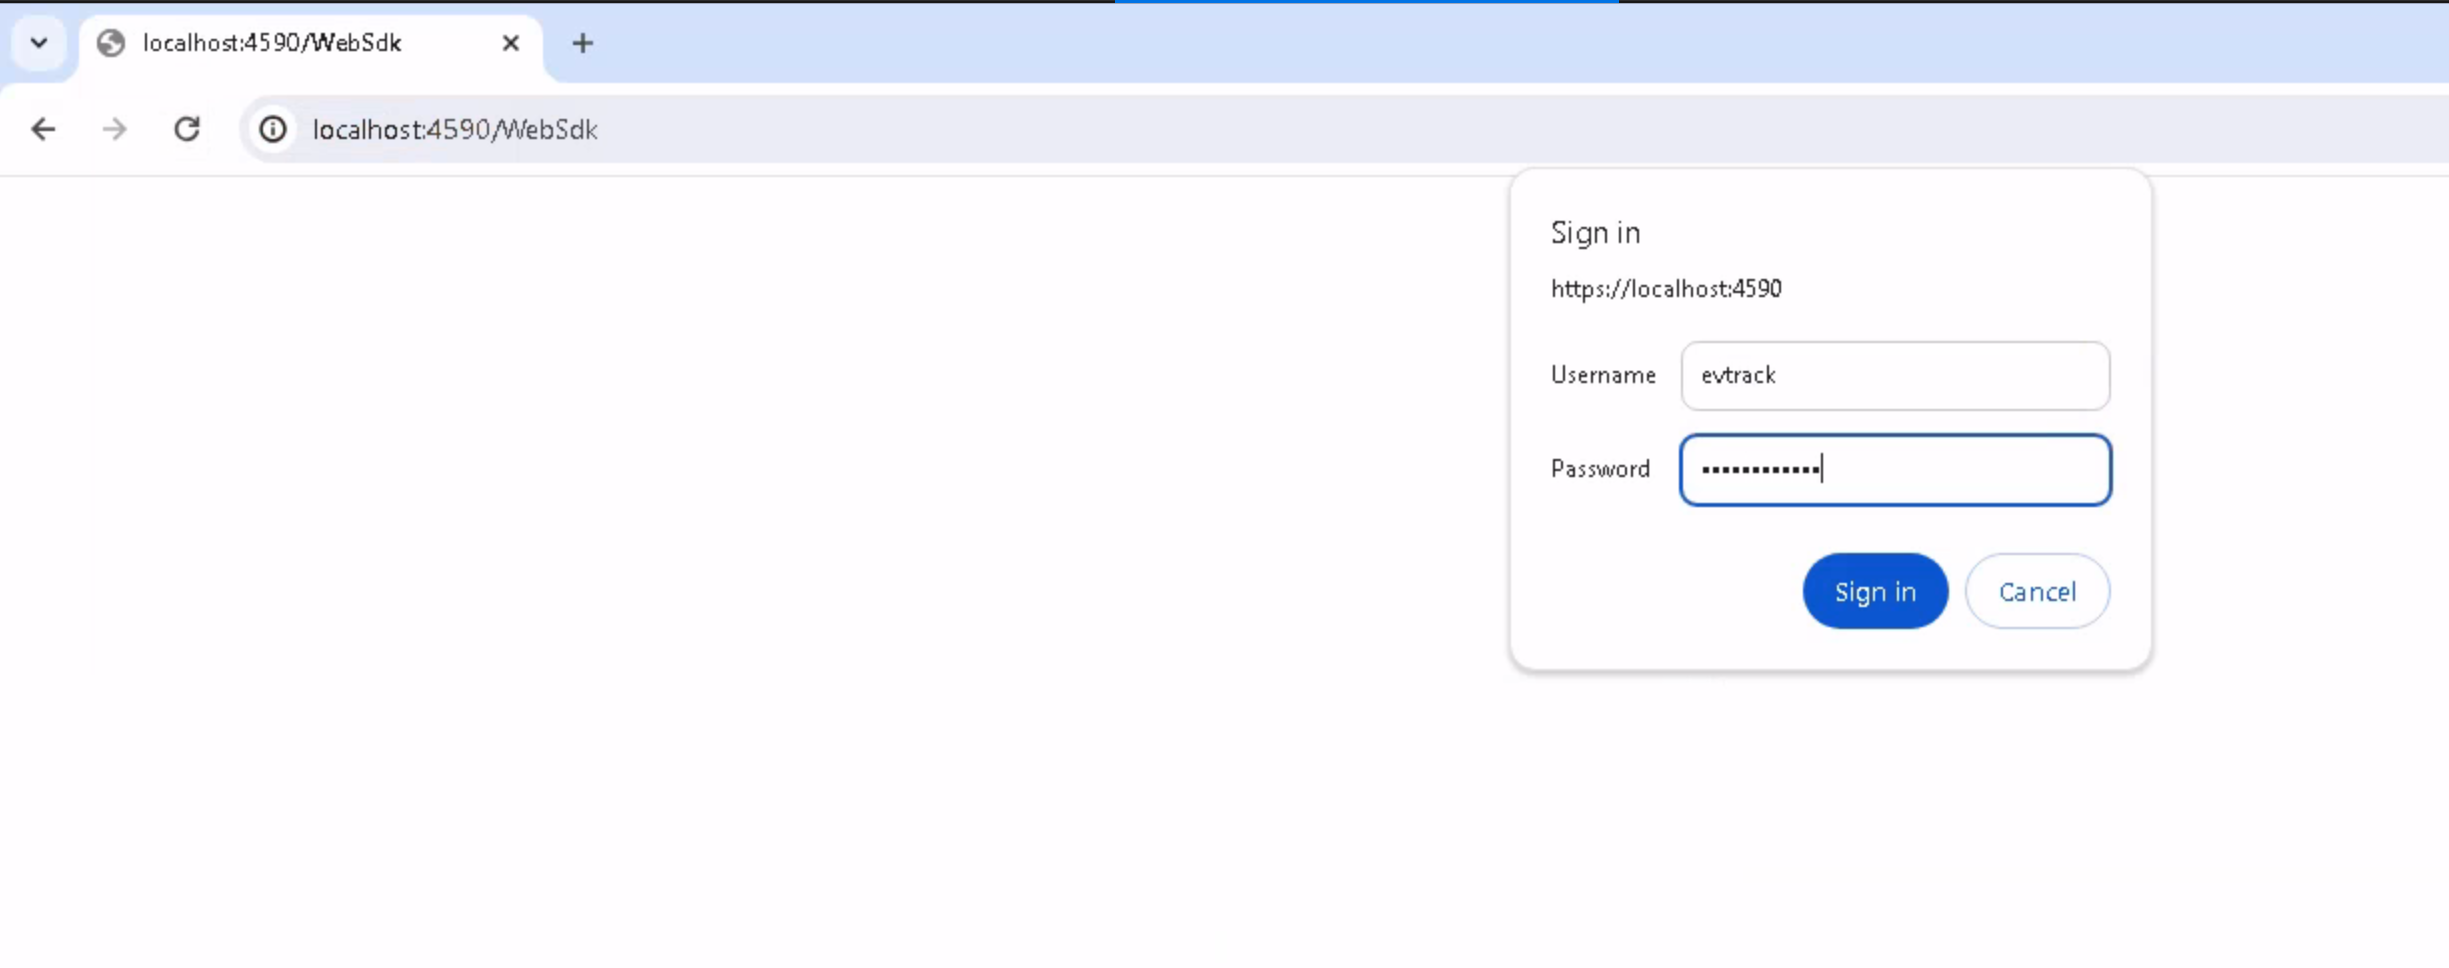
-
If EvTrack is not located on the same machine or is cloud based make sure that WebSDK is accessible to by access the WebSDK via IP Address or DNS https://gsc.example.com:4590/WebSdk
5.4 Windows Firewall Configuration for Genetec WebSDK
By default, Genetec Security Center’s WebSDK operates over TCP port 4590. For event streaming and advanced integrations, TCP port 4591 is also required.
Important:
- The Windows Firewall rule for port 4591 is not created by default.
- You must manually add a rule to allow incoming TCP traffic on port 4591.
Step 1: Open Windows Defender Firewall
- Navigate to Control Panel → System and Security → Windows Defender Firewall → Advanced Settings.
- Select Inbound Rules → New Rule….
Step 2: Confirm Allow Rule for TCP Port 4590
- Rule Type: Port
- Protocol: TCP
- Specific Local Port:
4590 - Action: Allow
- Profile: As required
- Name:
Genetec WebSDK TCP 4590 - Confirm and Apply
Example Screenshot: 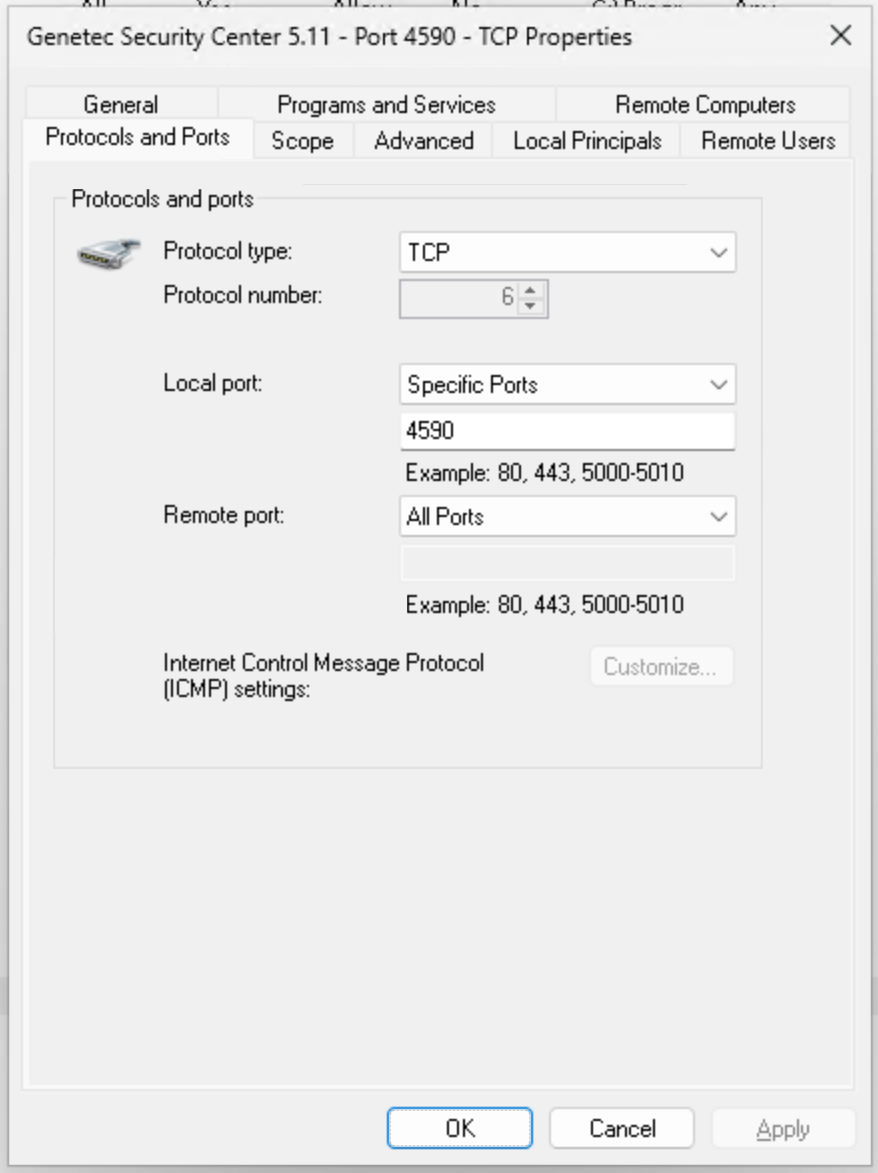
Step 3: Manually Create Allow Rule for TCP Port 4591
Port 4591 is not configured by default. This rule must be created manually for proper integration and event streaming.
- Rule Type: Port
- Protocol: TCP
- Specific Local Port:
4591 - Action: Allow
- Profile: As required
- Name:
Genetec WebSDK TCP 4591 - Confirm and Apply
Example Screenshot: 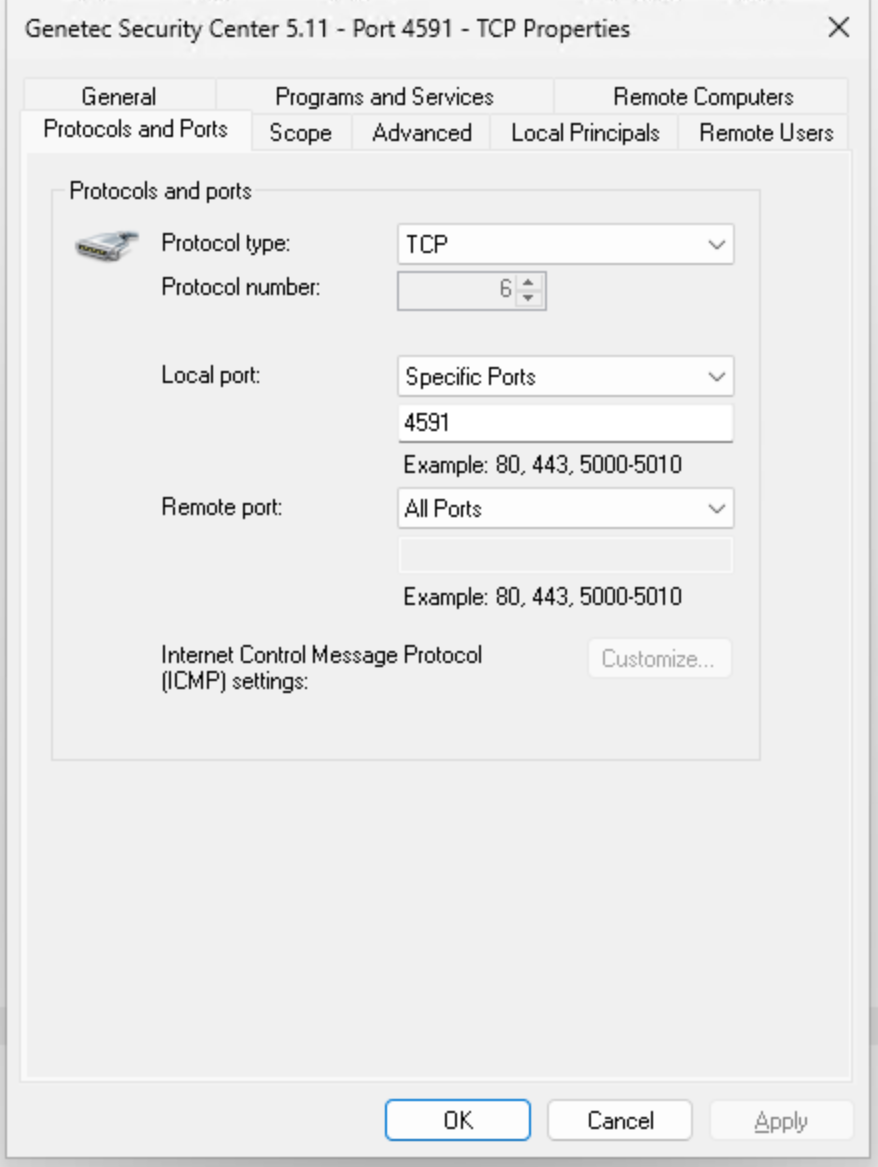
6. EvTrack Configuration
6.1 Configure Integration
-
Add App
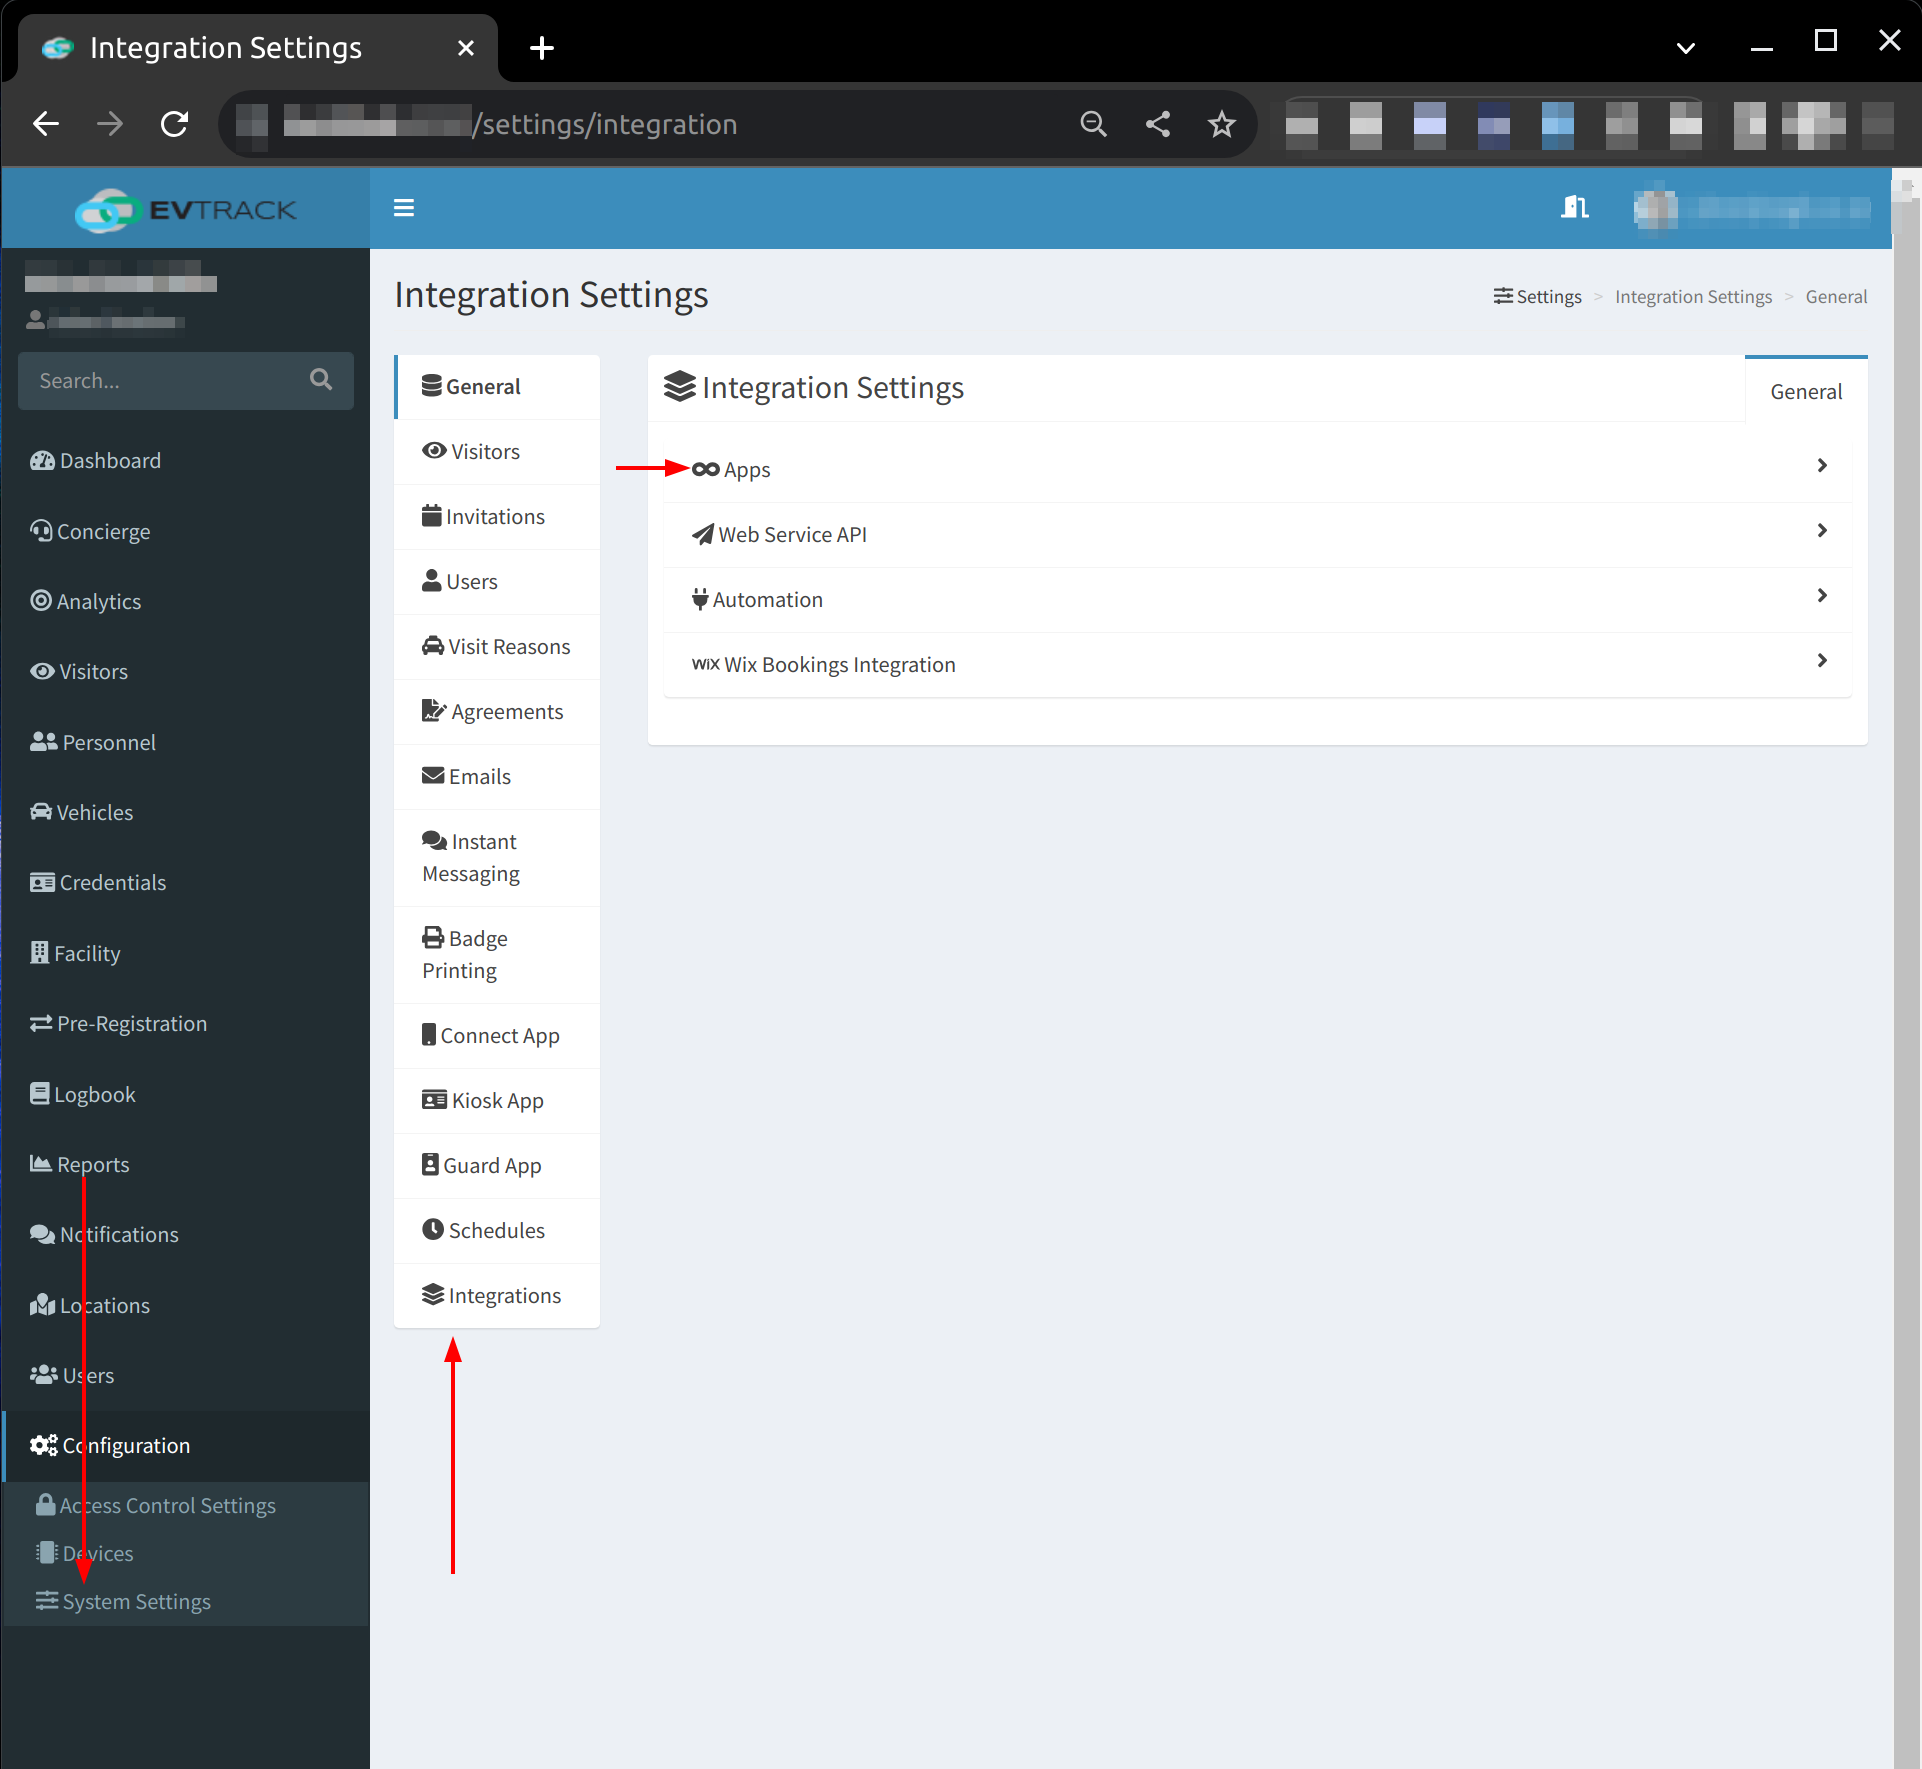
-
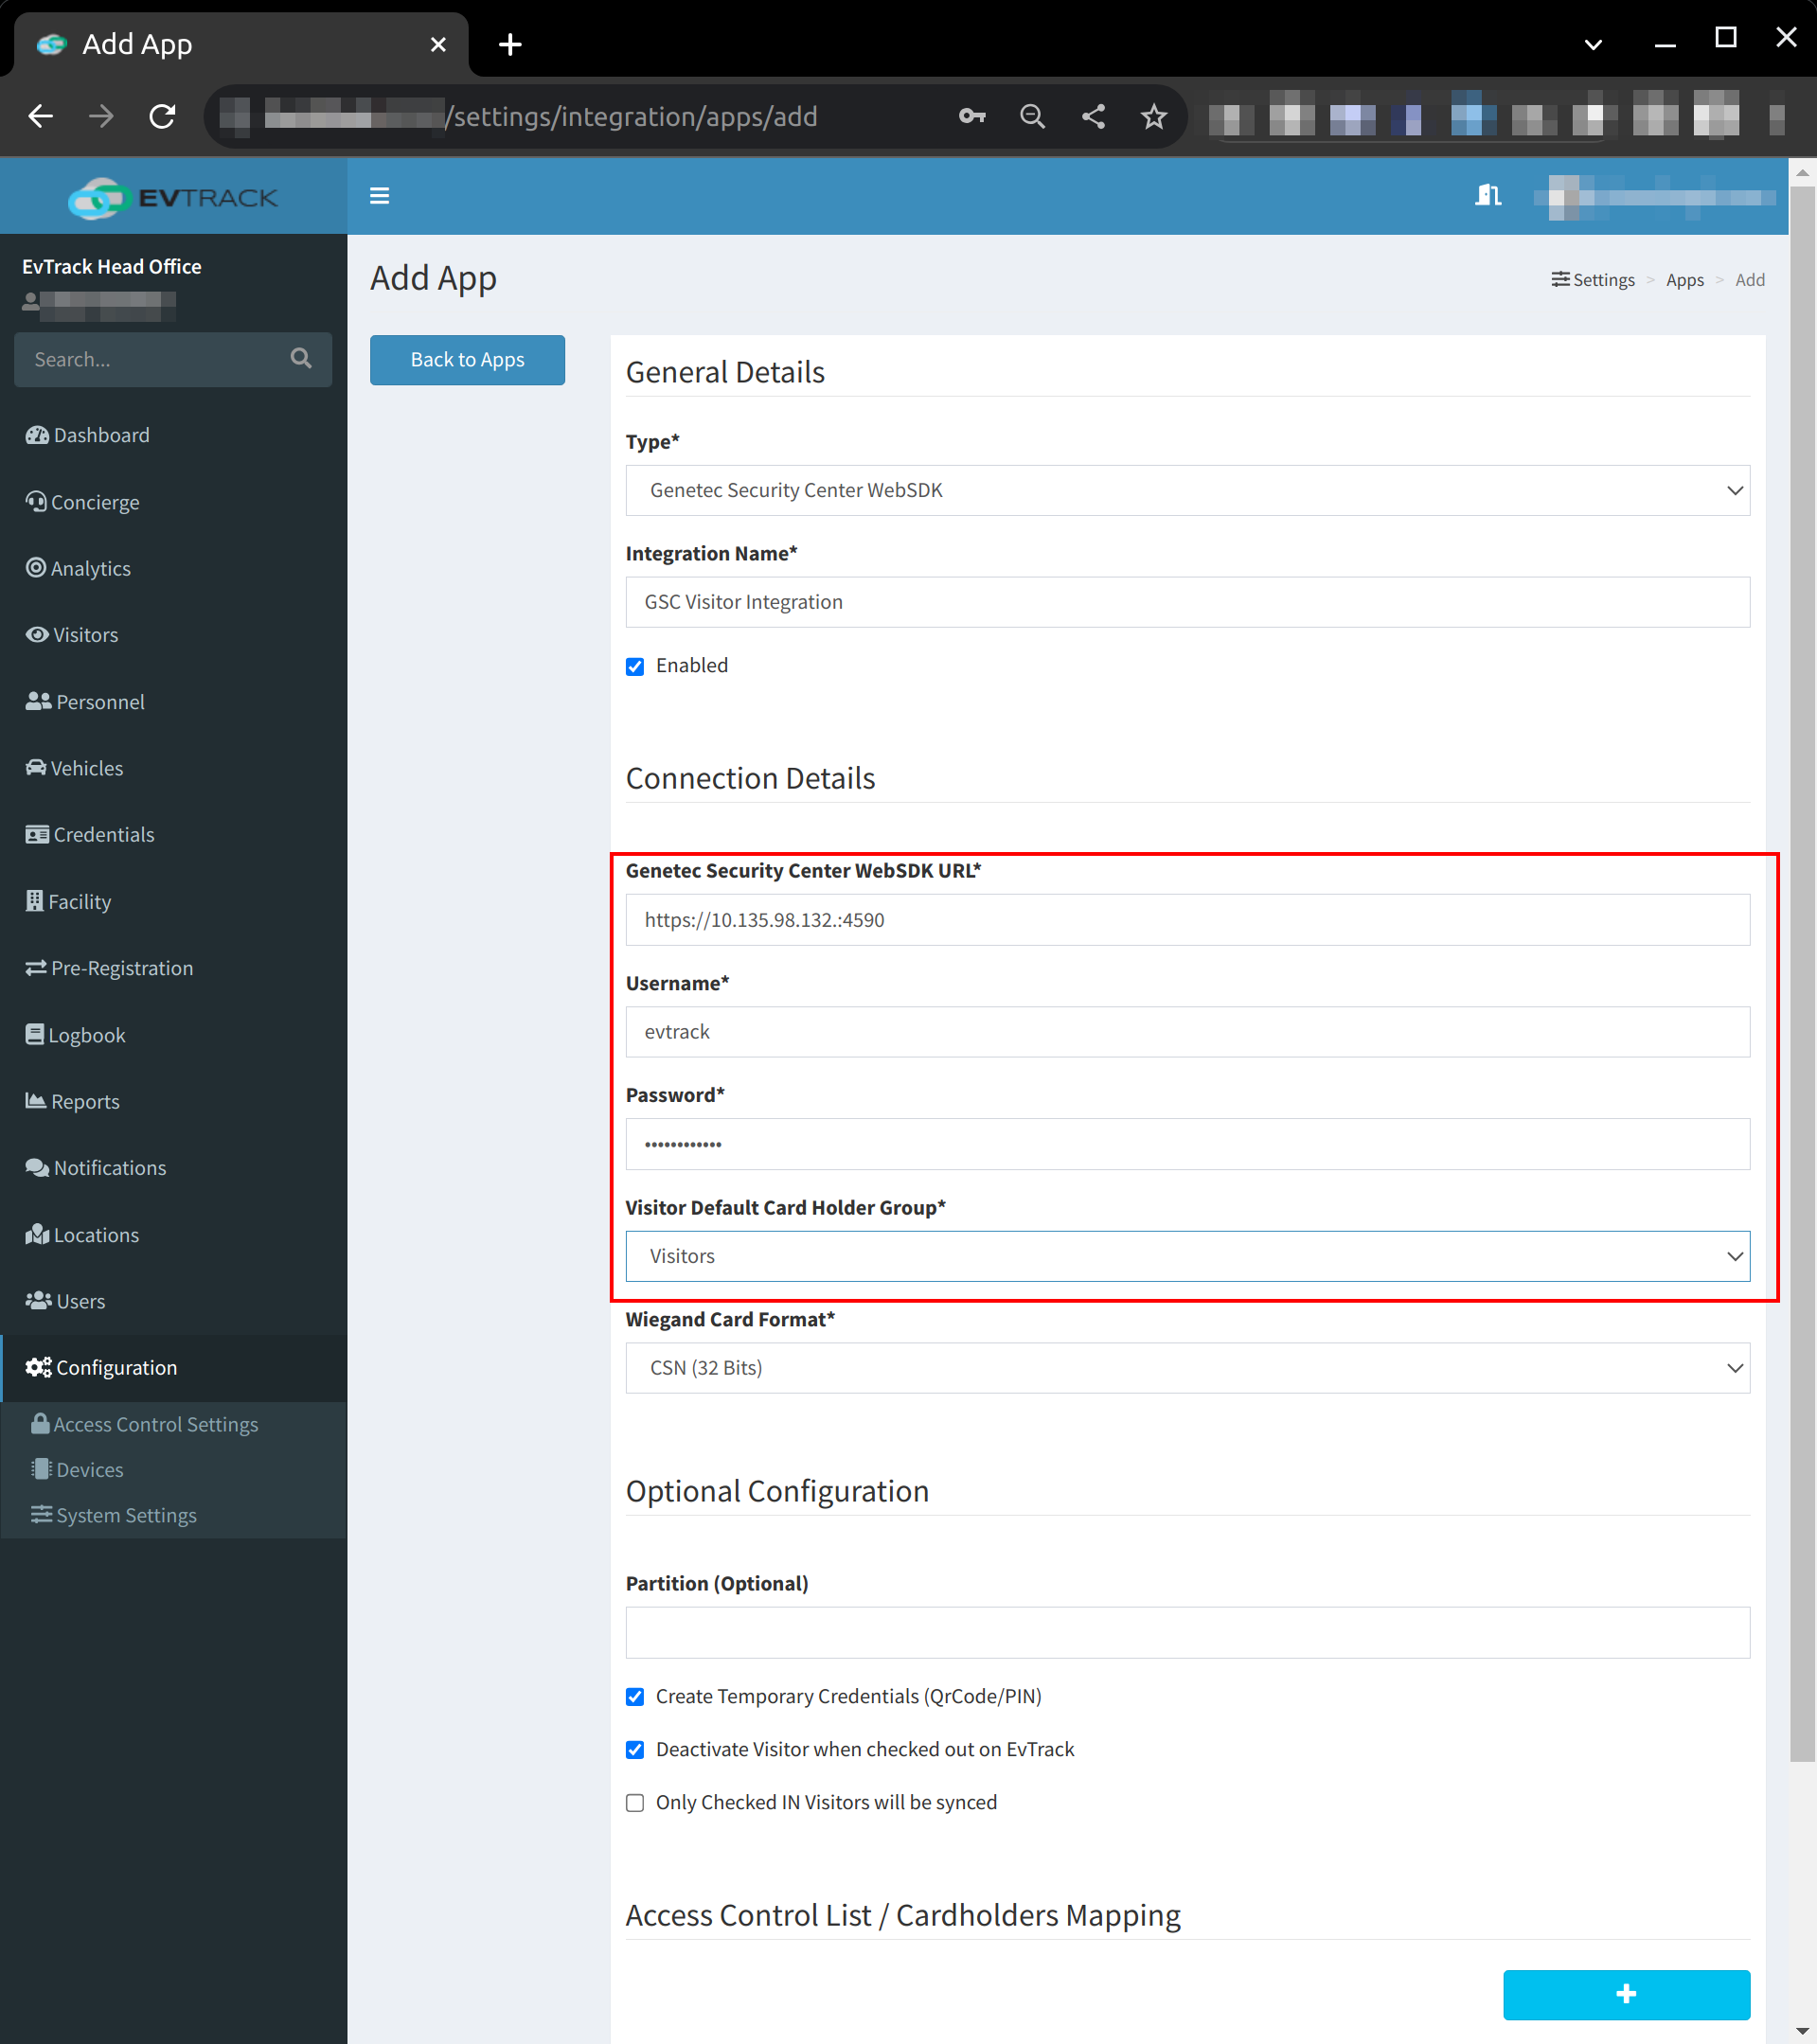
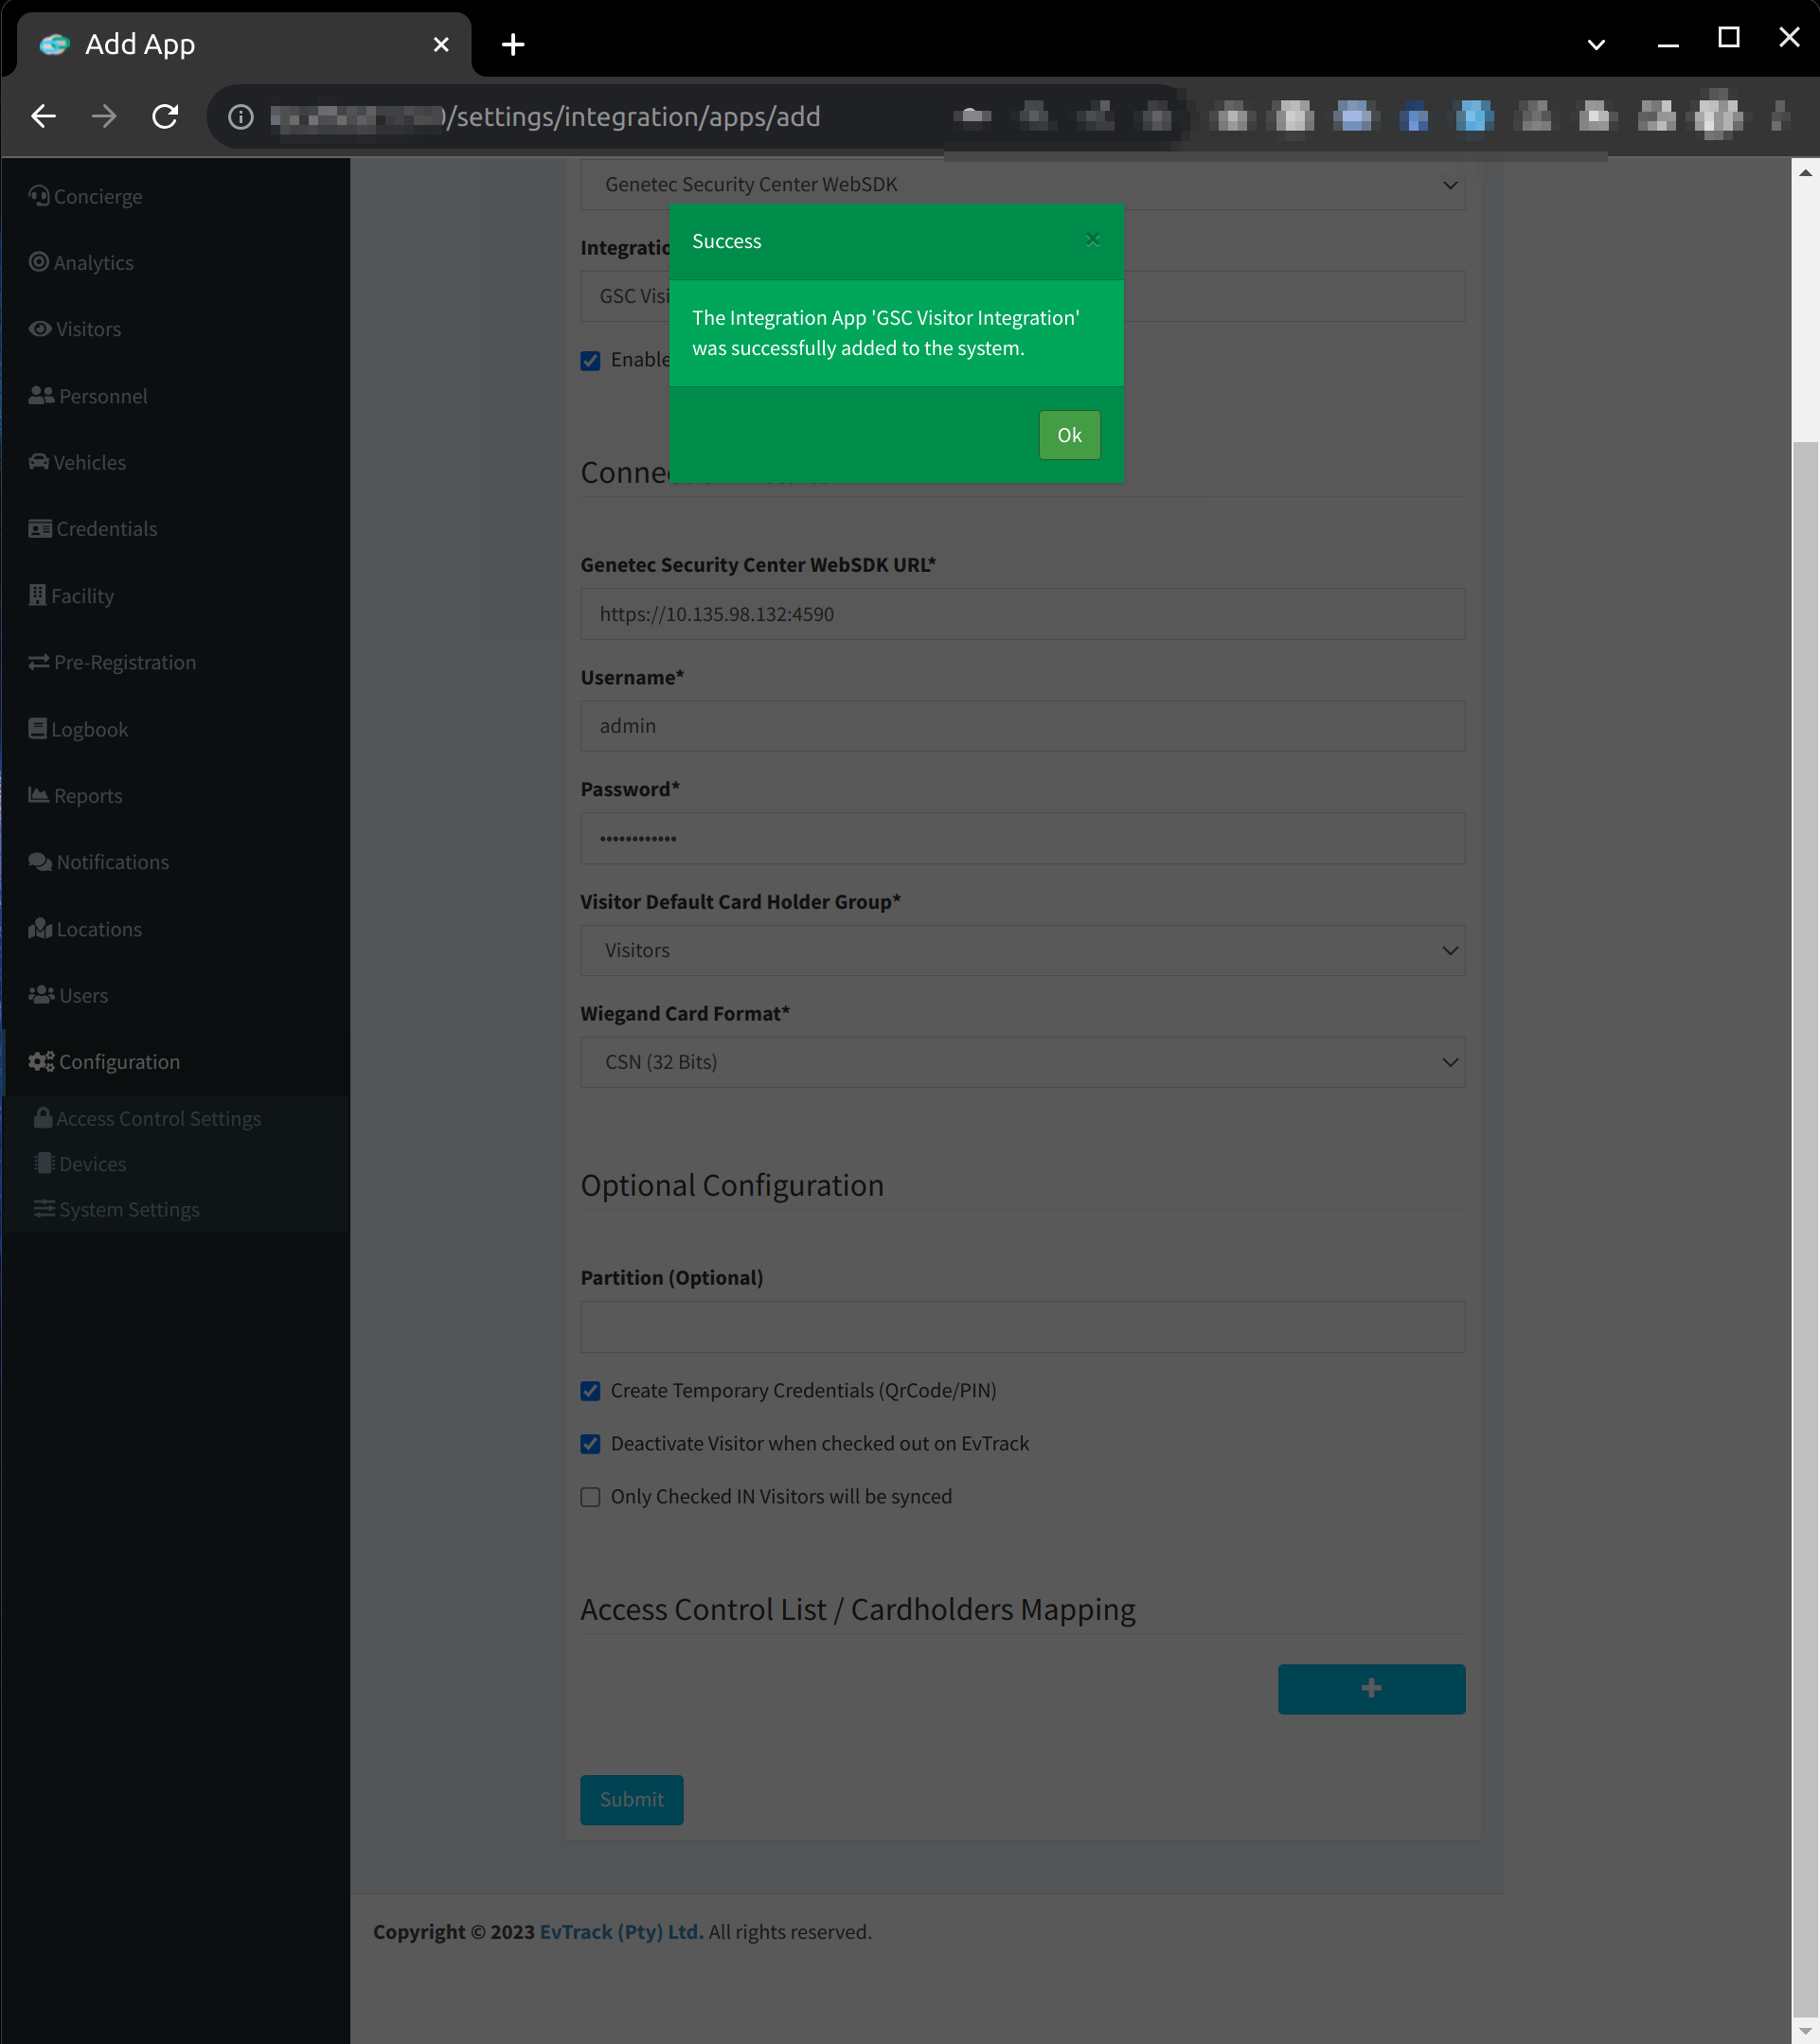
Set App Connection Details:
- Remote WebSDK URL
- WebSDK Username
- WebSDK Password
- Default Visitor Card Holder Group
- Create Temporary Credentials (QrCode/PIN) - When this option is checked, EvTrack sync the generated temporary visitor credentials in the form of a QR code or PIN to Genetec Security Center
- Deactivate Visitor when checked out on EvTrack - By enabling this checkbox, EvTrack will automatically deactivate a visitor’s access credentials in Genetec’s Security Center when they are checked out using EvTrack. This ensures that visitors no longer have access rights once they have completed their visit. If this option is not selected, manual deactivation may be required.
- Only Checked IN Visitors will be synced - Selecting this checkbox means that only visitors who have completed the check-in process in EvTrack will be synchronized with Genetec’s Security Center. Visitors who are invited but have not checked in will not have their credentials created or synchronized. This can be useful for scenarios where you want to control which visitors have access to your facility based on their actual arrival.
- Wiegand Card Format
- CSN (32 Bits): Set this format when using EvTrack Wiegand QR Code Readers or compatible devices.
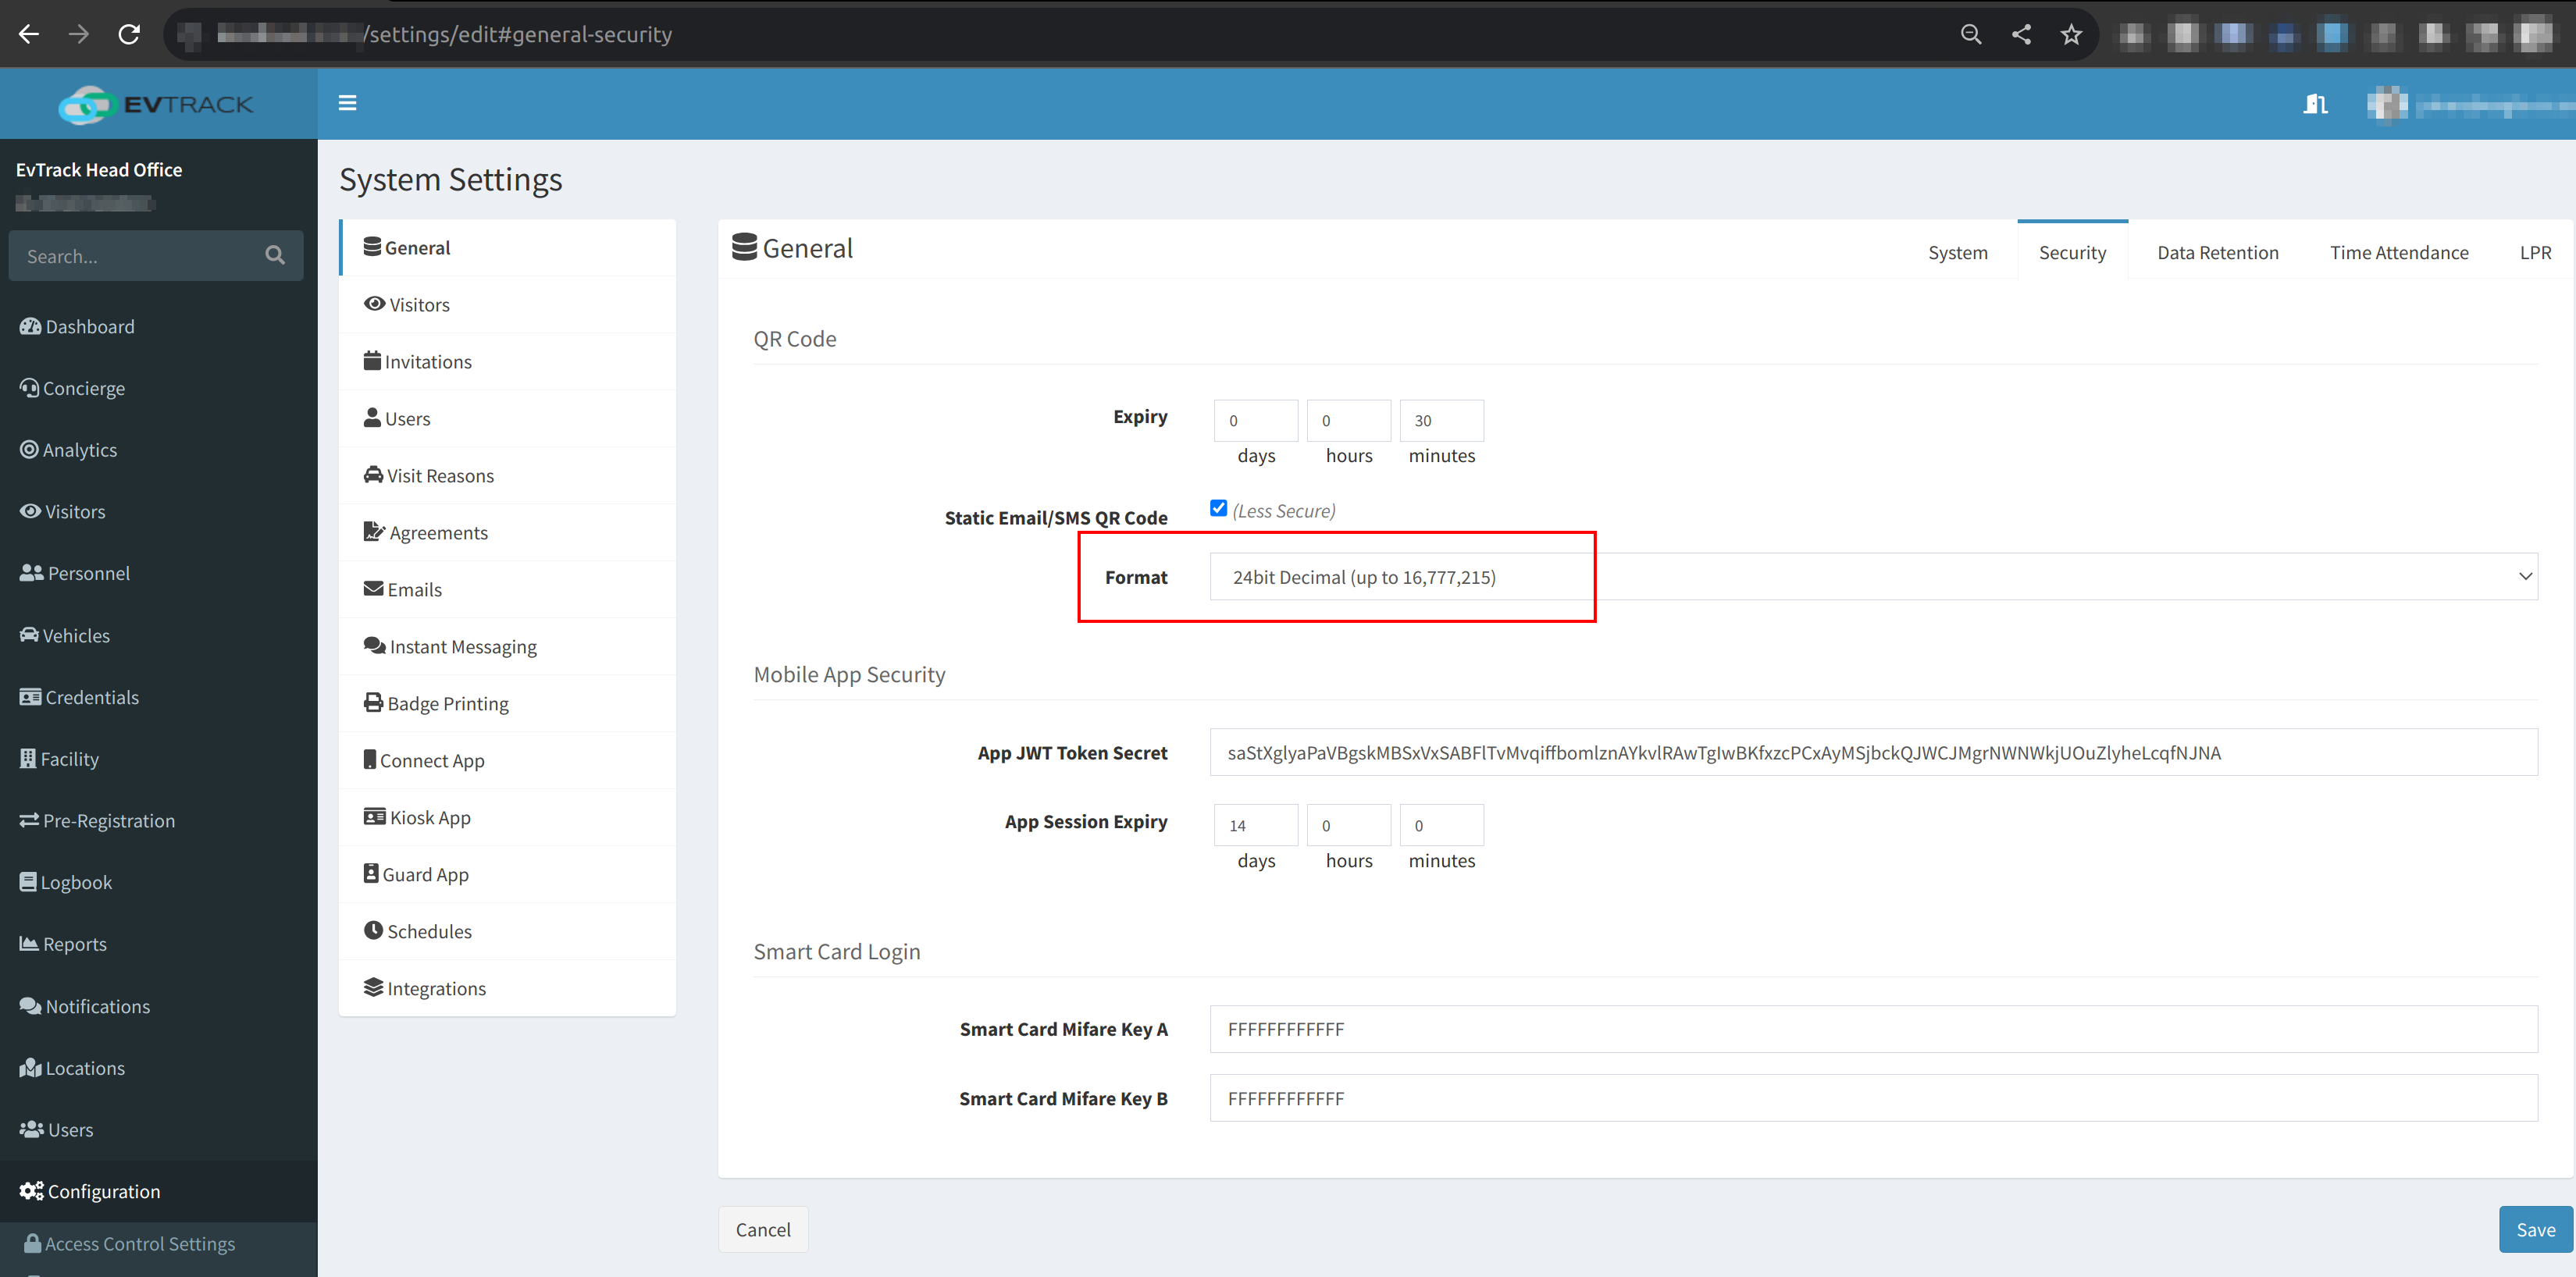
- Standard 26 Bits: Set this format when using SAFR. The EvTrack QR Code Security Format needs to be set to 24 Bit mode to work with SAFR.
!!! If you encounter a Username/Password error, please review your credentials and verify that the user has the appropriate privileges set up in Security Center as described in section 5.1. Additionally, confirm that the prerequisite licensing and part numbers (GSC-1SDK-EvTrack-VM) are in place as outlined in section 4.2.
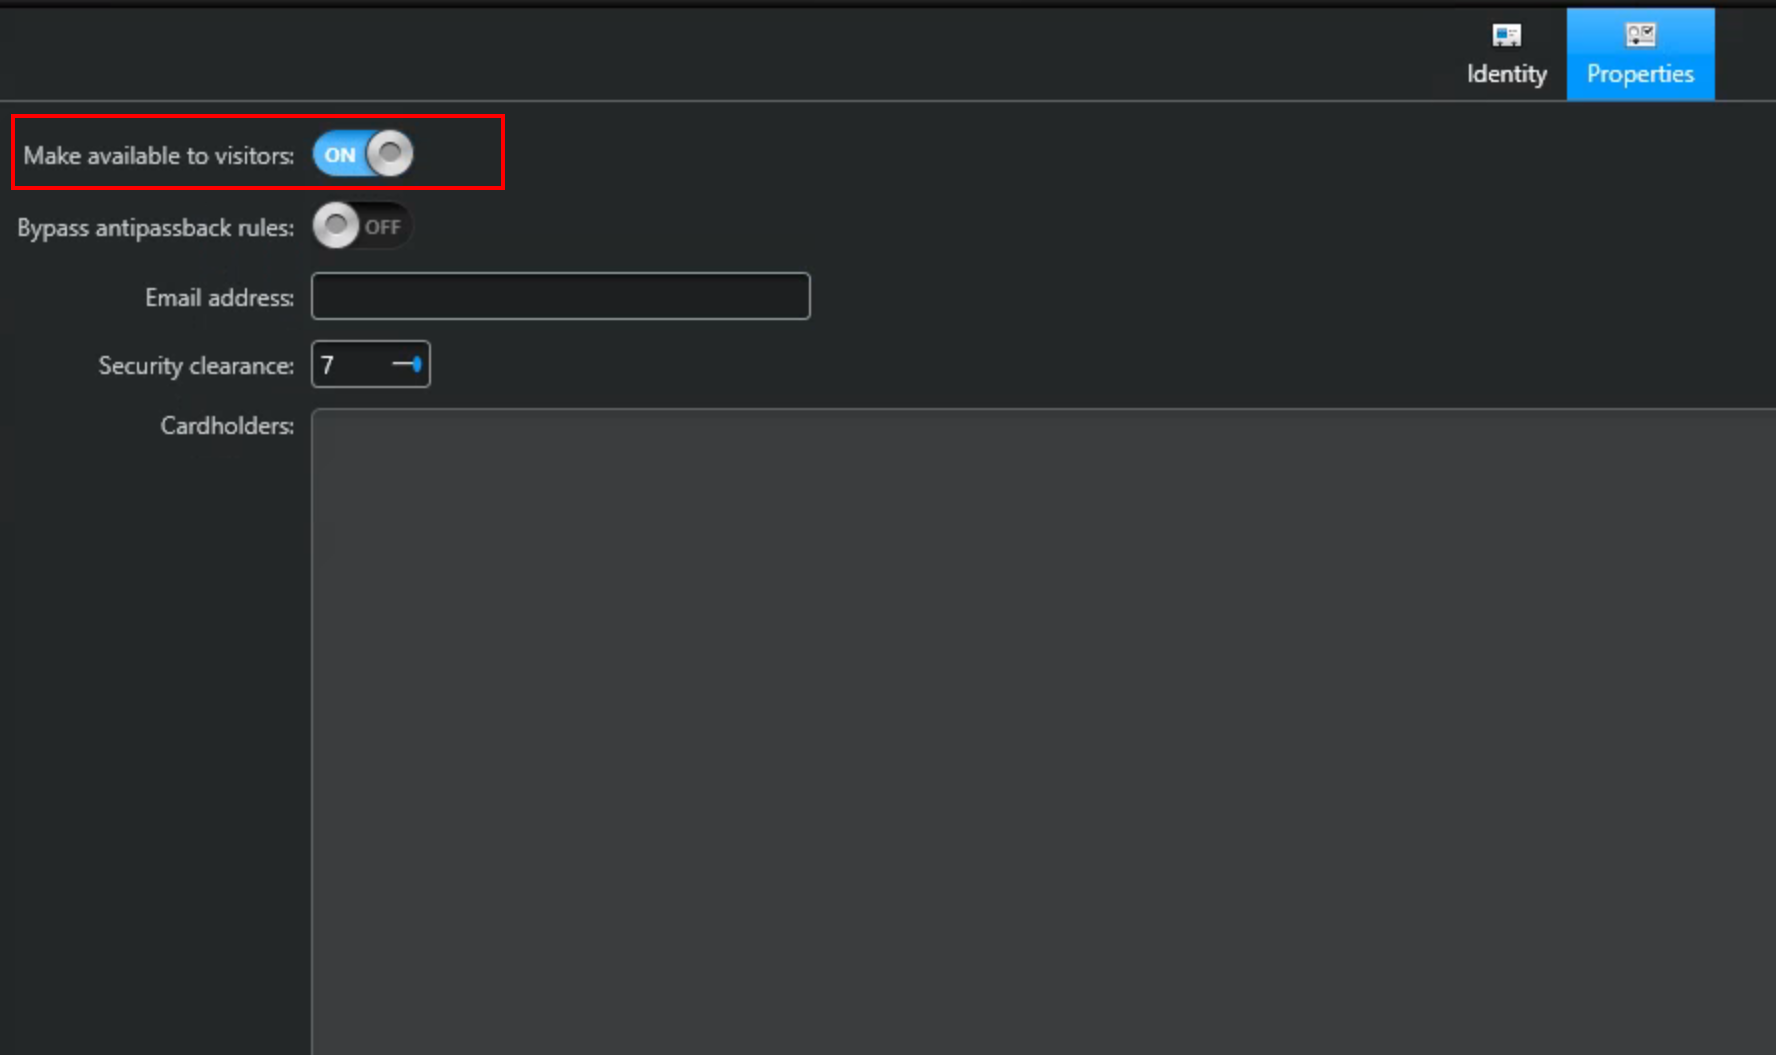
! If you intend to create a custom Genetec Card Holder group for visitors instead of using the built-in “Visitors” card holder group, please ensure that the “Make available to visitors” option is enabled (set to “ON”) for the new dedicated visitor card holder group.
! To use this configuration with SAFR, ensure that the EvTrack QR Code Security Format is set to 24 Bit mode, and the Wiegand Card Format should be set to Standard 26 Bits.
- Confirm Sucessfull Connection
7. Testing
-
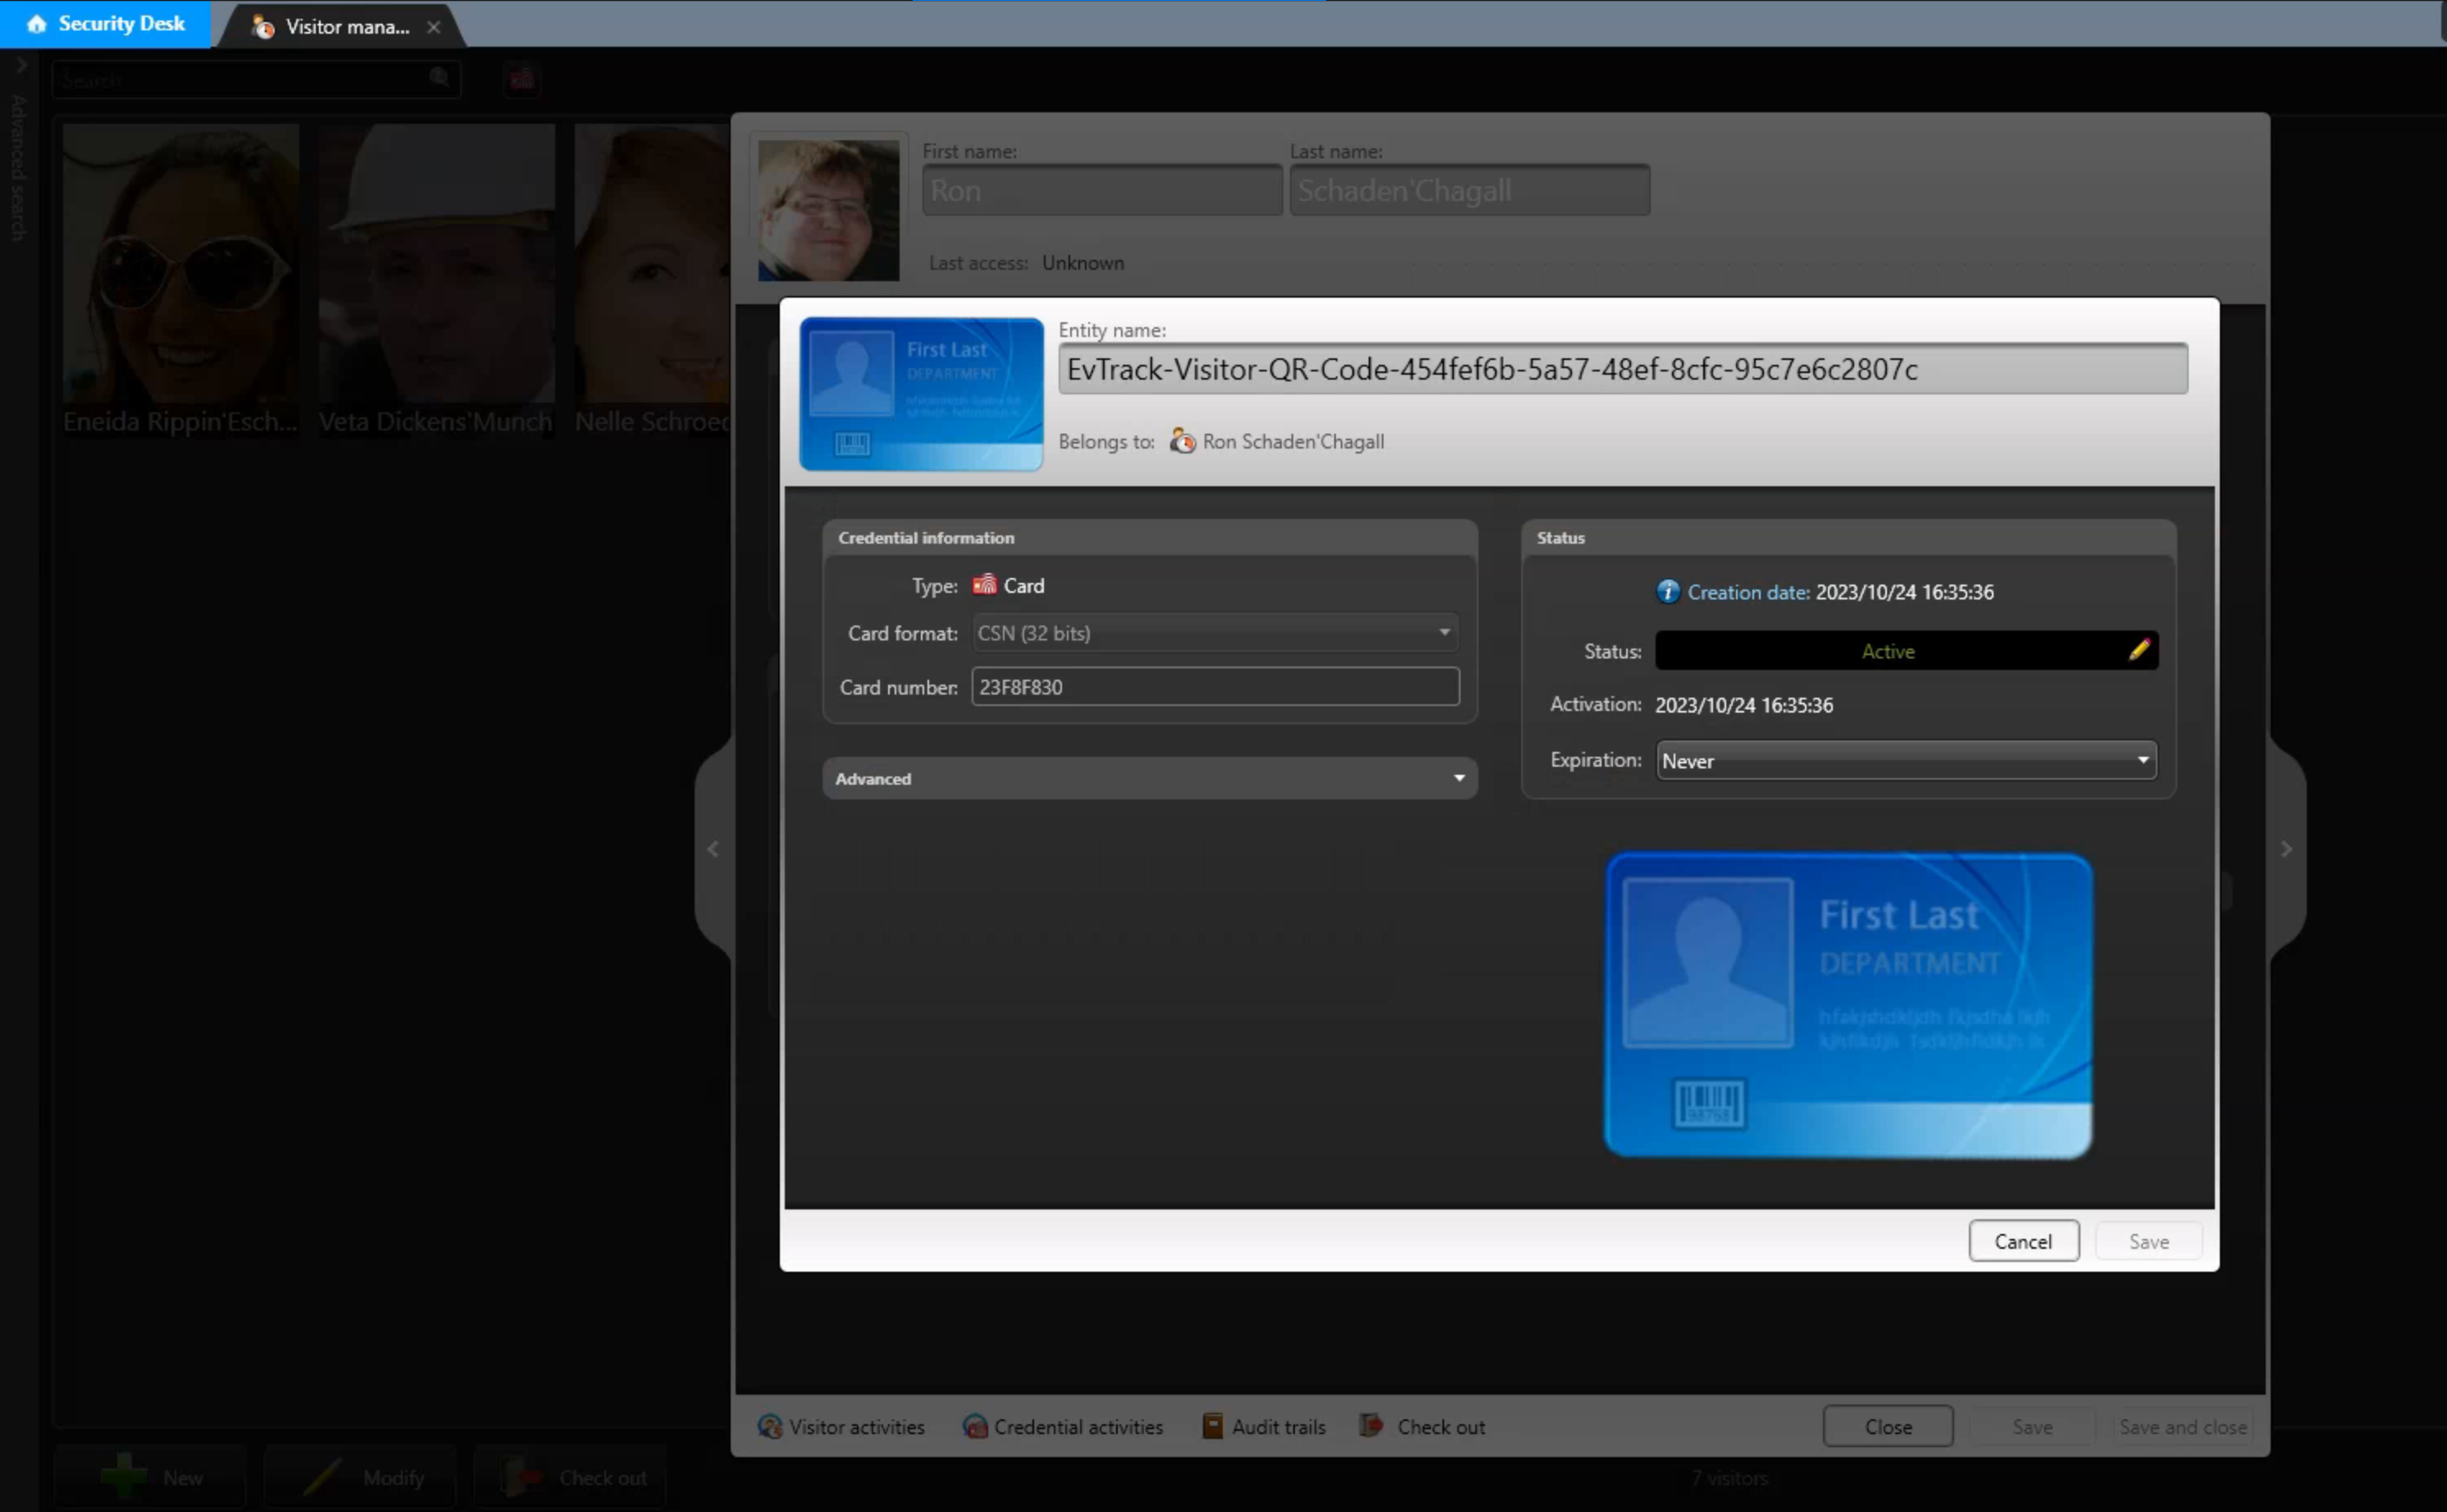
Check-IN Visitor via Kiosk or Guard Device and confirm that the visitor and credential is created in Genetec Security Center > Security Desk > Visitor Management:
-
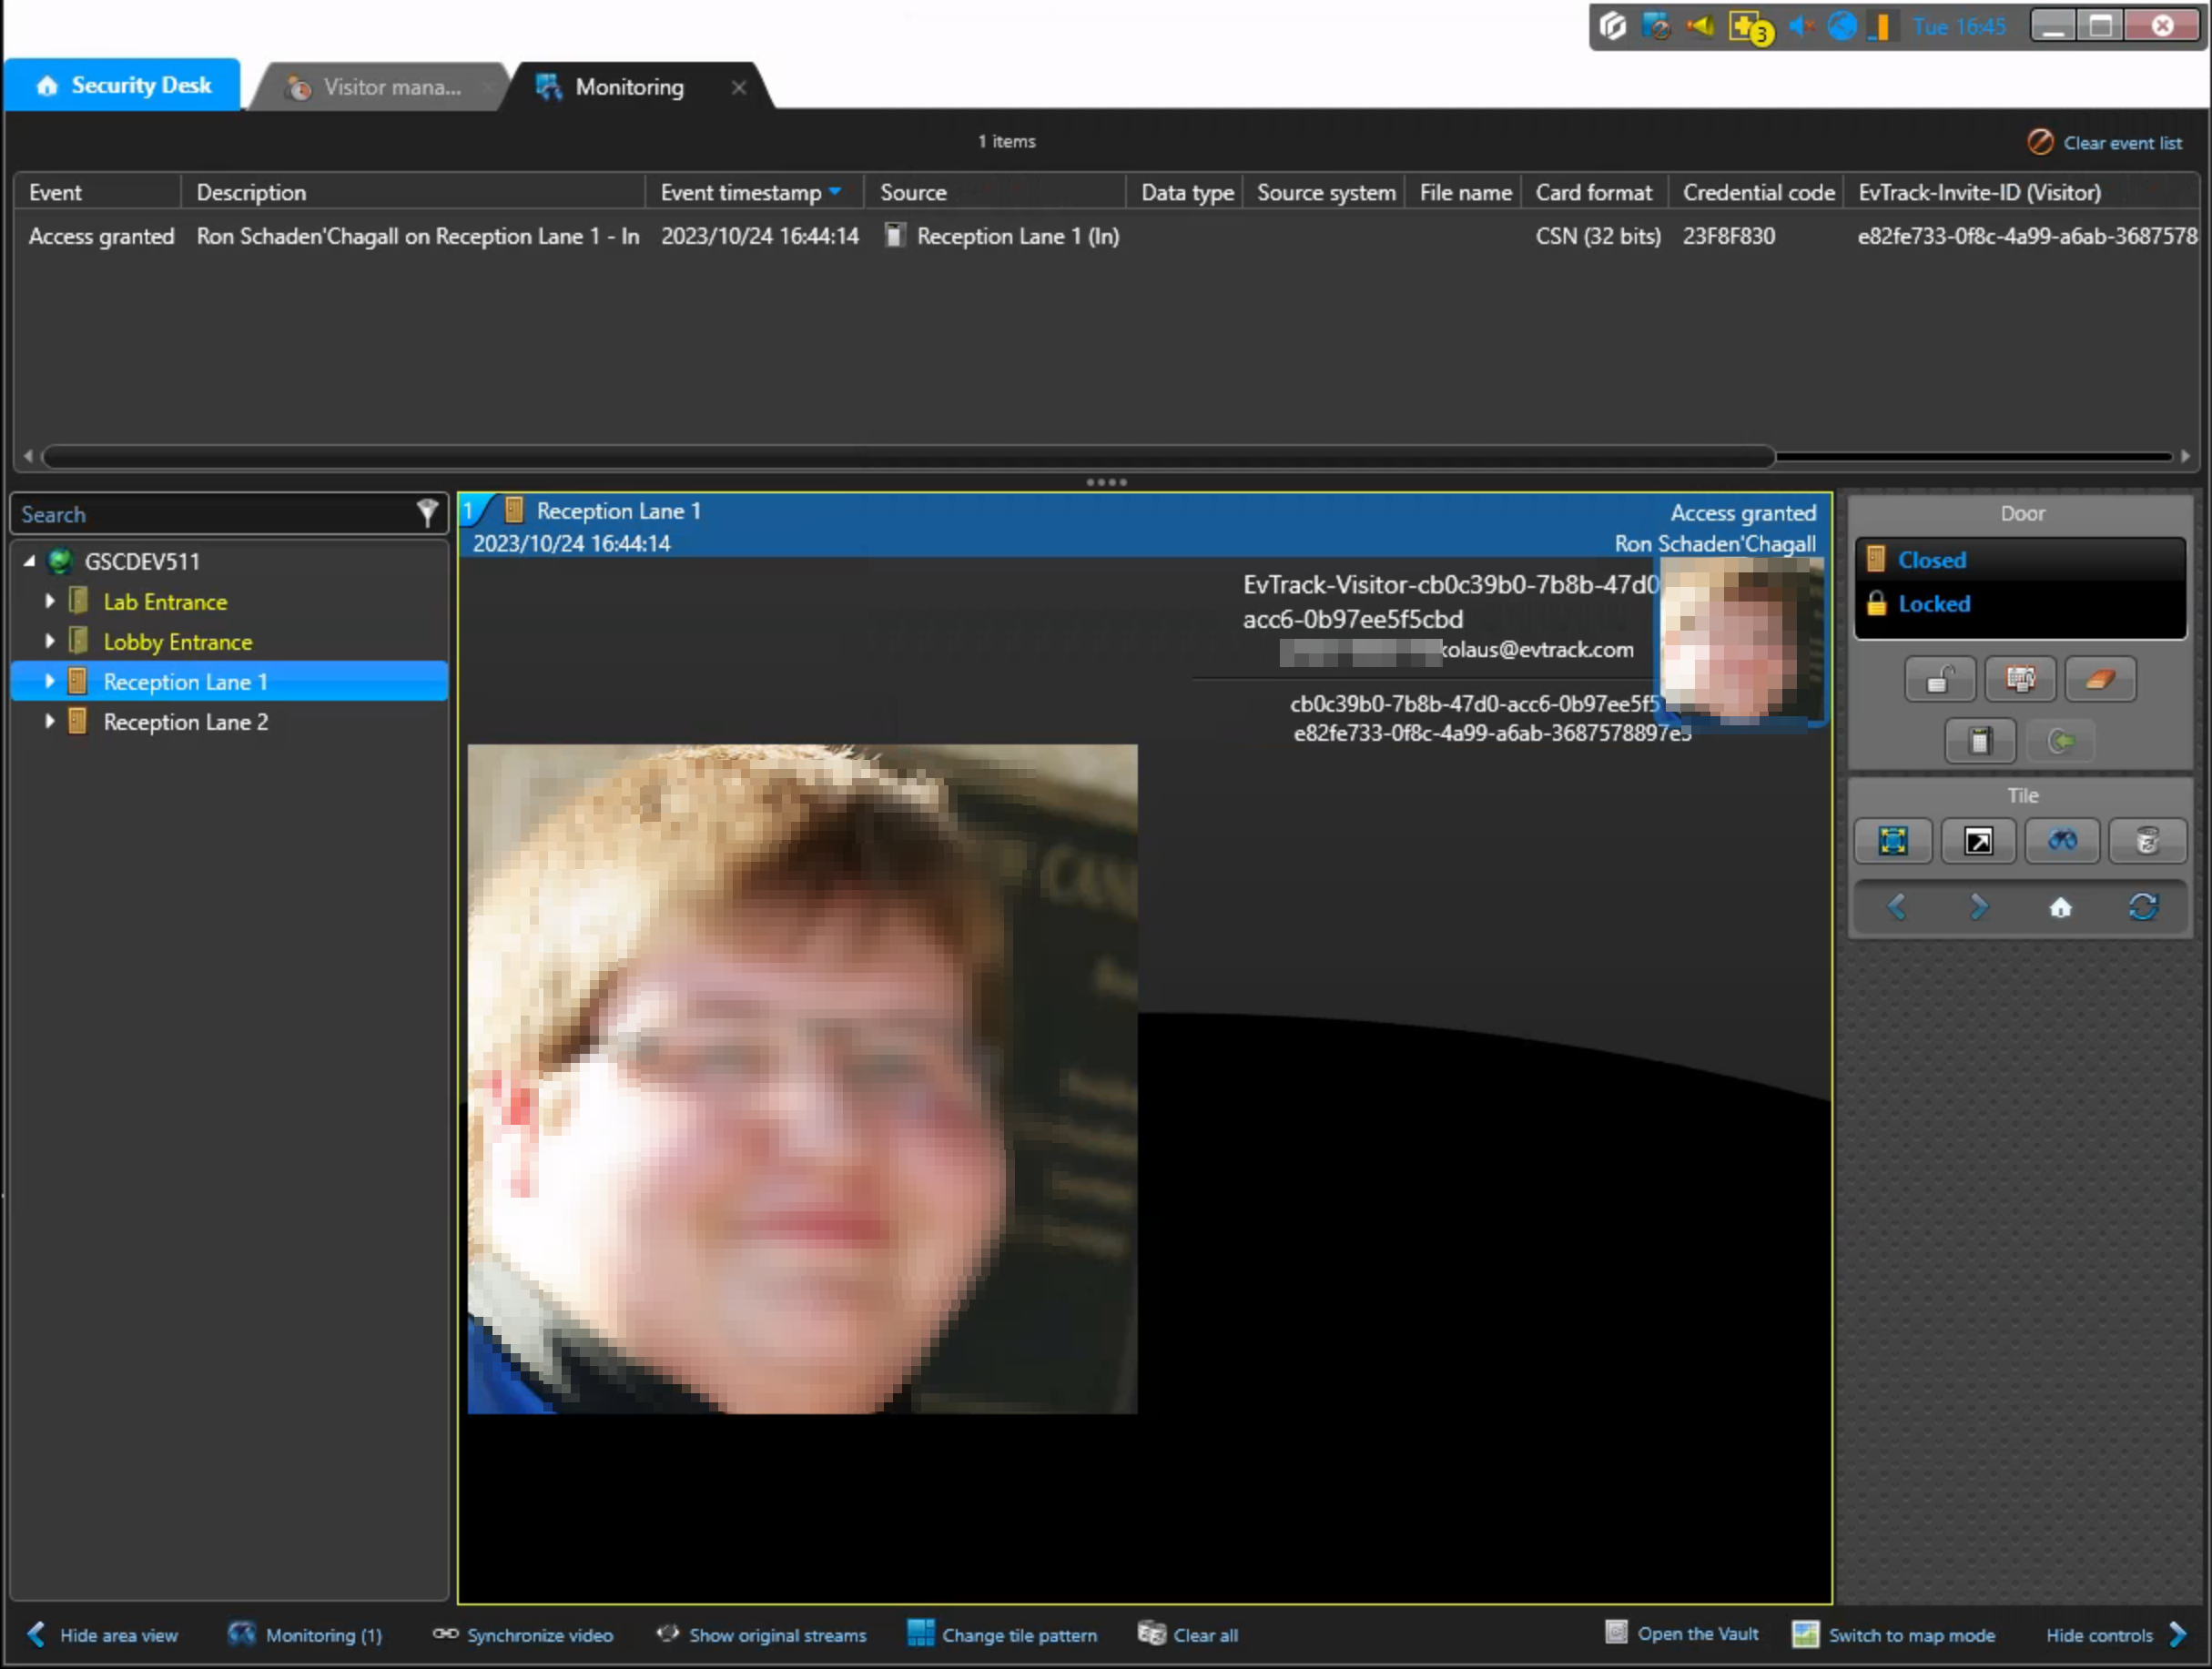
Scan the Visitor QR code (Badge or sent via Email/SMS/WhatsApp) using the EvTrack QR Code Reader to verify end-to-end functionality.
8. Troubleshooting
If you encounter issues during the integration and installation process, the following troubleshooting steps may help resolve common problems:
Issue 1: Username/Password Error
- Symptom: You receive a username or password error during the integration setup.
- Resolution:
- Double-check the credentials you entered in the “Set App Connection Details” section. Ensure that the username and password are correct.
- Verify that the user has the appropriate privileges set up in Genetec’s Security Center, as described in Section 5.1.
- Make sure that the prerequisites, including licensing and part numbers (GSC-1SDK-EvTrack-VM), are in place as outlined in Section 4.2.
Issue 2: Visitor Credentials Not Synced
- Symptom: Visitor credentials are not being synchronized with Genetec’s Security Center as expected.
- Resolution:
- Ensure that the “Create Temporary Credentials (QrCode/PIN)” option is checked if you want to generate temporary visitor credentials. If not checked, the system may use different credential management methods.
- Verify that the “Deactivate Visitor when checked out on EvTrack” option is enabled to ensure visitor access rights are automatically deactivated after check-out in EvTrack.
- If you have checked the “Only Checked IN Visitors will be synced” option, ensure that visitors have completed the check-in process in EvTrack for synchronization to occur.
Issue 3: WebSDK Inaccessibility
- Symptom: You cannot access the WebSDK.
- Resolution:
- Confirm that EvTrack is located on the same machine as the Genetec server. If not, ensure that the WebSDK is accessible by accessing it via the appropriate IP Address or DNS.
- If needed, configure the Windows firewall to permit TCP/4590 to allow WebSDK access.
For additional assistance or if the issue persists, reach out to your system administrator or technical support for both EvTrack and Genetec’s Security Center.
These troubleshooting steps aim to address common problems encountered during the integration process. If you encounter specific issues not covered here, EvTrack Support for further assistance.
Appendix A: Commission Check List
Section 1: Pre-Commissioning Checks
- [ ] Ensure that Genetec Security Center version is 5.8 or later.
- [ ] Verify the presence of the part number (GSC-1SDK-EvTrack-VM) in the Genetec license for EvTrack Visitor Management.
- [ ] Confirm that the Visitor Management Module is properly licensed, if applicable for GSC versions 5.8 through 5.10.
- [ ] Check that the Genetec WebSDK is supported under the license.
Section 2: Genetec Security Center Configuration
- [ ] Create an “evtrack” user with the specified privileges.
- [ ] Add the WebSDK role and confirm its functionality.
- [ ] Ensure that the WebSDK is accessible, either via the localhost or the appropriate IP Address/DNS.
- [ ] Optional: Configure the Windows firewall to permit TCP/4590.
Section 3: EvTrack Configuration
- [ ] Add EvTrack as an application in the Genetec Security Center.
- [ ] Configure App Connection Details, including Remote WebSDK URL, WebSDK Username, WebSDK Password, and Default Visitor Card Holder Group.
- [ ] Confirm a successful connection to Genetec Security Center.
Section 4: End-to-End Testing
- [ ] Check in a visitor via EvTrack Kiosk or Guard Device and verify that the visitor and credential are created in Genetec Security Center’s Visitor Management.
- [ ] Scan the Visitor QR code (Badge or sent via Email/SMS/WhatsApp) using the EvTrack QR Code Reader to ensure end-to-end functionality.
Appendix B: EvTrack QR Code Reader
-
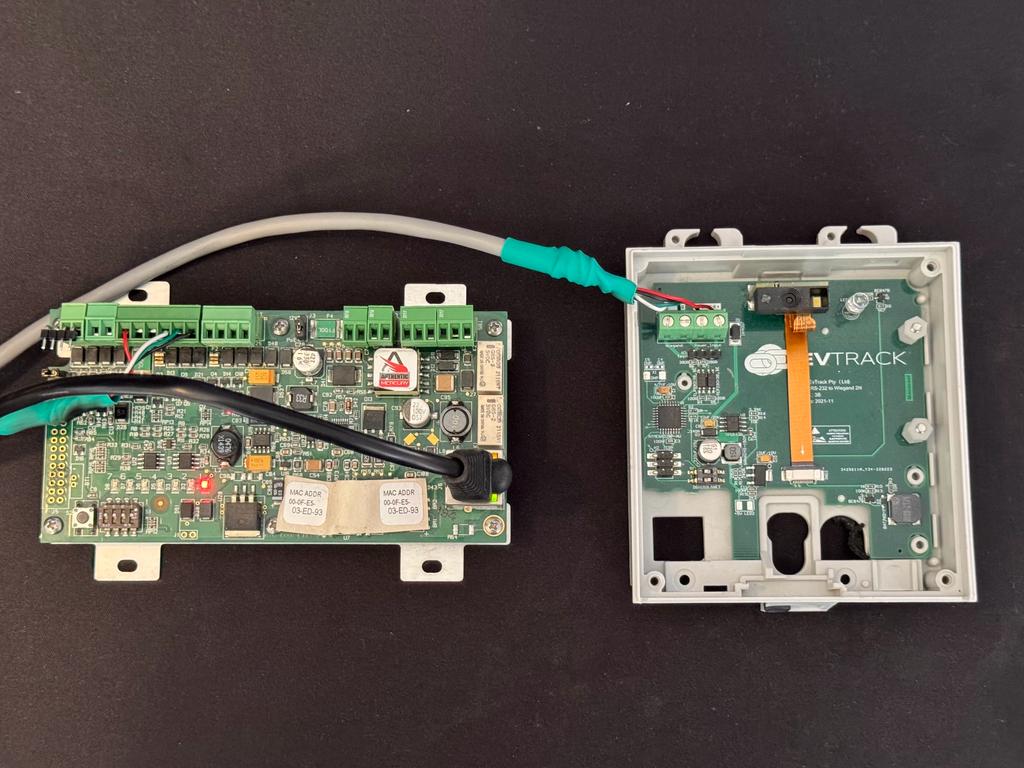
Connection Overview
-
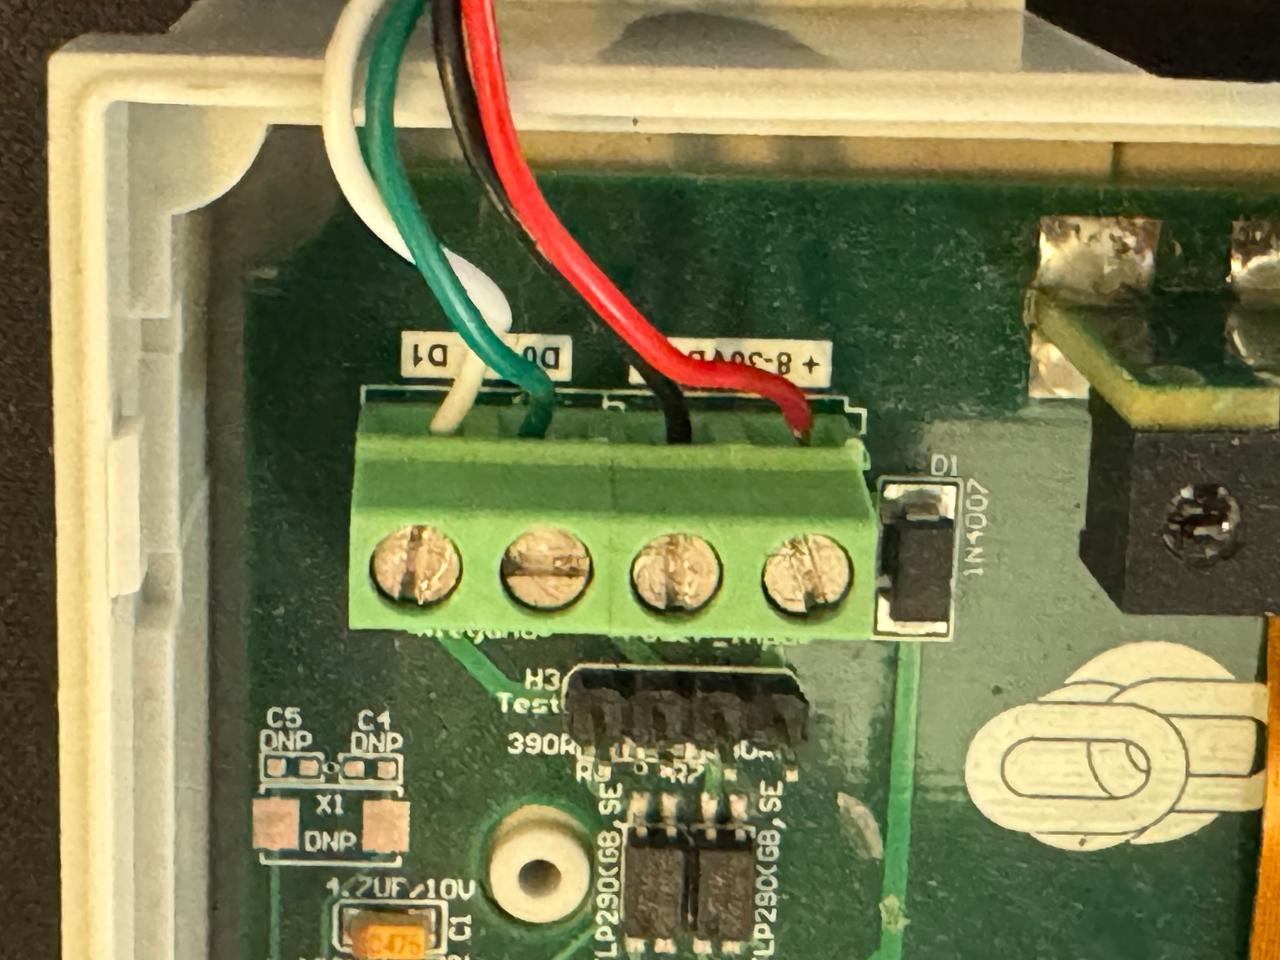
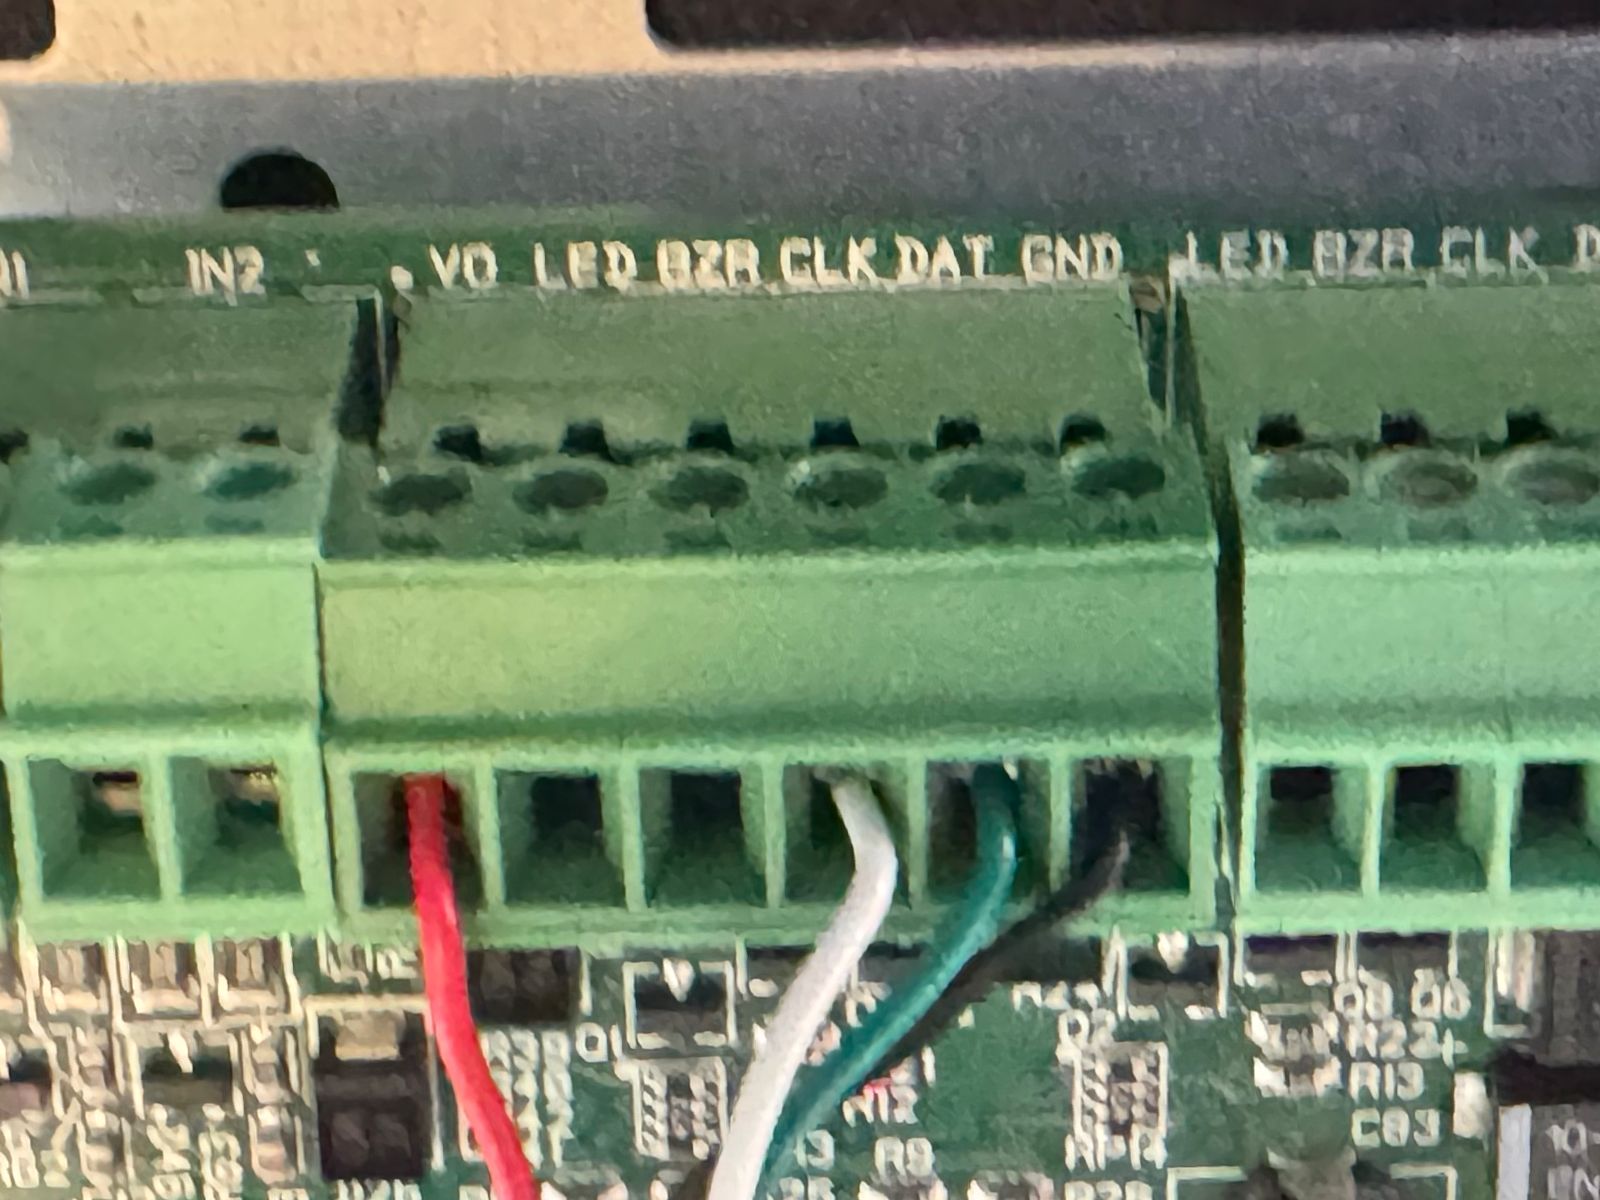
Mecury Wiegand Connection
-
EvTrack Qr Code Reader Connection