This quickstart takes a new site from zero to a working check-in point: a FrontDesk kiosk for visitor self check-in, a Guard app device for staff at the checkpoint, and the default access control list that makes credentials work.
Before you start you need:
- An operator account with device and access control permissions.
- An Android tablet for the kiosk and an Android handset for the guard, both on a network that can reach your EvTrack server.
- The clock on the kiosk tablet within one minute of the server clock. Pairing compares the two and refuses if they are more than 60 seconds apart, so set this up before you go near the tablet: switch on Settings > System > Date & time > Set time automatically on the tablet, confirm the server’s own clock is synchronised, and allow outbound NTP (UDP port 123) from the tablet’s network. This is the single most common reason a kiosk will not pair. Full detail is in FrontDesk Troubleshooting.
Everything else starts from an empty system.
The order matters: create the device record first, install the app from that record’s Downloads panel, then pair the app using the device key. Steps 1 to 6 do that for the kiosk, Steps 7 and 8 for the guard.
Step 1: Create the kiosk device
Open Configuration in the sidebar, select Access Control Settings, click Devices, then click Add and choose the EvTrack FrontDesk device type. Give the device a name (for example “Reception Kiosk”). The form generates the Device Key, which is the pairing secret the kiosk app will ask for. Click Save.
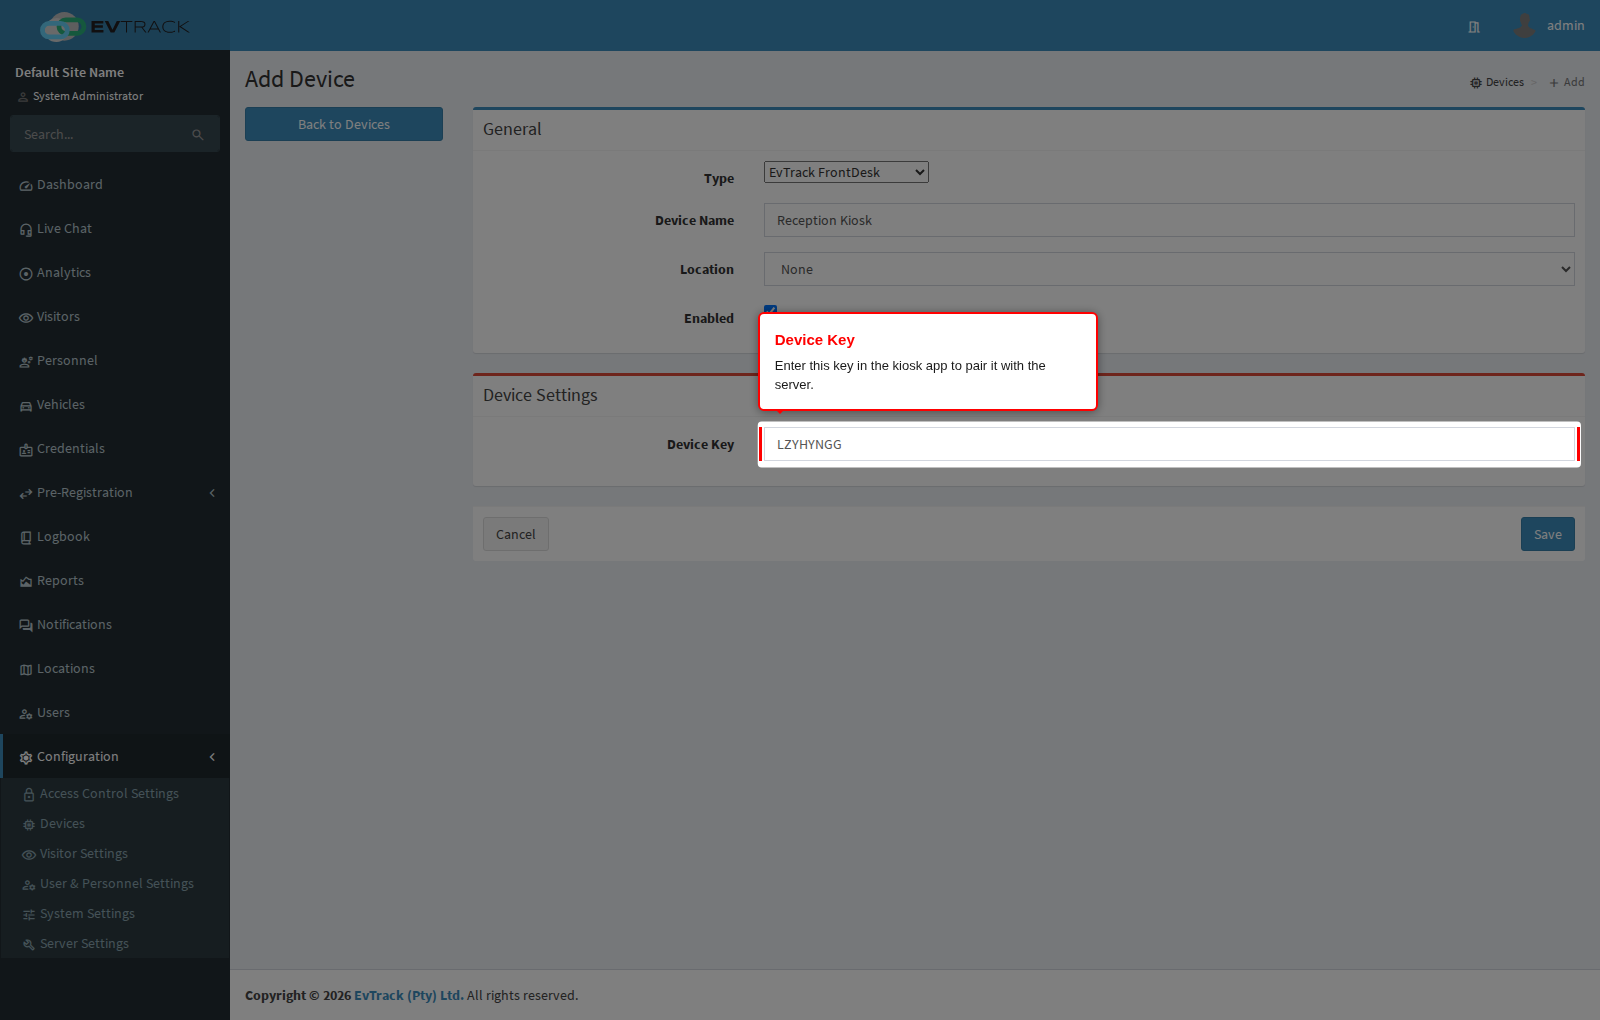
End state: the device is saved and its record opens.
Step 2: Open the saved kiosk device record
Everything else in this section happens on the device record. If you navigated away, open Configuration > Access Control Settings > Devices and click the “Reception Kiosk” row. The record opens on the Status panel, which summarises the device: its type, whether it is enabled, and the device key you will type into the app.
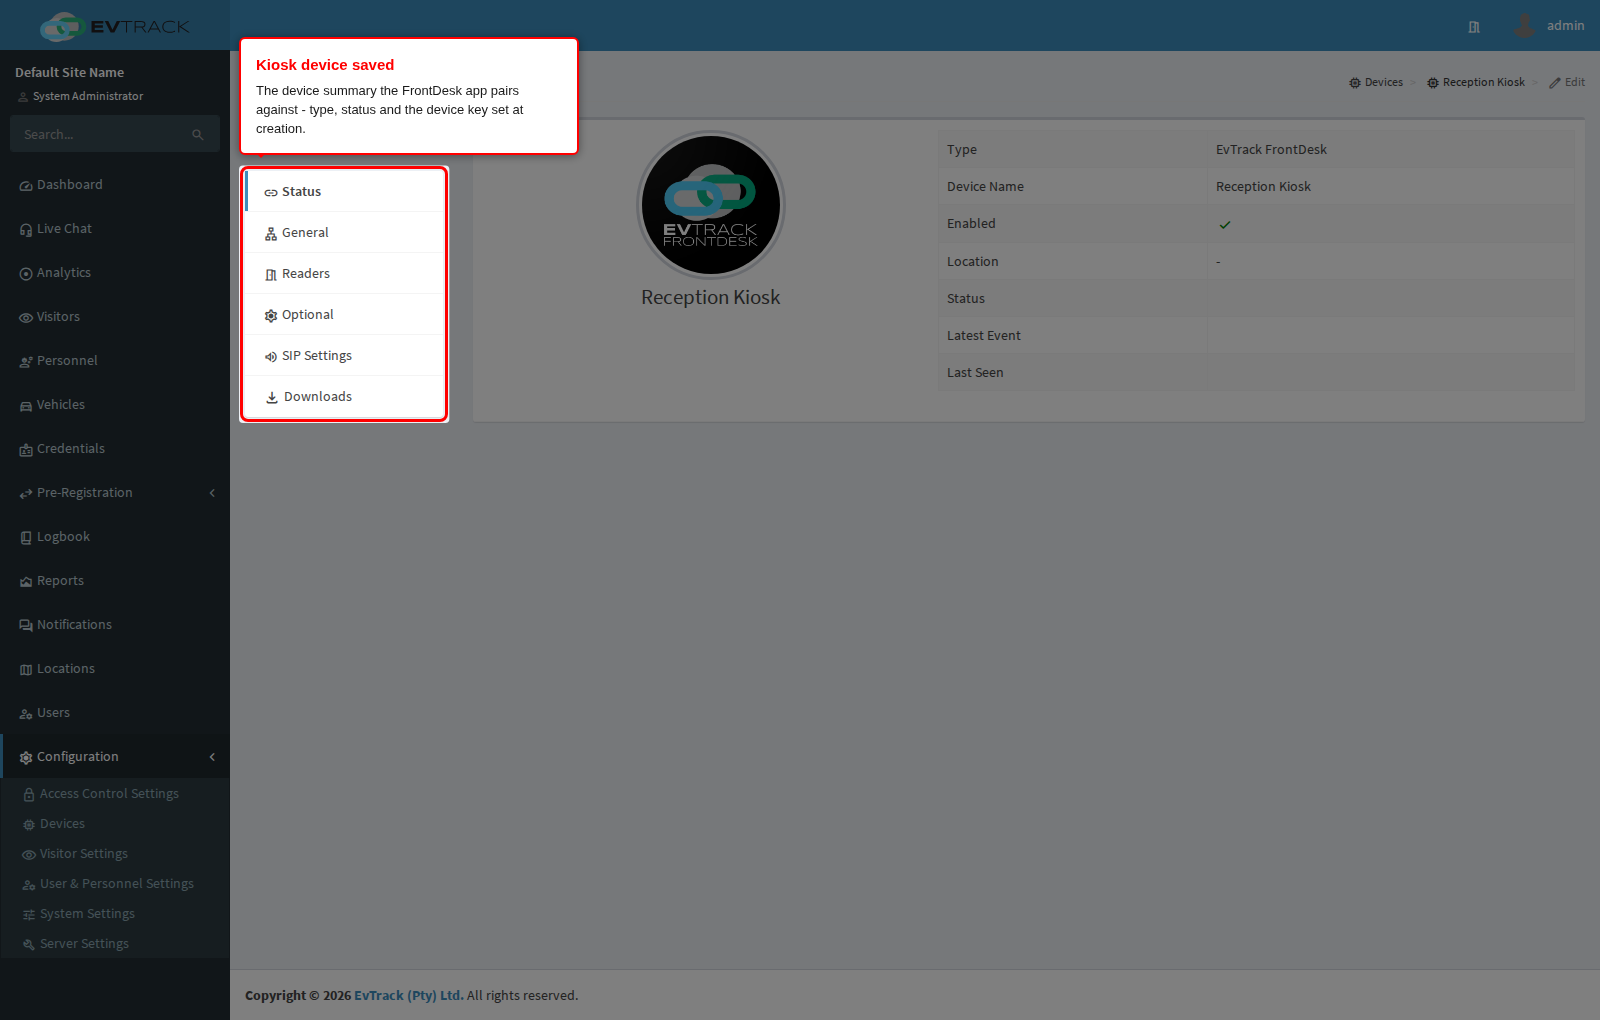
End state: you can read the device key from the summary. Keep this page open for Steps 3 to 6.
Step 3: Open the Downloads panel
Click Downloads in the menu on the left of the device record. The panel loads the current app packages the first time you open it, so allow a moment for the list to appear.
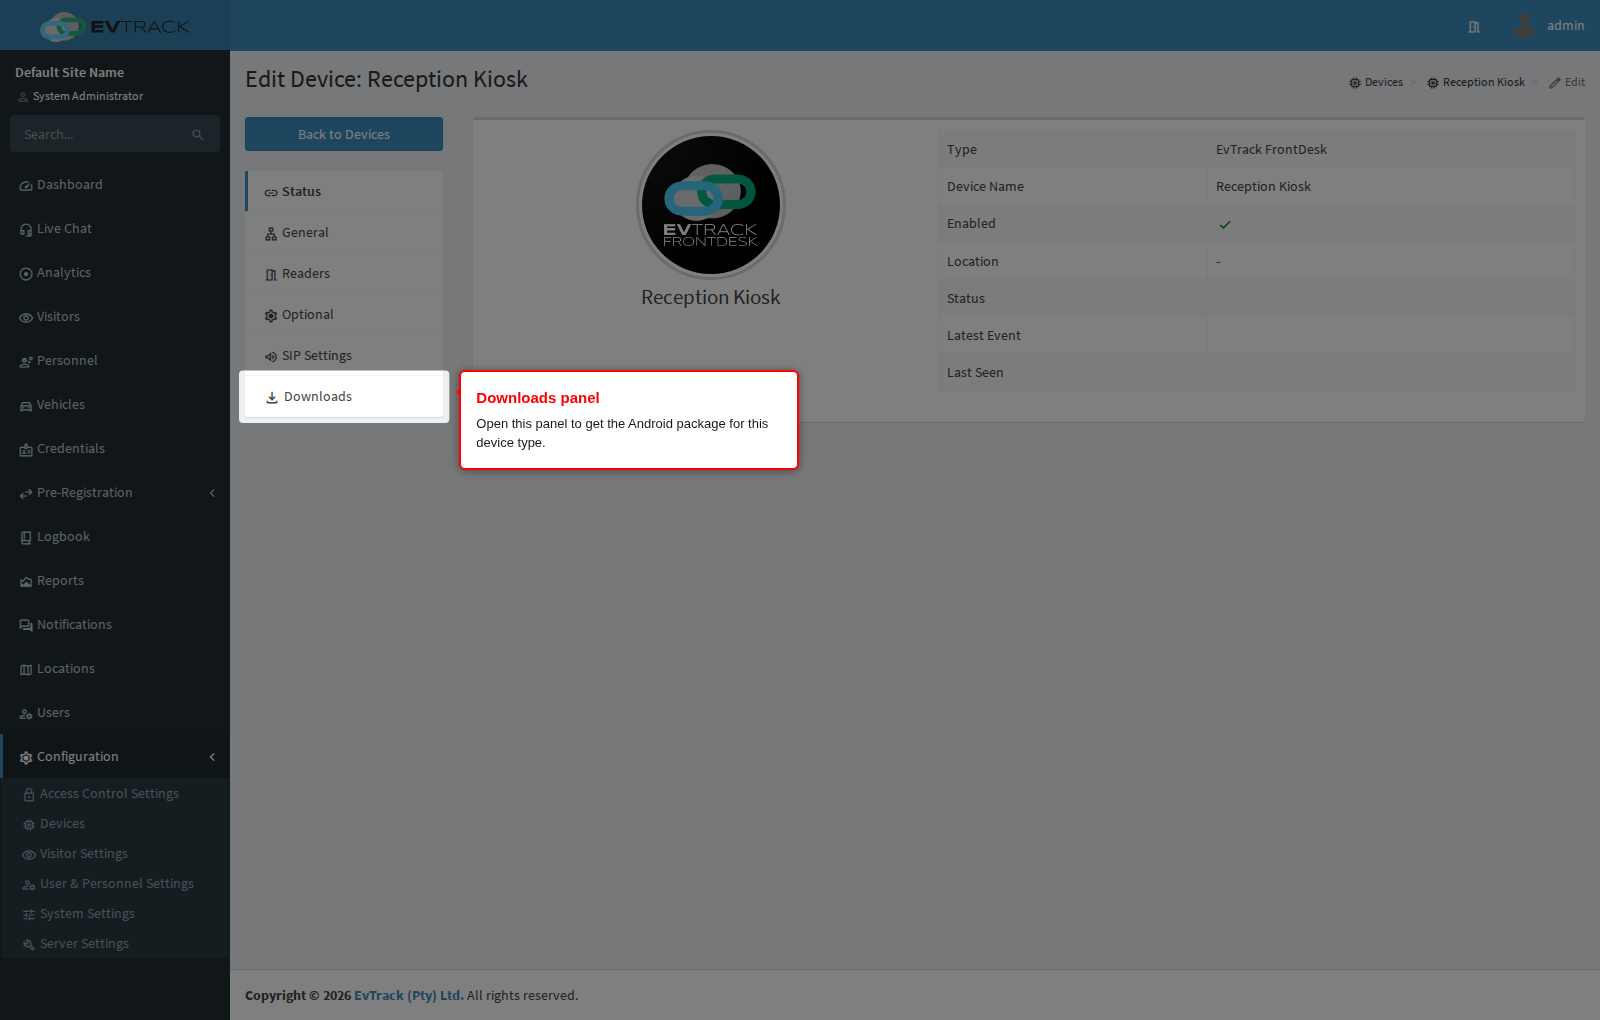
End state: the Downloads panel lists the app packages that apply to this device type. A kiosk device offers EvTrack FrontDesk (Kiosk) and EvTrack FrontDesk Emirates ID (Kiosk). A guard device offers a different set, covered in Step 8.
The Downloads panel fetches its version list from the licensing portal through this server, using the installed license. If the server has no outbound internet access, or no valid license is installed, the panel shows a clear message explaining what is wrong and offers a Refresh button to try again. In that case download the packages on a machine that does have internet access and transfer them to the tablet over USB.
Step 4: Choose the app and the release channel
Each app is shown in its own box with one row per release channel:
- Latest Releases with a Download button - the stable build. Use this unless you have been asked to do otherwise.
- Beta Releases with a Beta button - an early build for testing new behaviour. Do not run beta builds on a live reception desk.
Use EvTrack FrontDesk (Kiosk) for a normal visitor kiosk. Use EvTrack FrontDesk Emirates ID (Kiosk) only where the kiosk has an Emirates ID reader attached and must read those cards.
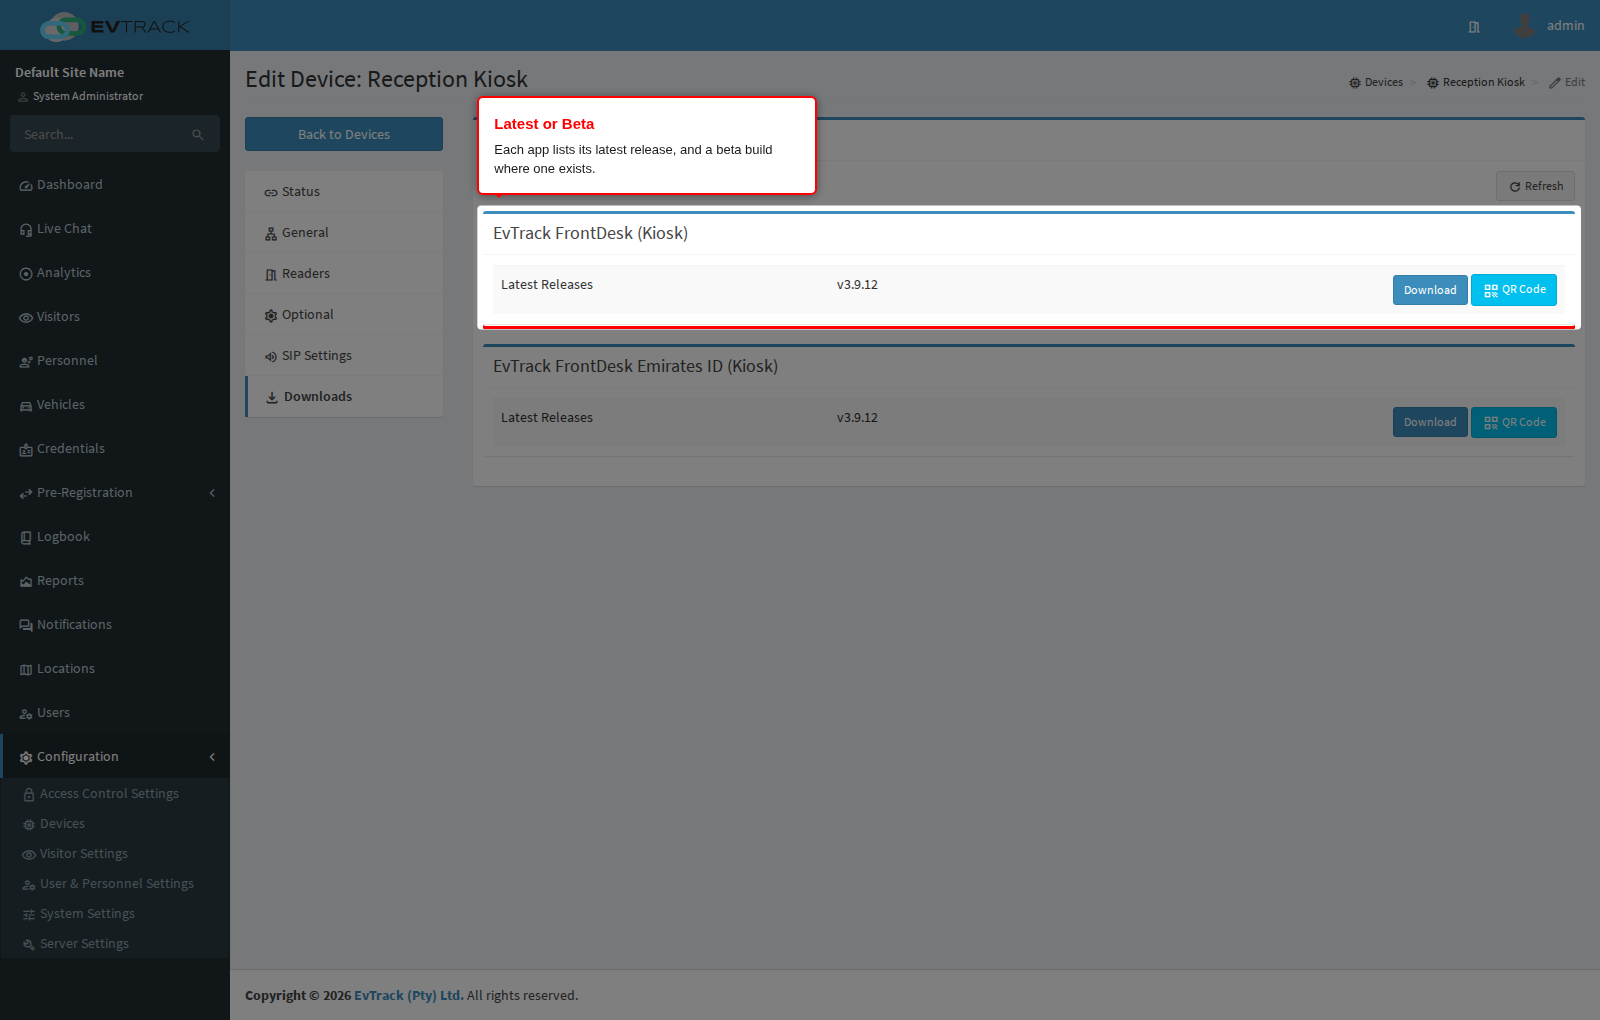
End state: you know which app and which channel you want. The version number next to each button is the build you are about to install (the numbers in these examples will differ from what your system shows).
Step 5: Install the app on the tablet
Clicking Download or Beta downloads the package to the computer you are working on, which is useful when you plan to transfer it by USB. The quicker route is to install straight onto the tablet: click the QR Code button on the row you chose.
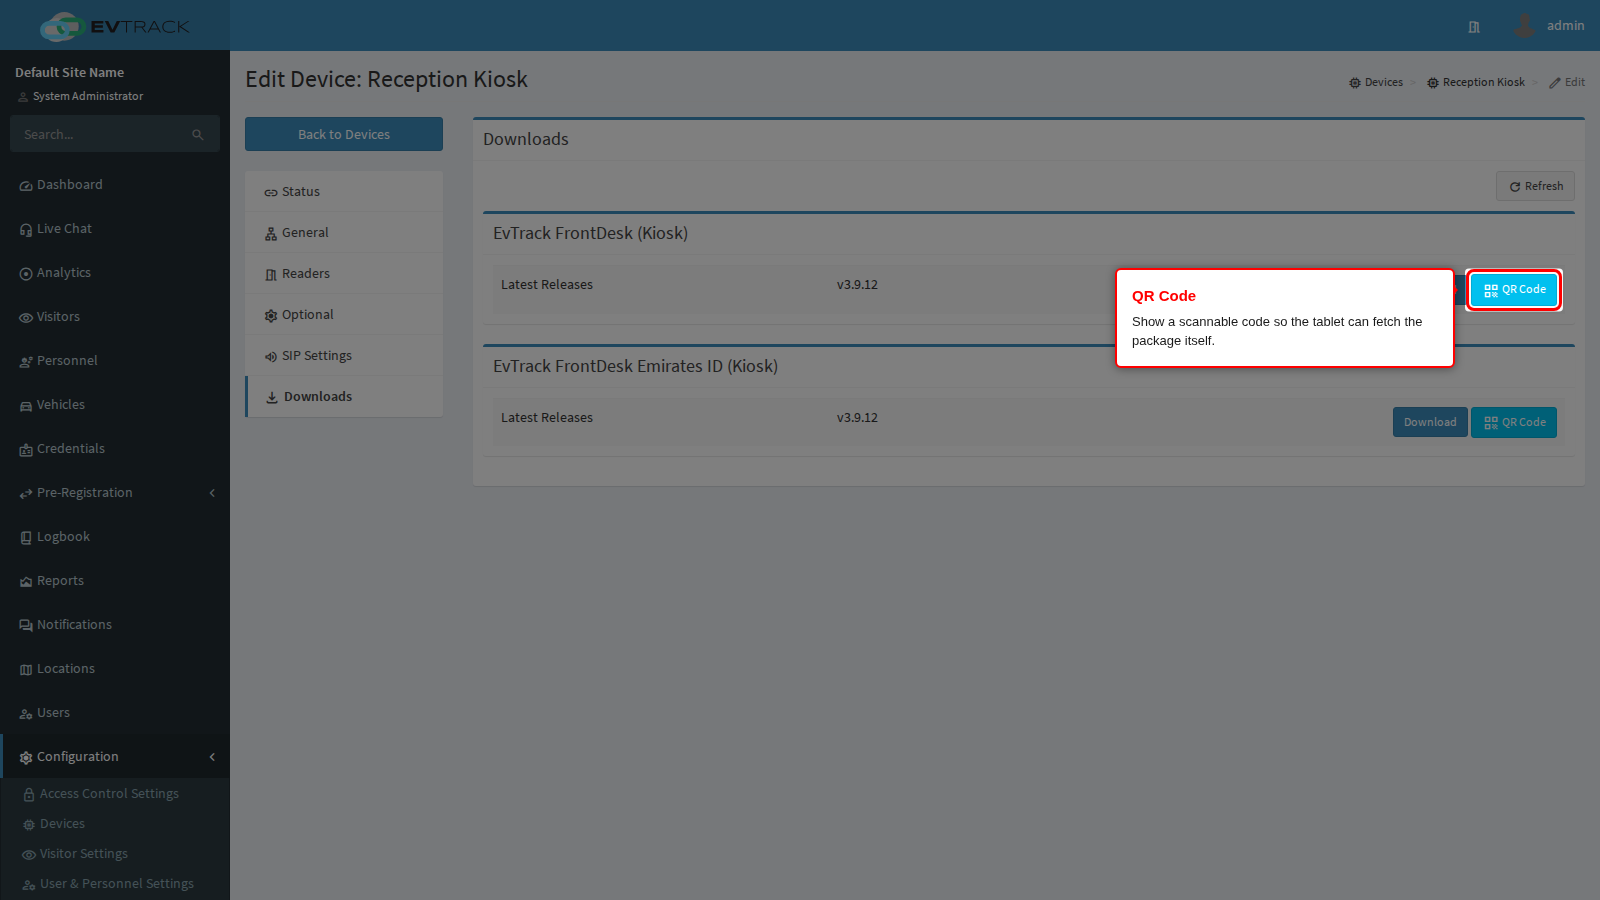
A dialog opens showing a scannable code for that exact package. Point the camera of the tablet or handset at the code, open the link it offers, and the device downloads the package itself. No URL has to be typed. Click Close when the download has started.
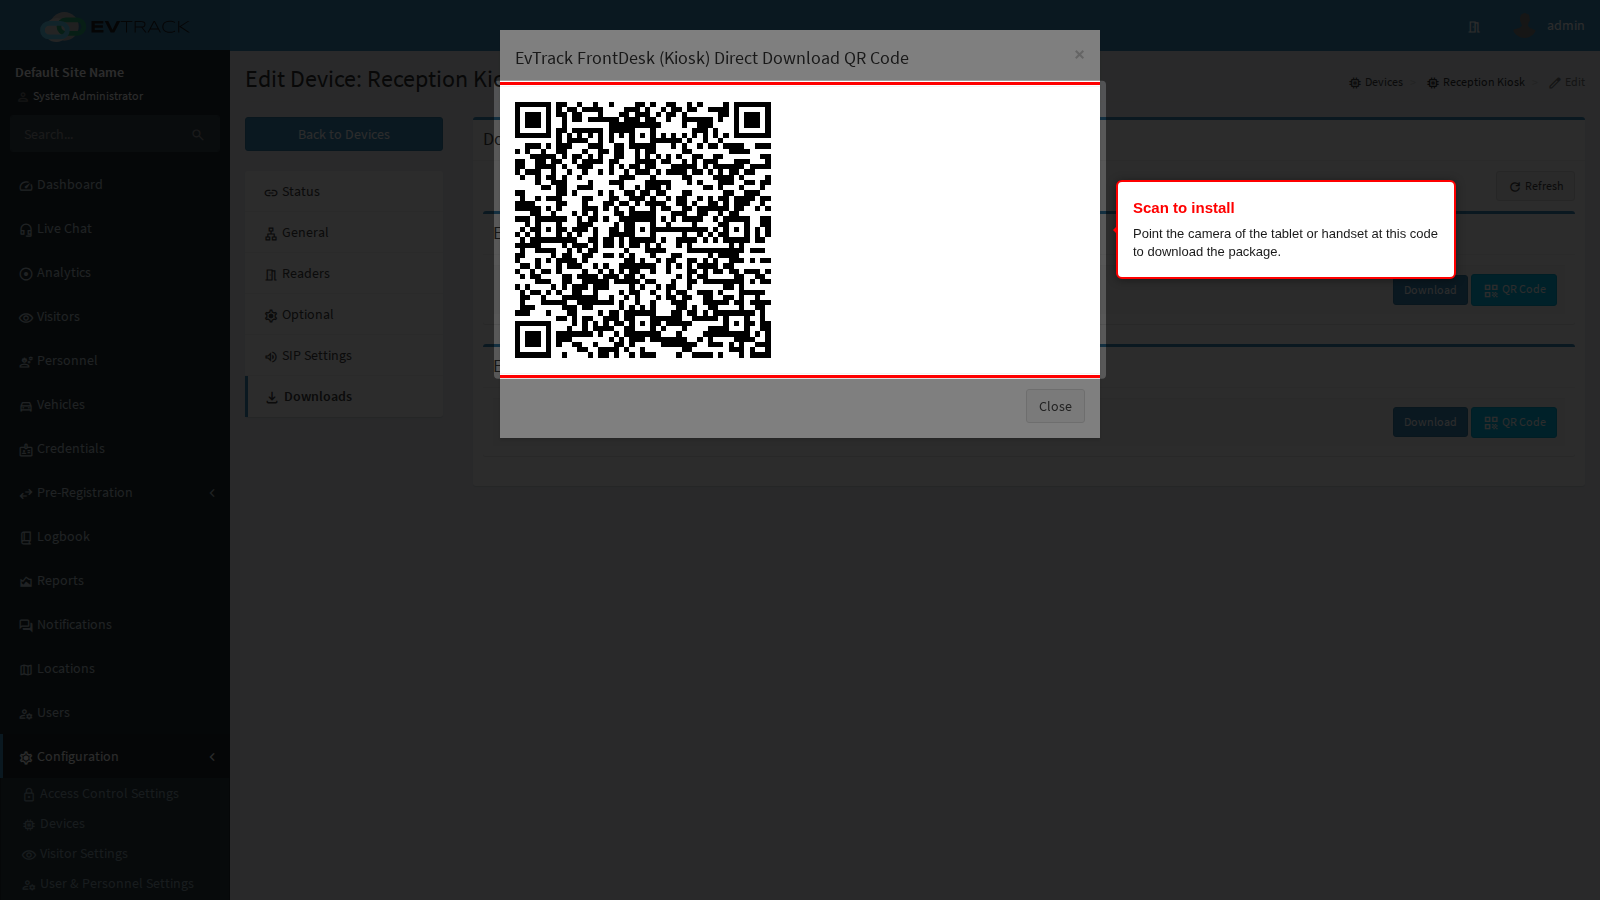
Android blocks packages that did not come from the Play Store until you allow it. When the tablet warns that it cannot install the file, open the permission prompt it offers (or Settings > Apps > Special app access > Install unknown apps) and allow installation for the browser or file manager that downloaded the package, then run the install again. Grant the camera and storage permissions the app asks for on first start.
End state: the EvTrack FrontDesk app is installed on the tablet and opens to its pairing screen.
Step 6: Pair the kiosk app
On first start the app asks for your server address and a device key. Enter the address of your EvTrack server and the Device Key from the device record in Step 2, then tap Pair Device. Pin the app to the screen (kiosk mode) so visitors cannot leave it.
If your server uses a self-signed certificate, a certificate from your own internal authority, or you reach it by an address the certificate was not issued for, pairing fails until you switch on INSECURE SSL under the device key. Read Insecure SSL and Certificate Pinning before you do - it changes what happens when your certificate is later renewed, and it makes the network you pair on security-relevant.
If pairing fails with a message about the server configuration and timezone settings, the tablet’s clock is more than 60 seconds away from the server’s. Despite what the message says, the timezone is not the problem and changing it will not help: the two sides compare the actual moment in time, so a tablet in a different timezone pairs perfectly well as long as its clock is right. Compare the time shown on the tablet with the time shown on the server, to the second, and correct whichever one is wrong. See FrontDesk Troubleshooting.
End state: the device record shows the kiosk as connected, and pairing automatically creates a CHECK_POINT access control point for it with two virtual readers, Input 1 (IN) and Input 2 (OUT), which record self check-ins and check-outs.
Note: kiosk behaviour (fields, camera, agreements, lockdown) is configured under Visitor Settings > Kiosk - see Kiosk.
Step 7: Create the guard device
Go back to Configuration > Access Control Settings > Devices, click Add and choose the EvTrack Guard type. Name it (for example “Checkpoint Guard”) and give it the handset’s network address.
The form also asks for the Device Reported UID, the identifier the Guard app displays on the handset. If you do not have the app installed yet, leave this blank for now, save, and come back to it after Step 8.
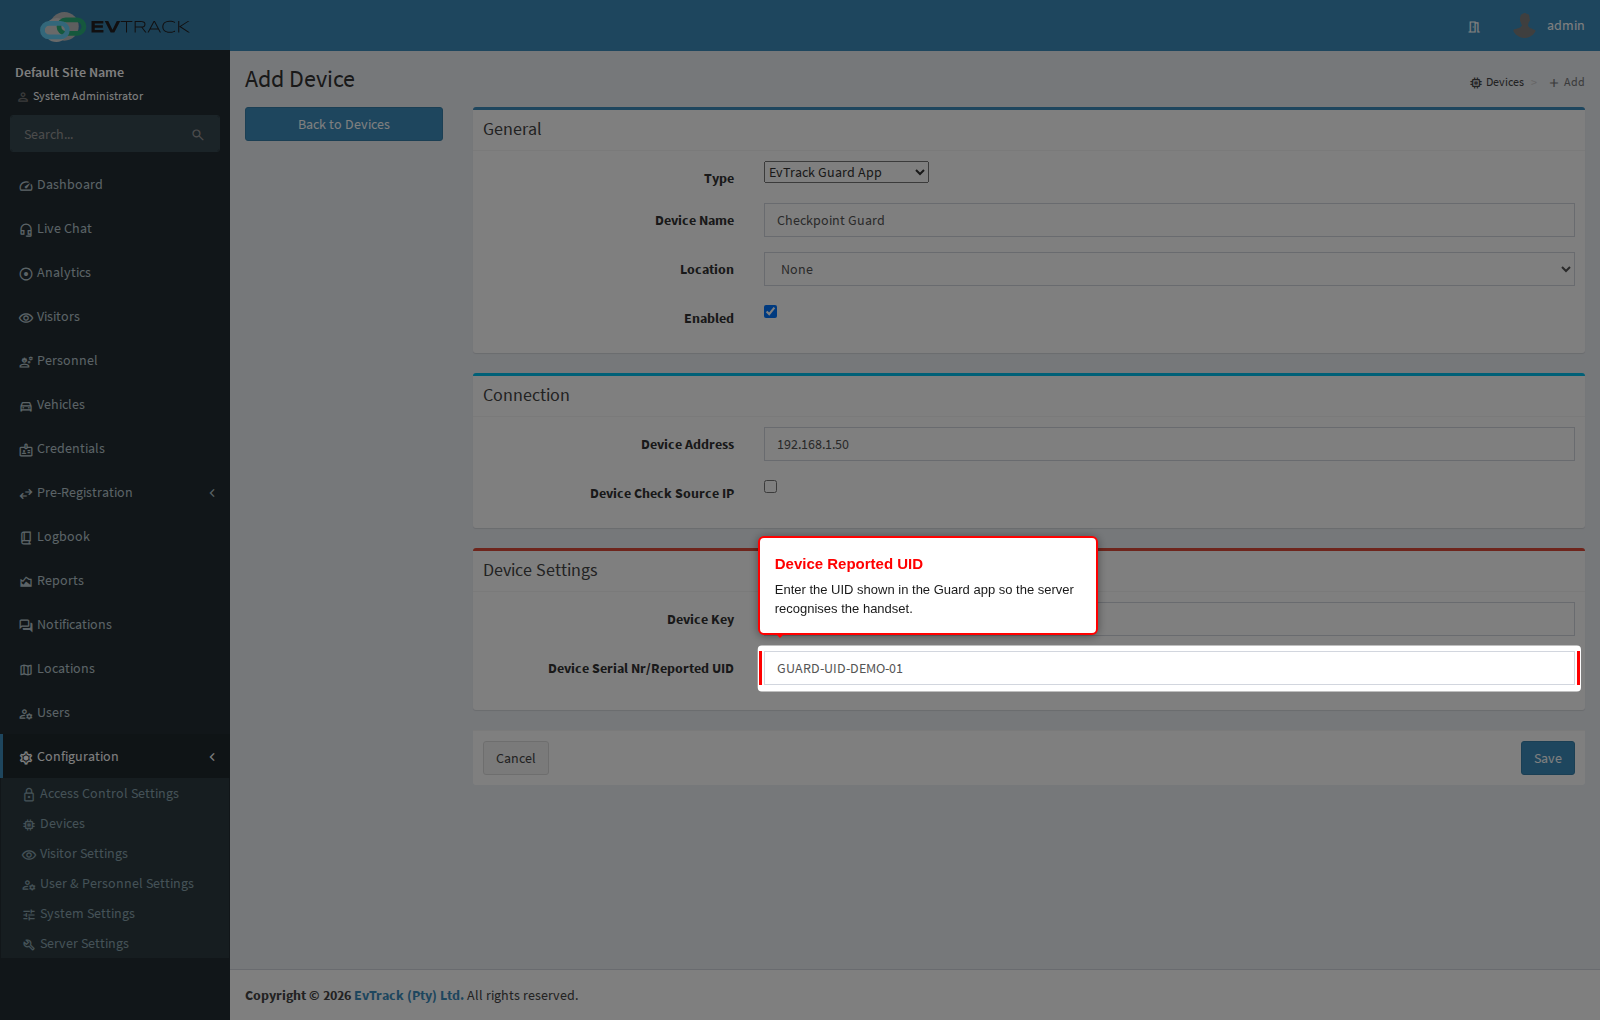
End state: the guard device record exists, which is what you need to reach its Downloads panel.
Step 8: Download and install the Guard app
Open the guard device’s record, click Downloads in its menu, and install the package the same way as in Steps 4 and 5: Download or Beta for a manual transfer, QR Code to install straight onto the handset, and allow installation from unknown sources on the handset before the install will run.
A guard device offers two packages:
- EvTrack Guard - the app the officer uses to scan passes and verify visitors. This is the one you need.
- EvTrack EidaService - a companion package that reads Emirates ID cards, matching the Emirates ID kiosk build.
Install the companion package only where the site actually uses those readers.
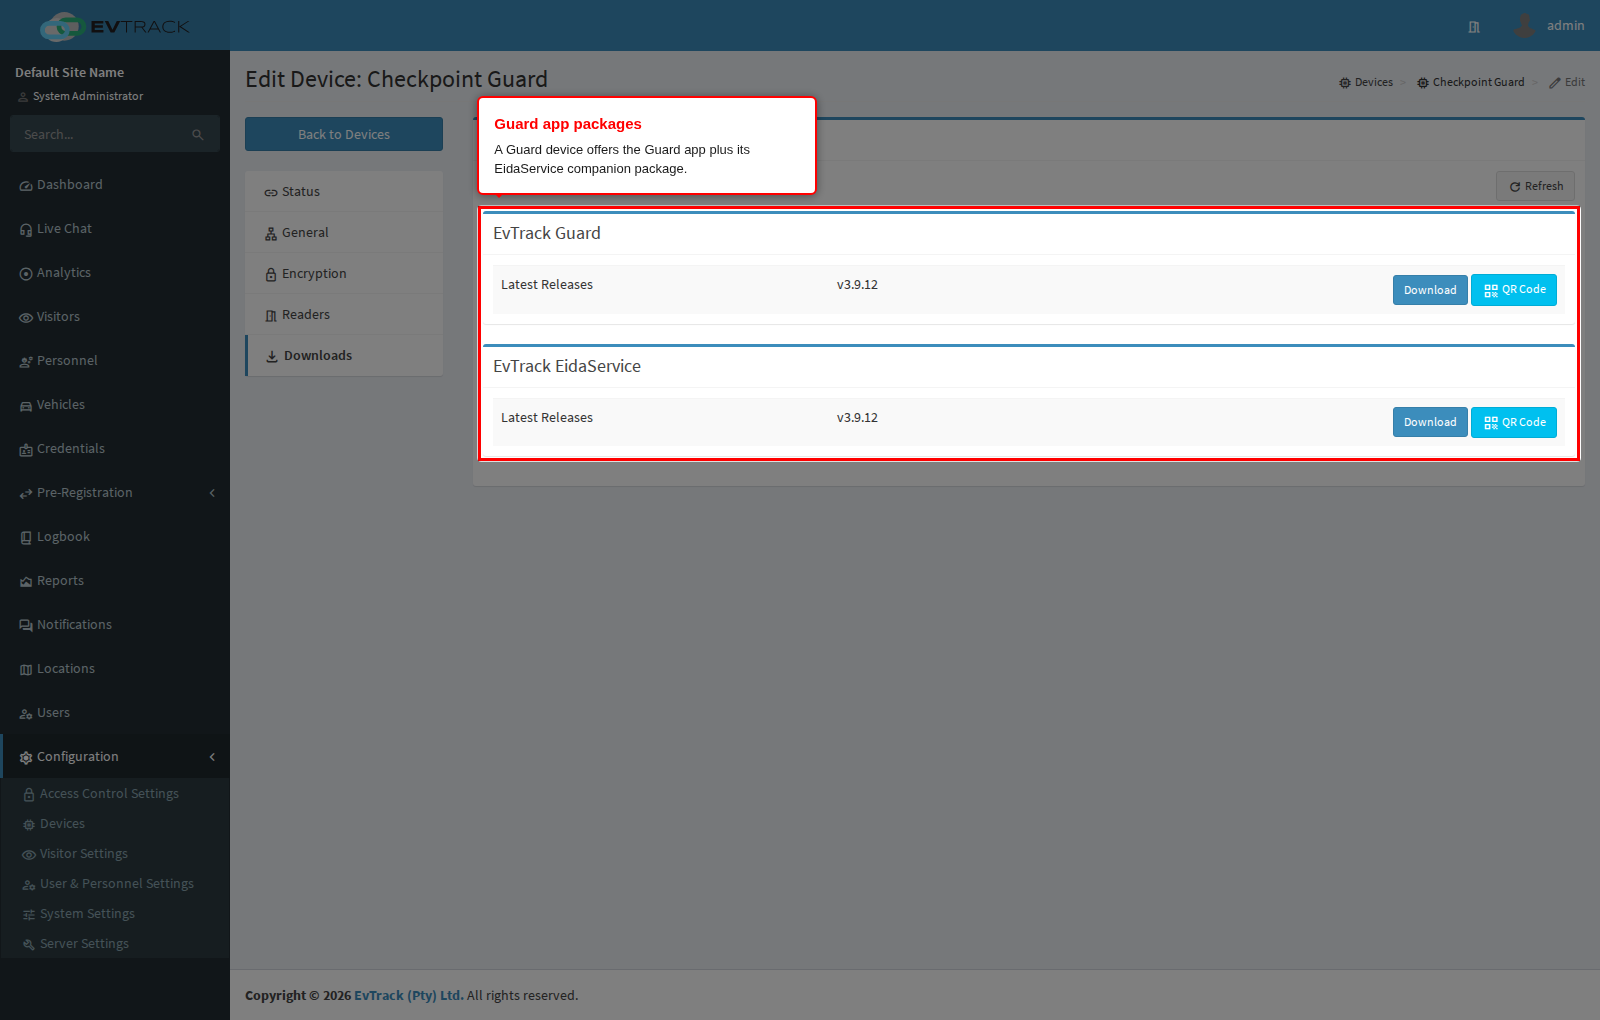
Install EvTrack Guard first and start it. It displays a Device Reported UID. Copy that value onto the General panel of the guard device record, into the Device Reported UID field from Step 7, and click Save.
End state: the Guard app runs on the handset, its UID matches the device record, and the officer can log in and scan passes.
Note: guard behaviour (scanning, printing, offline queue) is configured under Visitor Settings > Guard App - see Guard App.
Step 9: Grant access through the Default Access Control List
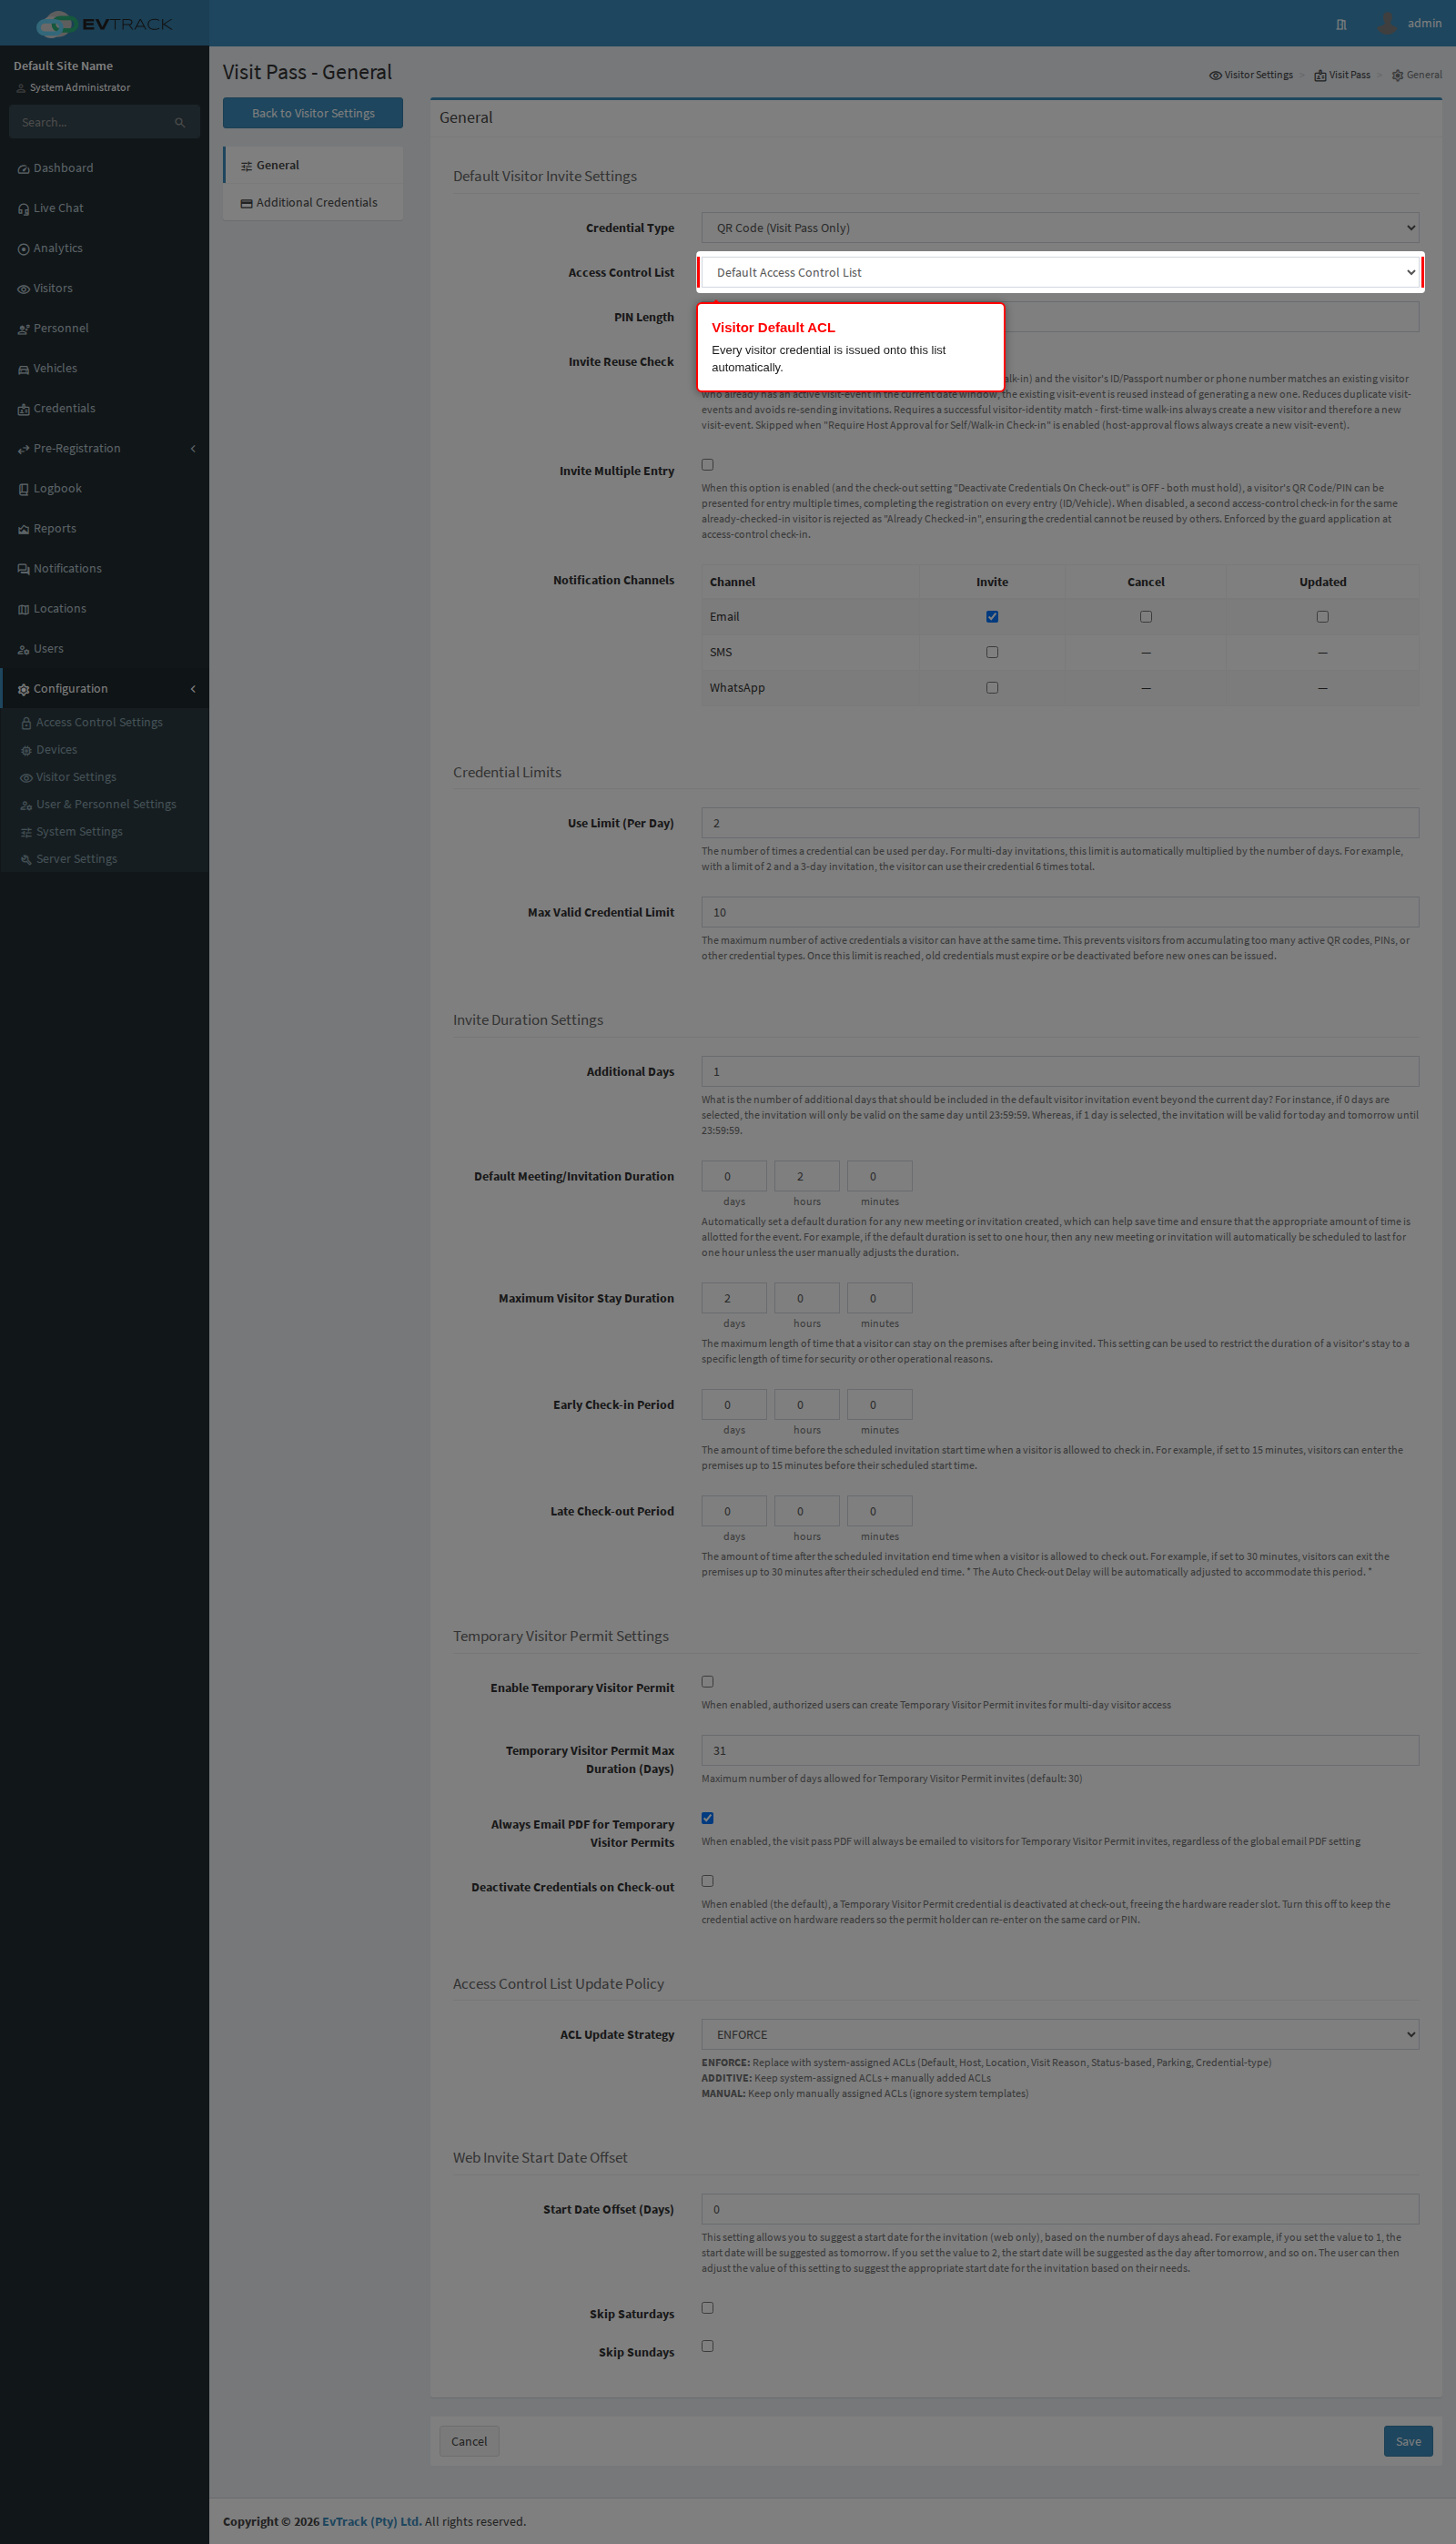
Credentials admit visitors only where their access control list allows. A new system ships with a Default Access Control List, and every visitor credential is issued onto it automatically, so once your kiosk’s access control point is on that list, every visitor pass works at the kiosk immediately. Walk through it:
9a: Open Access Control Lists
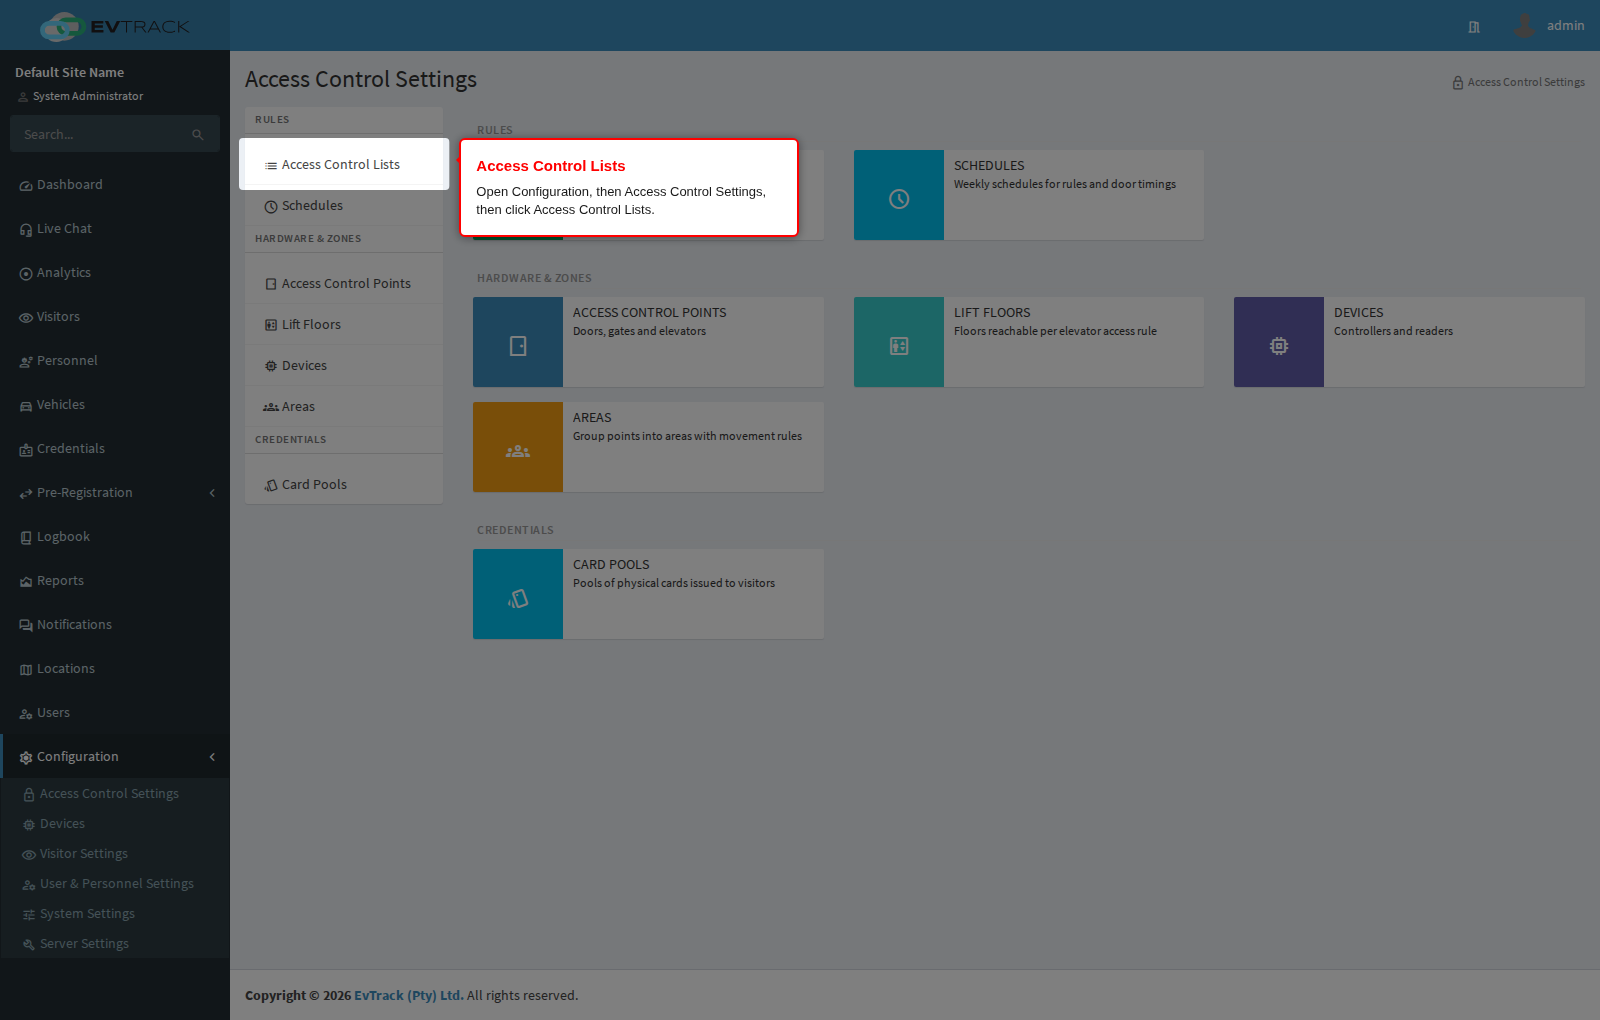
Select Configuration in the sidebar, open Access Control Settings, then click Access Control Lists in the settings menu. The Access Control Lists page opens.
9b: Open the Default Access Control List
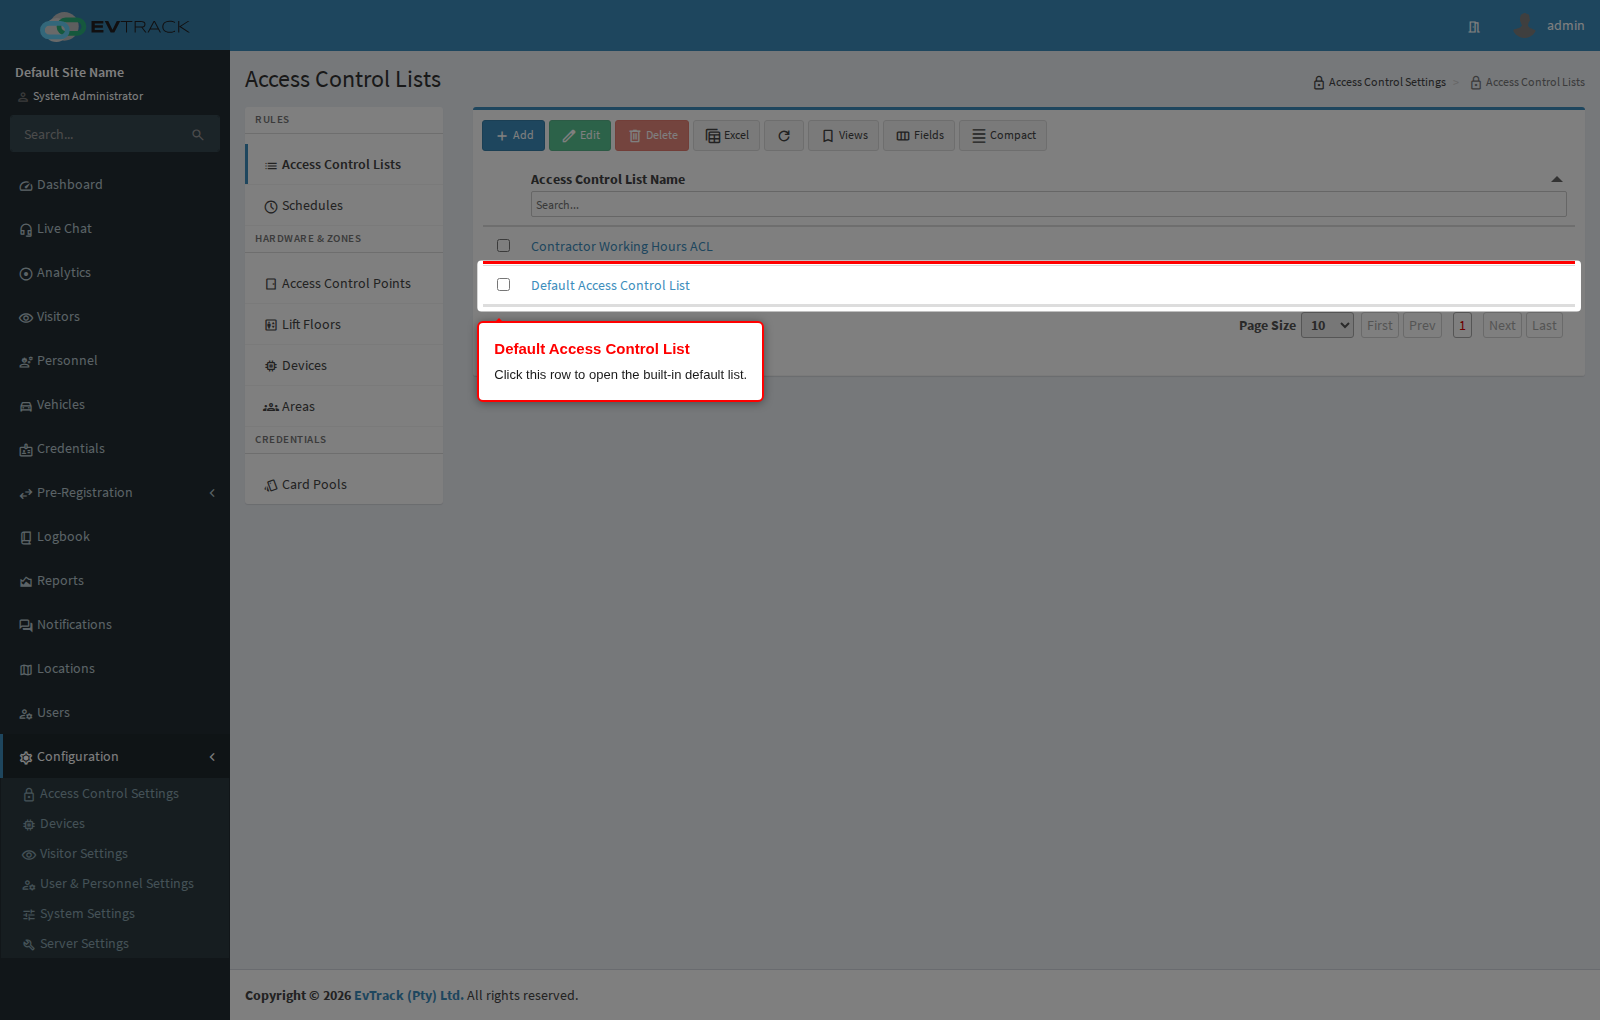
The list page shows every access control list on the system. Click the Default Access Control List row to open it.
9c: Go to the Access Rules panel
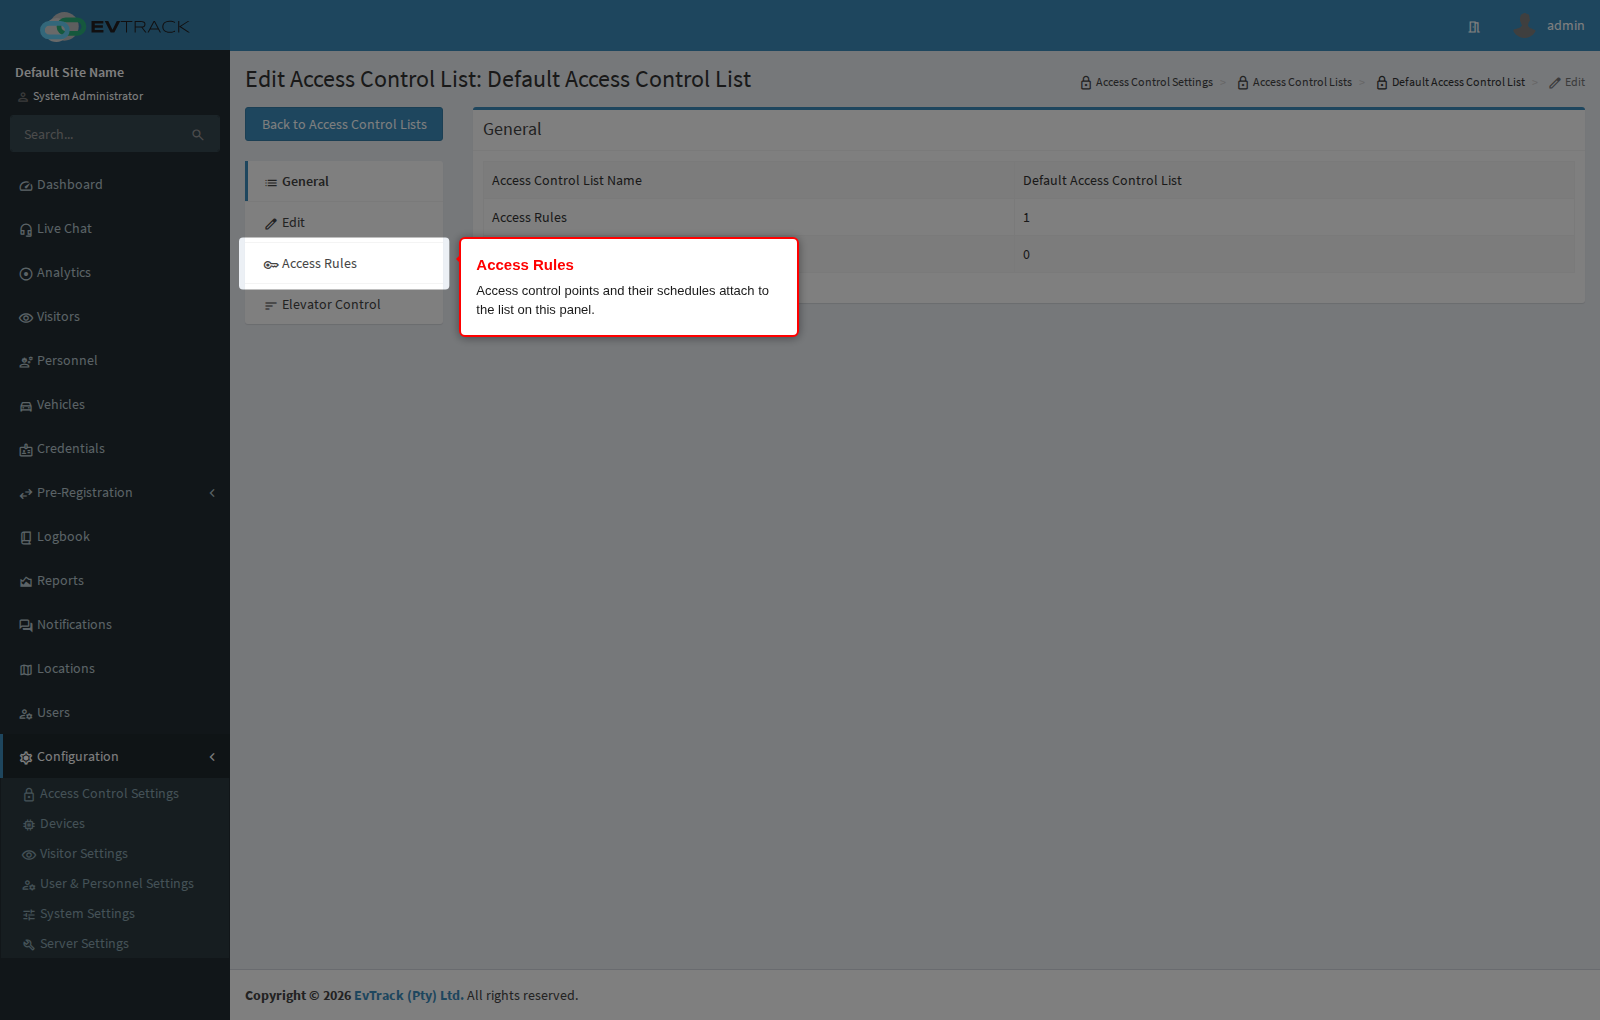
The list’s page opens on the General panel, which summarises the list and how many rules it holds. Select Access Rules in the menu on the left.
9d: Review which points the list covers
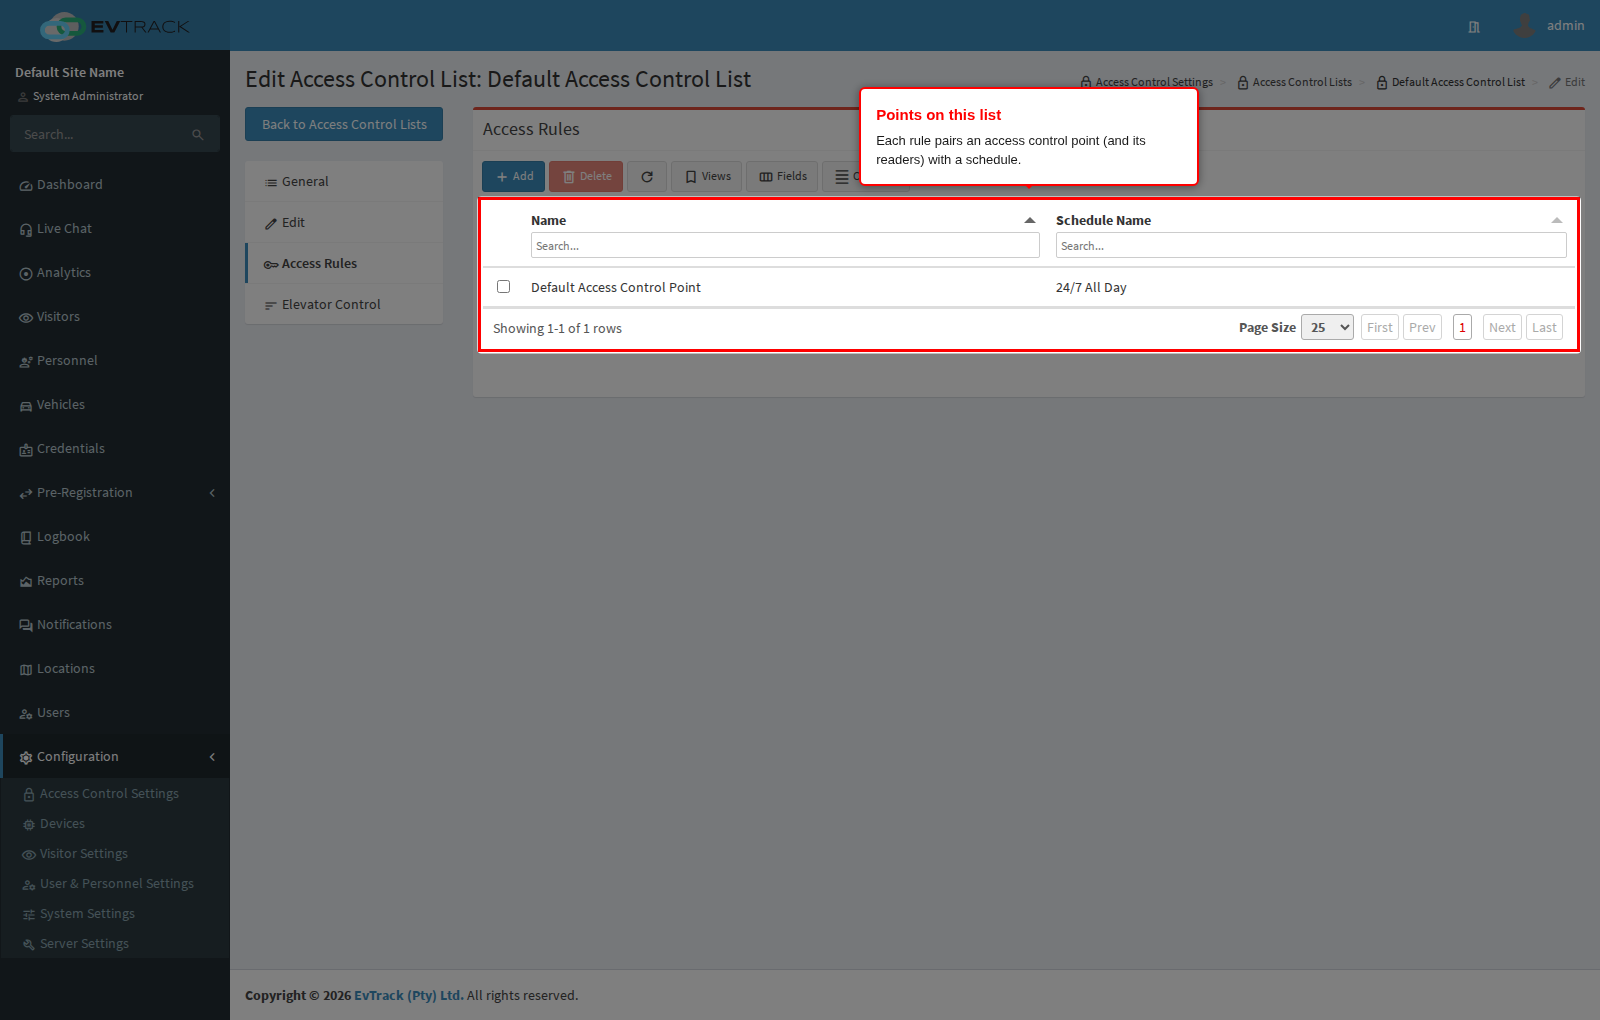
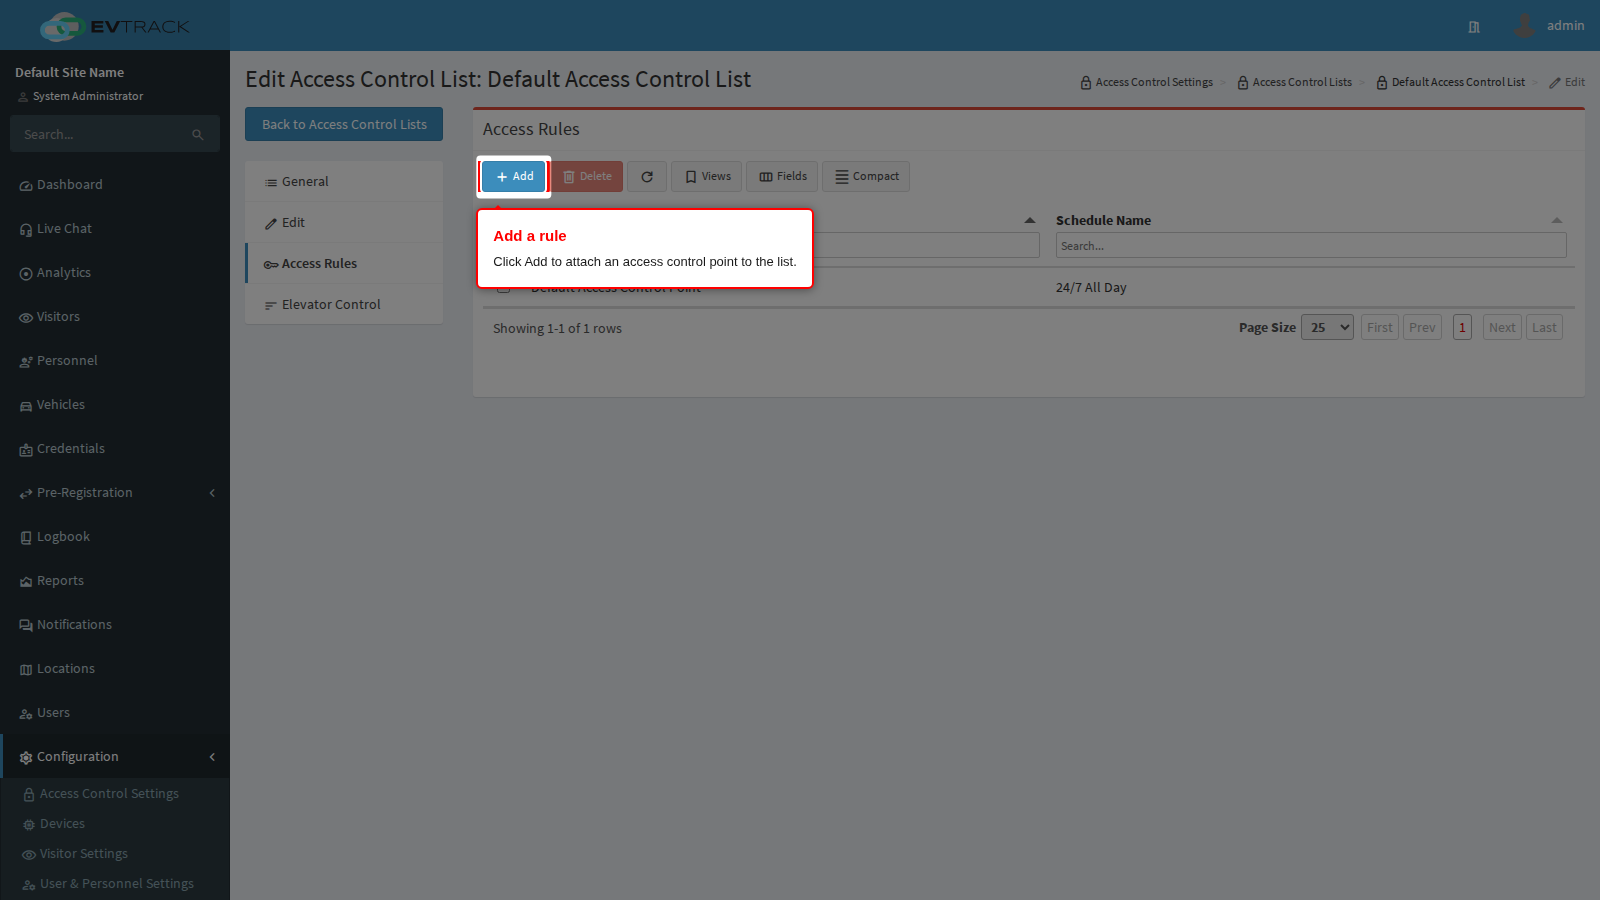
The Access Rules panel lists every rule on the list. Each rule pairs an access control point (with its readers) with a schedule that says when the rule applies. Your kiosk’s CHECK_POINT must appear here for visitor passes to work at it.
9e: Add a rule for your kiosk’s point
If the kiosk’s point is not listed yet, click the Add button in the toolbar above the rules table.
9f: Pick the point and schedule, then save
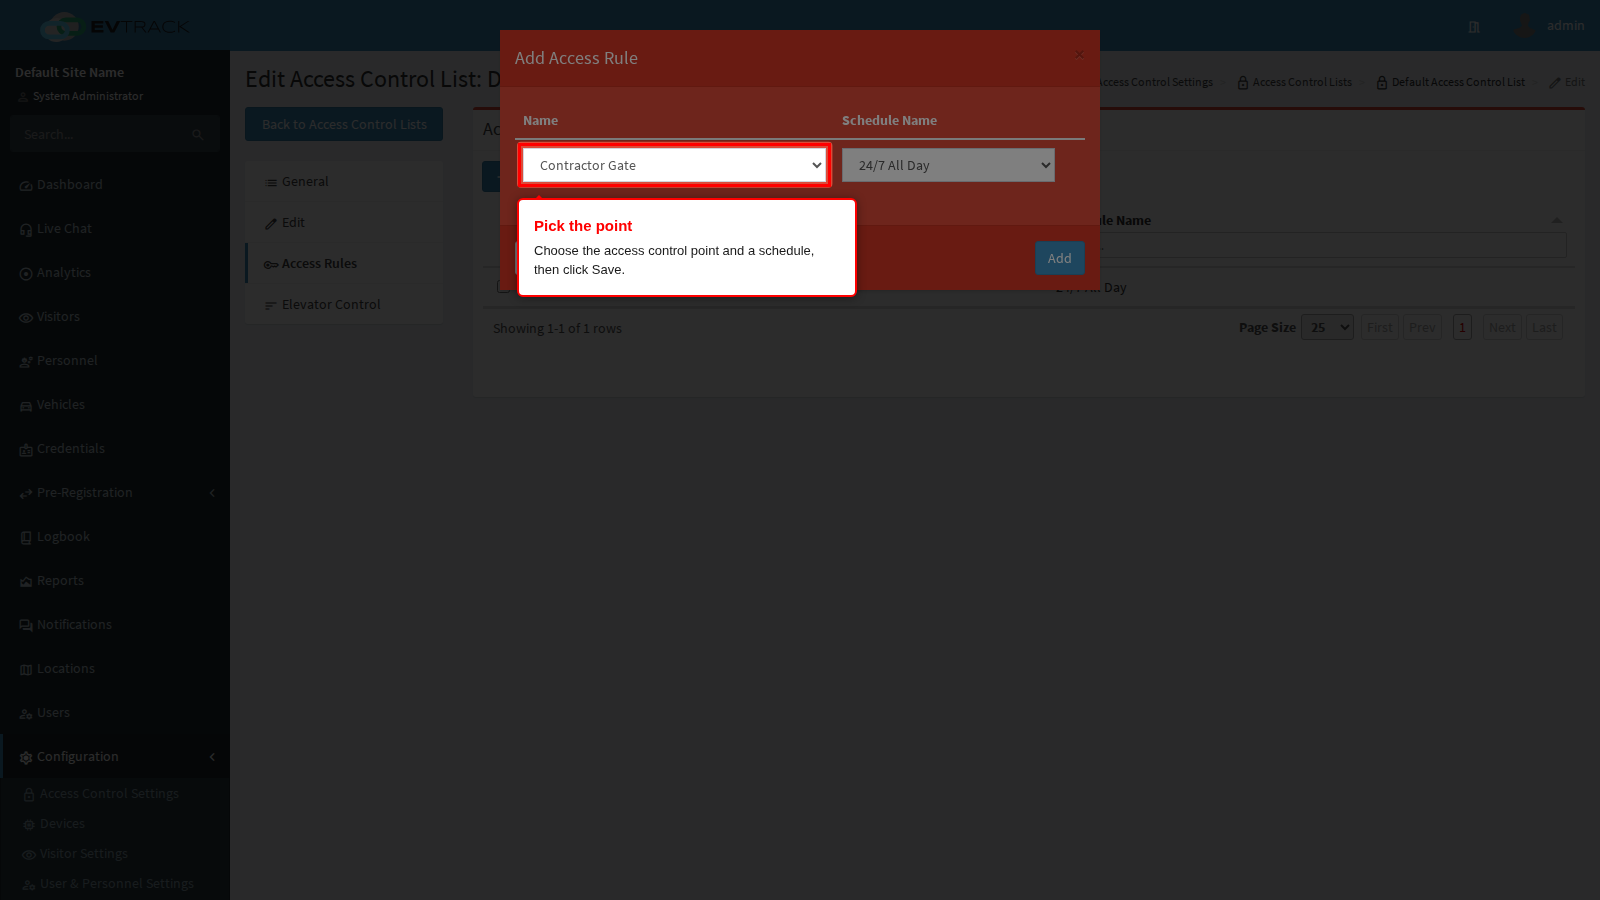
In the Add Access Rule dialog, choose your kiosk’s access control point (for example “Reception Kiosk”) and a schedule (the built-in always-on schedule works for a first setup), then click Save. The dialog closes and the new rule appears in the rules table, so the list now grants access at the kiosk’s readers.
9g: Confirm visitor credentials use the Default list
Visitor passes join an access control list automatically at issue time. Open Visitors > Settings > Visit Pass and check the Visitor Default ACL setting. With it pointing at the Default Access Control List, every pass issued to a visitor works at the kiosk and guard checkpoint immediately. Credentials can also be put on lists manually on the credential’s ACL tab.
With the apps installed, the devices paired and the default list covering their readers, invited visitors can present their QR pass at the kiosk, staff can verify at the checkpoint with the Guard app, and every movement lands in the Logbook and visit lifecycle.