Group pre-registration lets one person - the group leader - register a whole group (a tour, a delegation, a work crew or a school class) in a single request. The leader verifies their email address, describes the group, completes their own details, adds each member, and submits. The operator then processes the whole group at once.
This page walks the journey twice: first as a set of numbered steps with captures, then as a reference list of every field the leader and each member can be asked for, with the photo and document uploads covered in detail.
The journey at a glance
Two people do the work, and they never meet. The leader completes the whole group on the public form and submits it; the request then waits in the operator’s queue until somebody in the console approves it. The numbers are the steps documented further down this page.
sequenceDiagram
    actor Leader as Group leader
    participant Form as Public registration form
    participant Queue as Registration list
    actor Operator

    Leader->>Form: 1. Enter an email address
    Form-->>Leader: A one-time PIN, by email
    Leader->>Form: 1. Confirm the PIN, choose "I am registering a group"
    Leader->>Form: 2. Group name, group type, expected number of members
    Note over Leader,Form: 3. The expected number counts the members only, not the leader
    Leader->>Form: 4. The leader's own visitor details
    Leader->>Form: 5. Identity number, or the student and minor exemption
    Leader->>Form: 6. Contact details, on the verified address
    Leader->>Form: 7. Photo
    Leader->>Form: 8. Identity document copy
    Form-->>Leader: The member roster opens

    loop Steps 9 to 11, once per member
        Leader->>Form: 9. Member details
        Leader->>Form: 10. Member photo and document copy
        Form-->>Leader: 11. The roster, with the member added
    end

    Leader->>Form: 12. Review and submit
    Form-->>Leader: 13. Confirmation page, and an email
    Form->>Queue: 13. The request waits as Pending

    Operator->>Queue: 14. Open Registration and find the request
    Queue-->>Operator: 15. The processor shows the leader and every member
    Operator->>Queue: 16. Set visit reason, location and visit window, then Approve
    Queue-->>Leader: 16. The group is registered, and the leader is told
Four rules govern the handover, and they explain most of the questions this page gets:
- Only the leader is verified, and only the leader is corresponded with. The one-time PIN is sent once, to the leader, at the start. Members are never asked to confirm an address, and every message about the group goes to the leader.
- The leader answers the visit questions once, for everybody. Reason for the visit, host, location and the arrival and departure window are captured on the leader’s form and inherited by every member. A member cannot request a different arrival time.
- Submitting decides nothing. Step 13 ends the leader’s involvement and starts the operator’s. Nothing is approved, no pass is issued and no visitor record exists until step 16.
- The operator decides on the leader, and the decision carries the whole group. Members carry no decision of their own, in this queue or in a bulk action.
Configuration
Group registration is off on a new system. Four things have to be in place before a leader can register a group, and all of them are set in the console by an operator who can change visitor settings.
1. Switch on the public registration form
Open Configuration > Visitor Settings > Self-Registration > General and tick Enable Public Registration Form. The group journey is part of the public form, so nothing below works while this is off. The same General tab produces the system-wide link, the per-user links and the QR codes; every location can also publish its own link under Locations > Self-Registration.
2. Switch on group registration
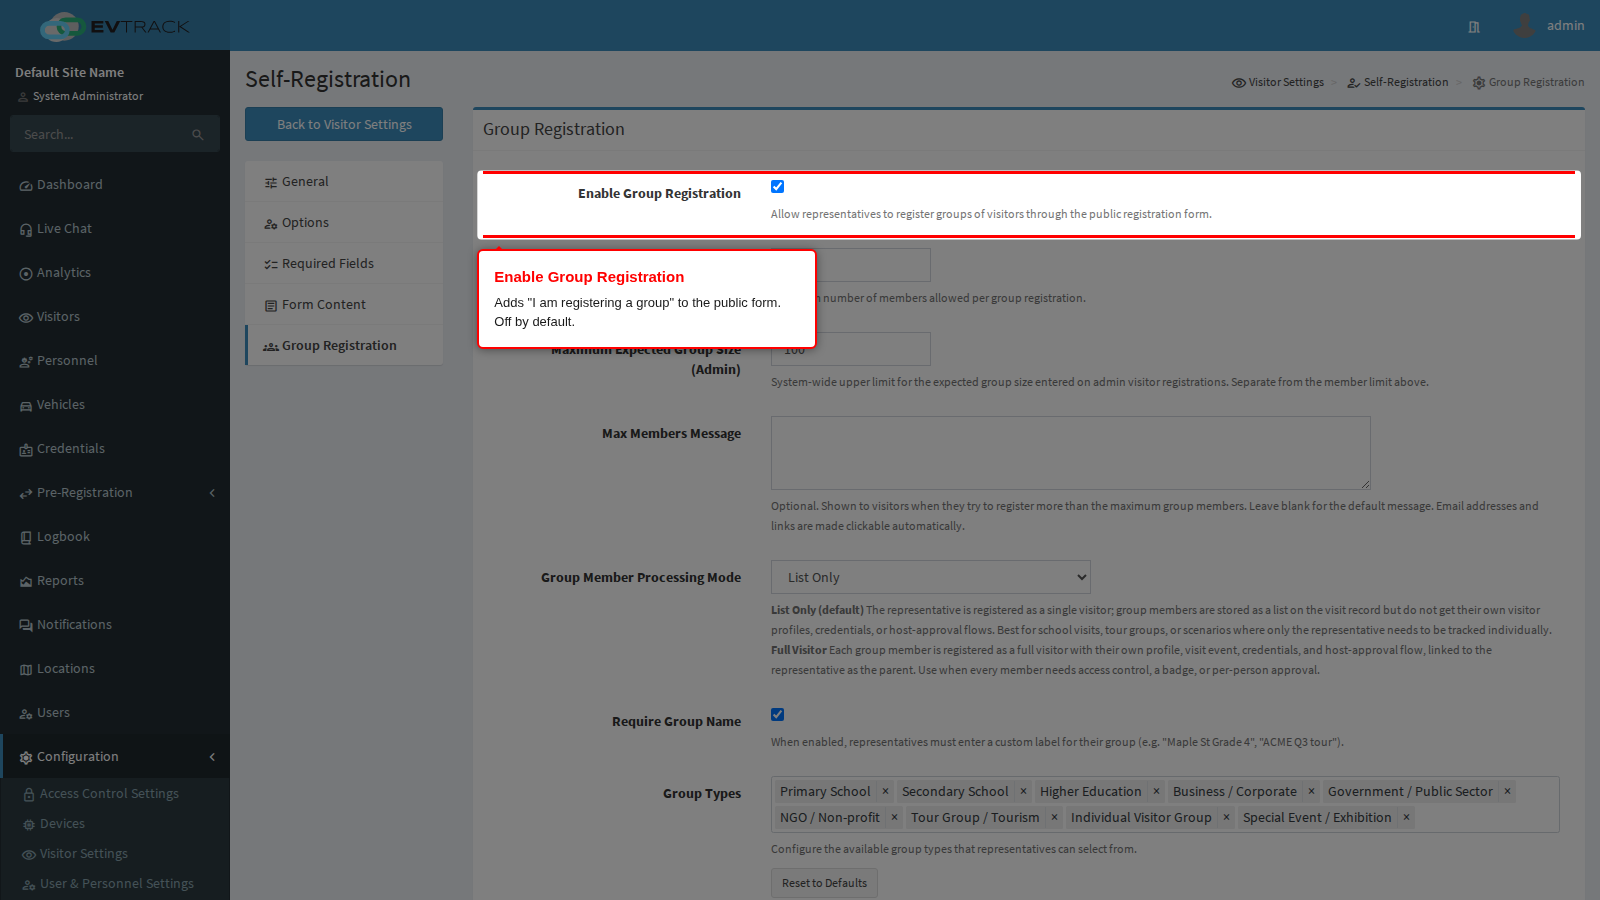
Open the Group Registration tab of Self-Registration and tick Enable Group Registration. The type chooser at the start of the journey then offers I am registering a group next to the individual option.
3. Set the group size limits
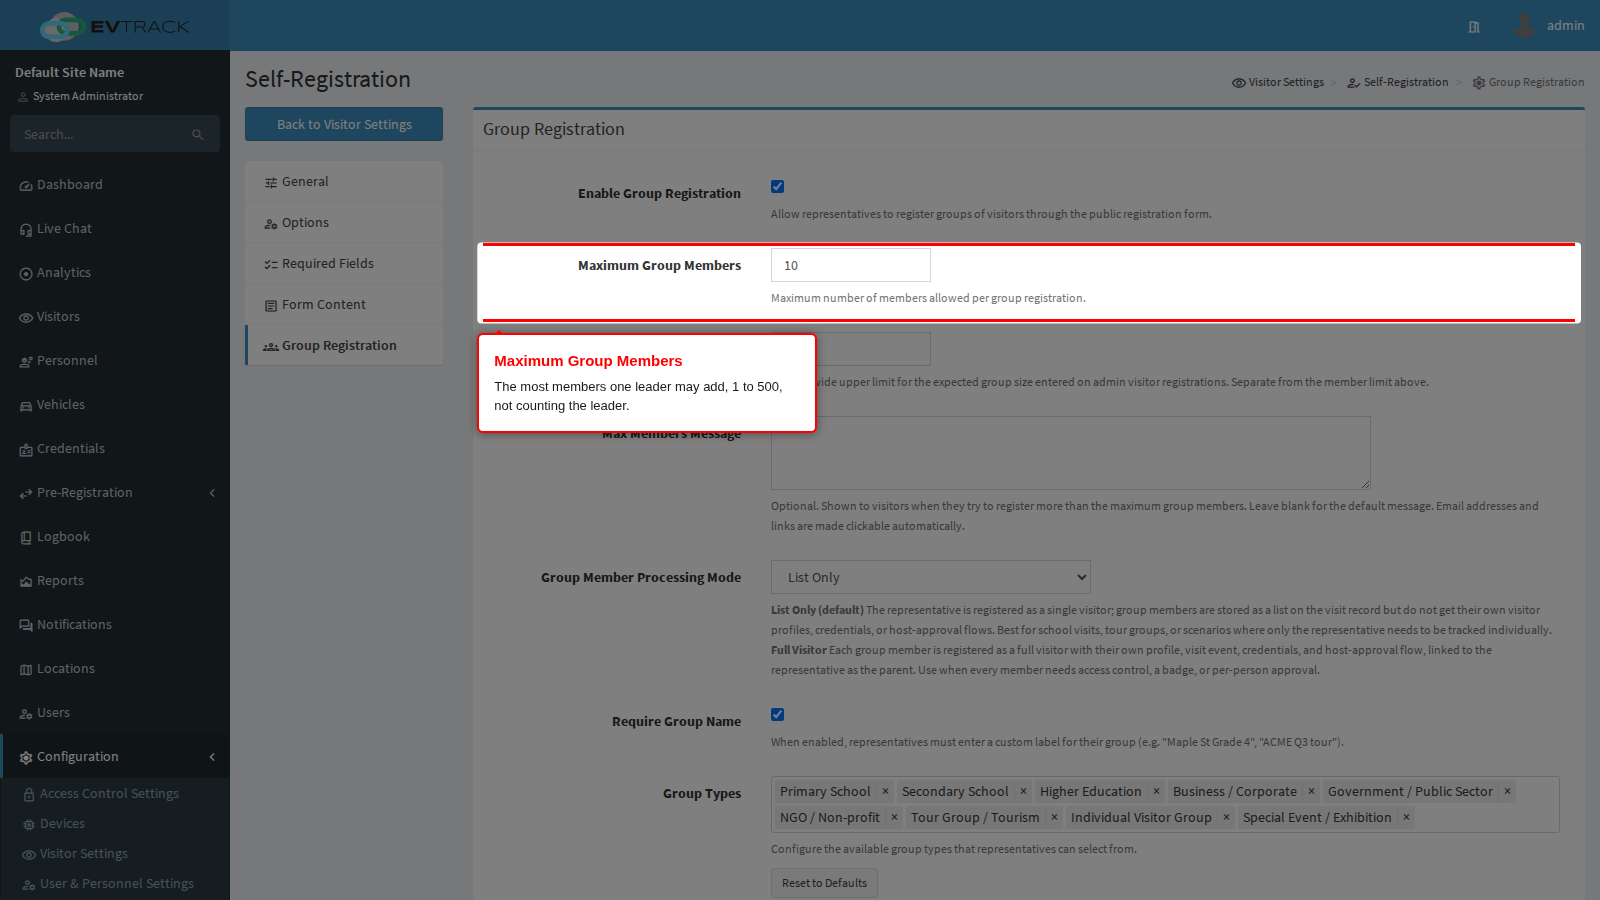
Maximum Group Members is the most members one leader may add, from 1 to 500 (10 on a new system). It counts the members only, not the leader, so a limit of 10 allows a group of eleven people. The leader’s Expected number of group members cannot be larger, the + Add Member button disappears once the roster reaches the limit, and trying to go past it shows the Max Members Message.
There is no minimum to configure. Every group needs at least one member besides the leader: the expected number must be 1 or more, and a roster with no members cannot be submitted.
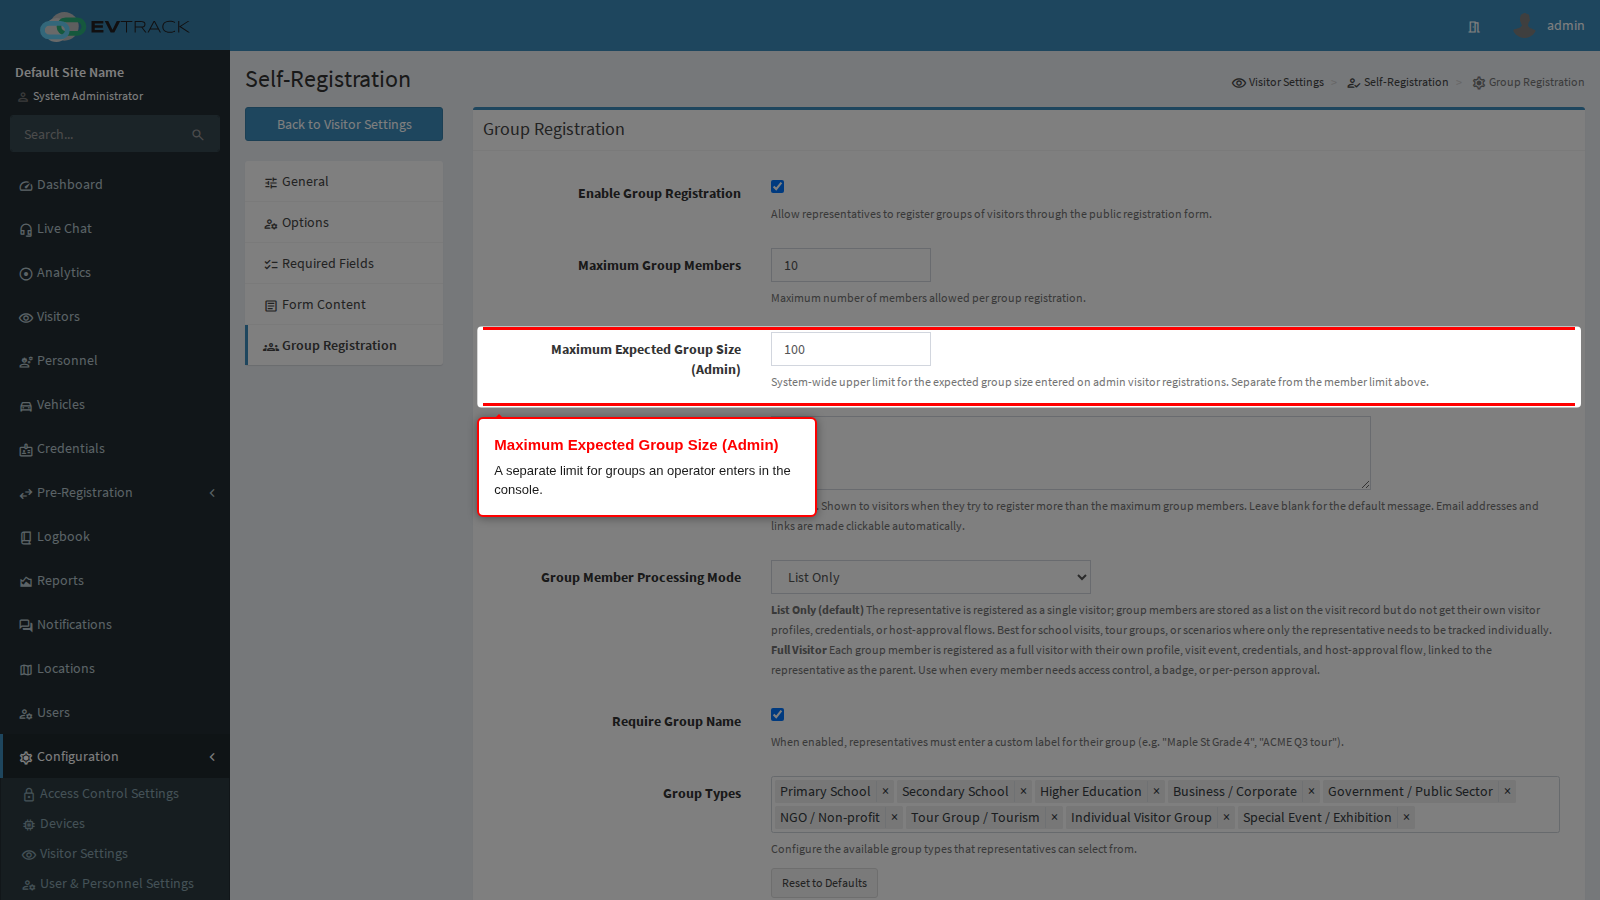
Maximum Expected Group Size (Admin) is a separate limit. It applies to groups an operator enters in the console (see Managing Group Registrations (Admin)), not to the public form.
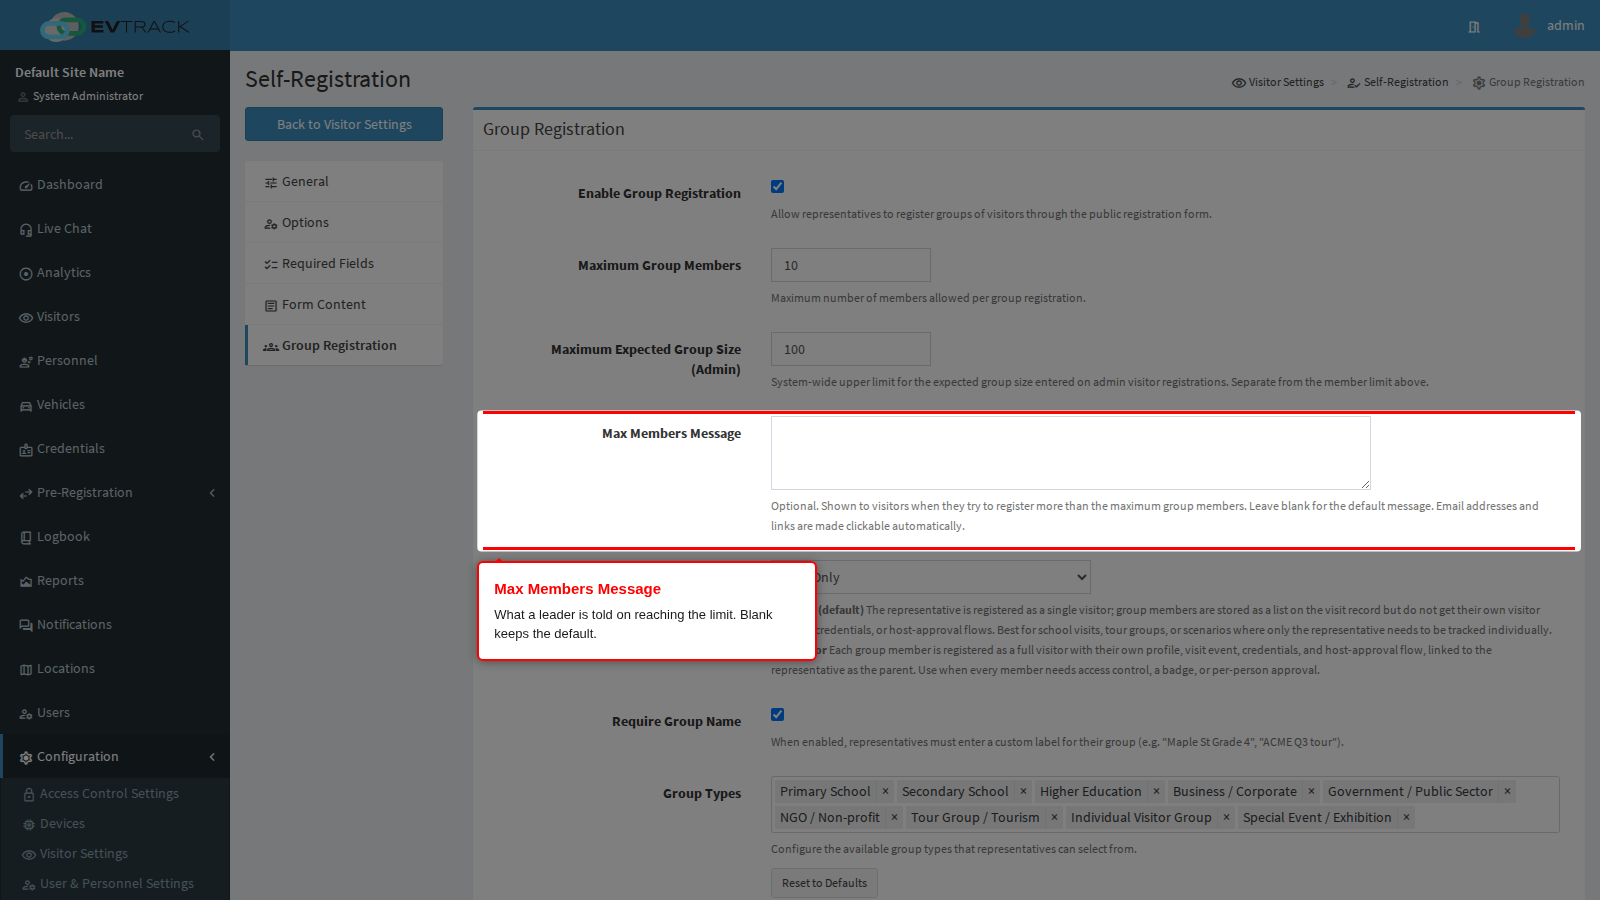
Max Members Message is what a leader is told on reaching the limit, for example who to contact to arrange a larger group. Leave it blank for the default message. Email addresses and links in it are made clickable.
4. Decide what an approved group becomes
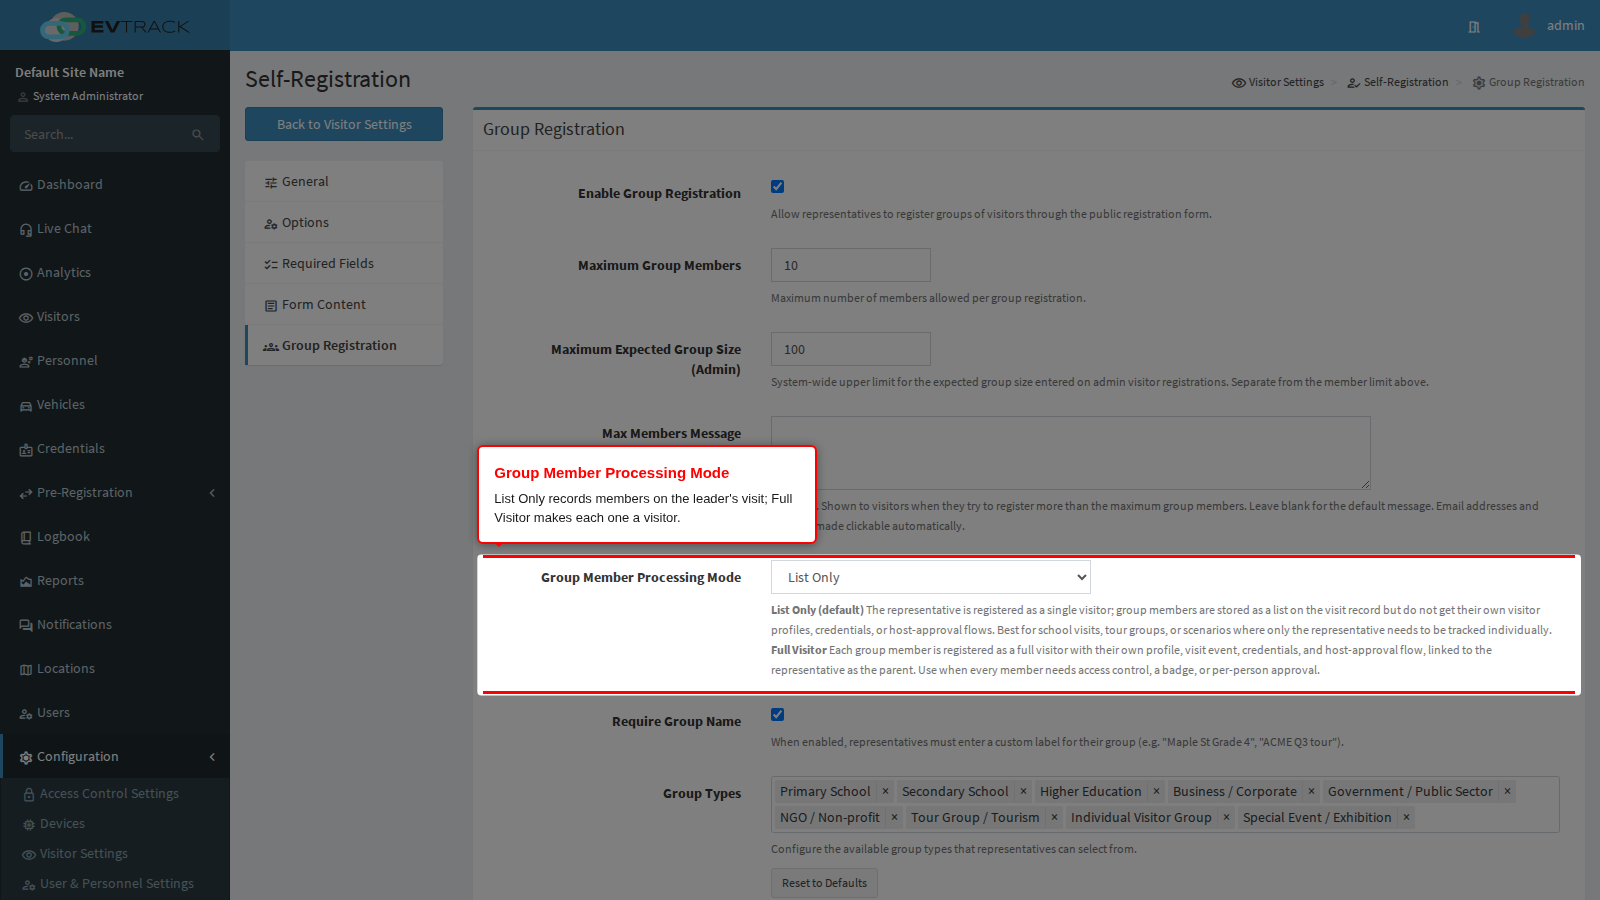
Group Member Processing Mode decides what approval creates:
- List Only (the default) registers the leader as the visitor and records the members as a list on the leader’s visit. Members get no visitor profile, credential or host approval of their own. Use it for school visits and tour groups, where only the leader needs to be tracked.
- Full Visitor registers every member as a visitor in their own right, with a profile, a visit, a credential and host approval, linked to the leader. Use it when each person needs access control, a badge or an individual approval.
5. Describe the groups
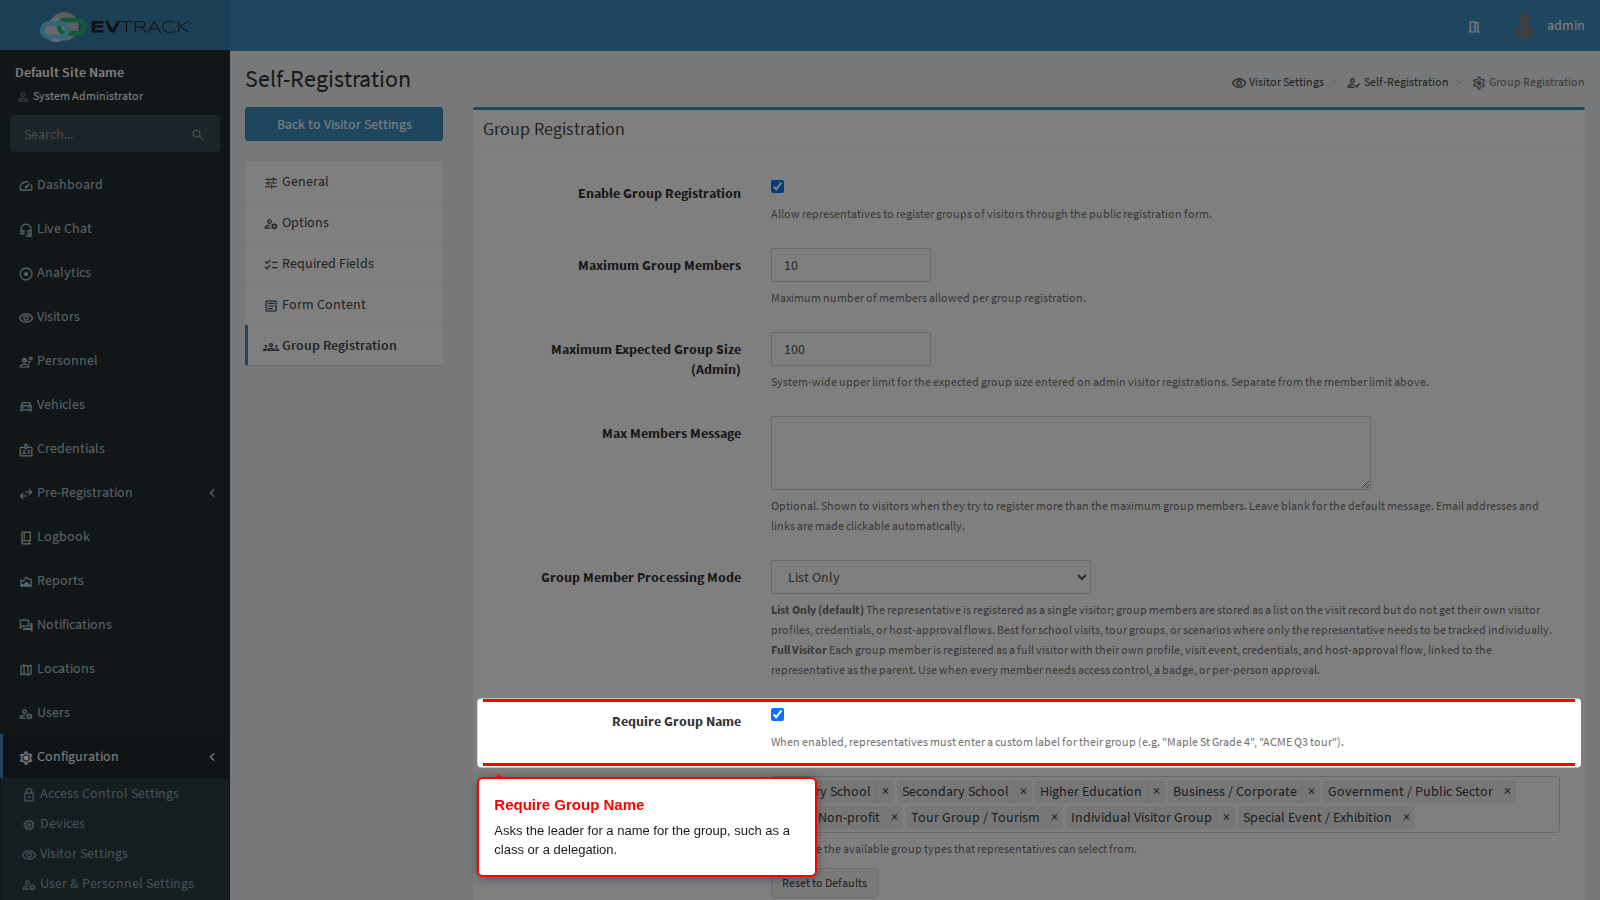
Require Group Name asks the leader to name the group (for example “Maple St Grade 4” or “ACME Q3 tour”). When it is off, the name question is not shown.
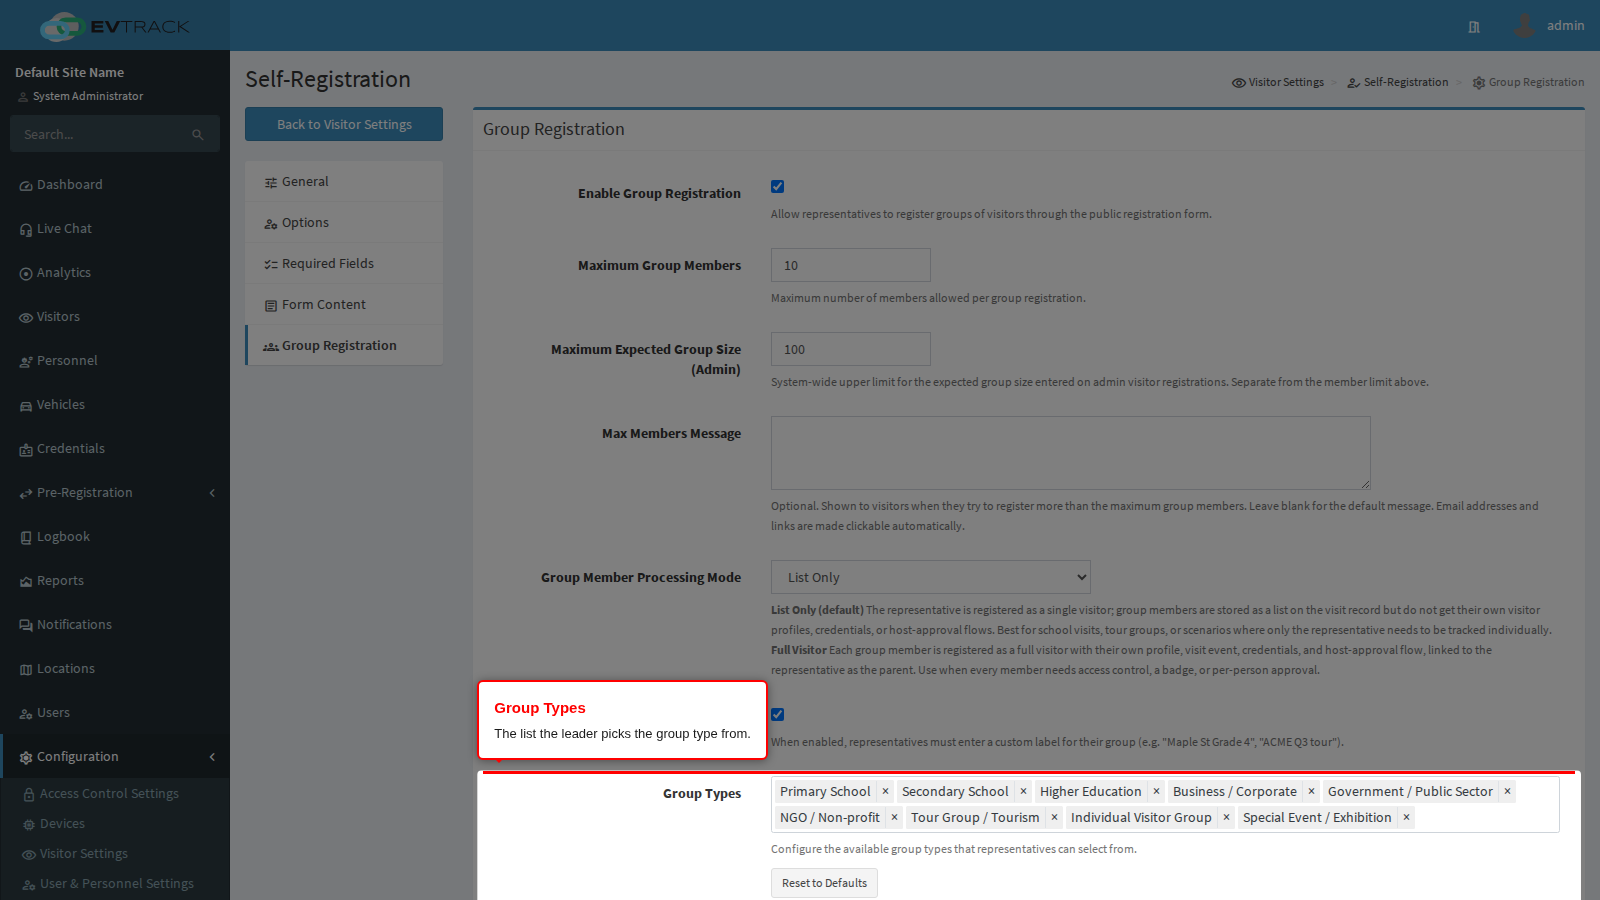
Group Types is the list the leader picks the group type from. Add or remove types to suit your site; Reset to Defaults restores the supplied list. A type typed in by the leader that is not on this list is refused.
6. Choose the fields: leader and members separately
The leader and the members are asked for different things, and each list is set in its own place.
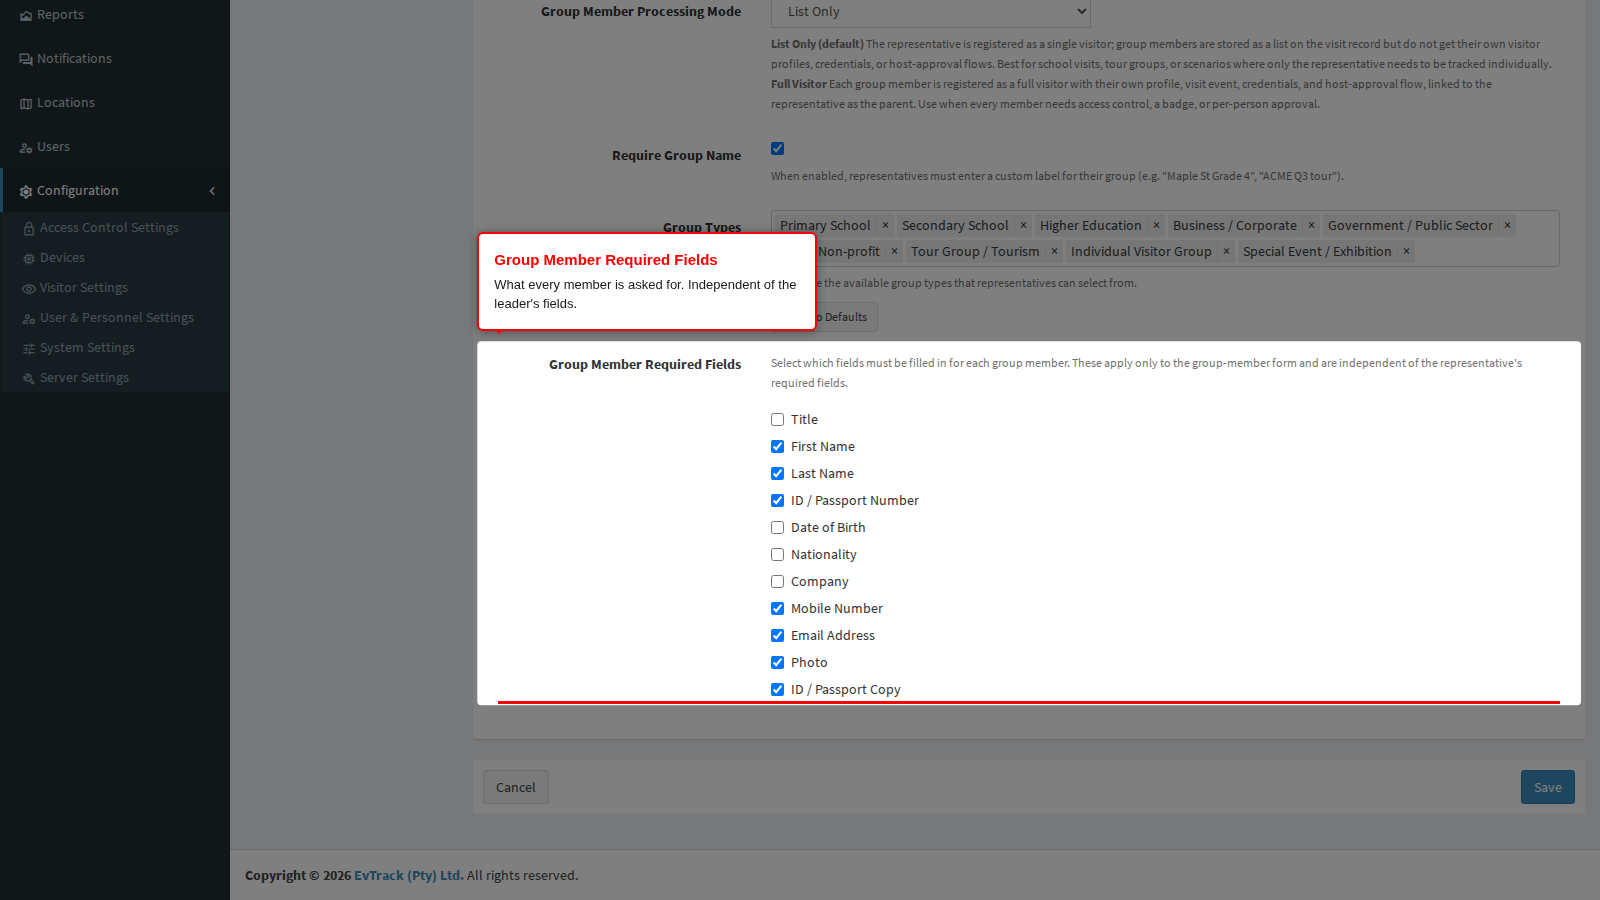
Group Member Required Fields, at the foot of the Group Registration tab, decides what every member is asked for: title, names, identity or passport number, date of birth, nationality, company, mobile number, email address, photo and identity document copy. Tick a field to ask for it; every field that is ticked is required on the member form. At least two identifying fields must remain ticked while group registration is on, so a group can never arrive as a list of nameless people.
The leader is asked for the fields on the Required Fields tab of Self-Registration, the same list a visitor registering alone is asked for. This tab also holds the Custom Fields builder for questions of your own. Custom questions are asked of the leader only.
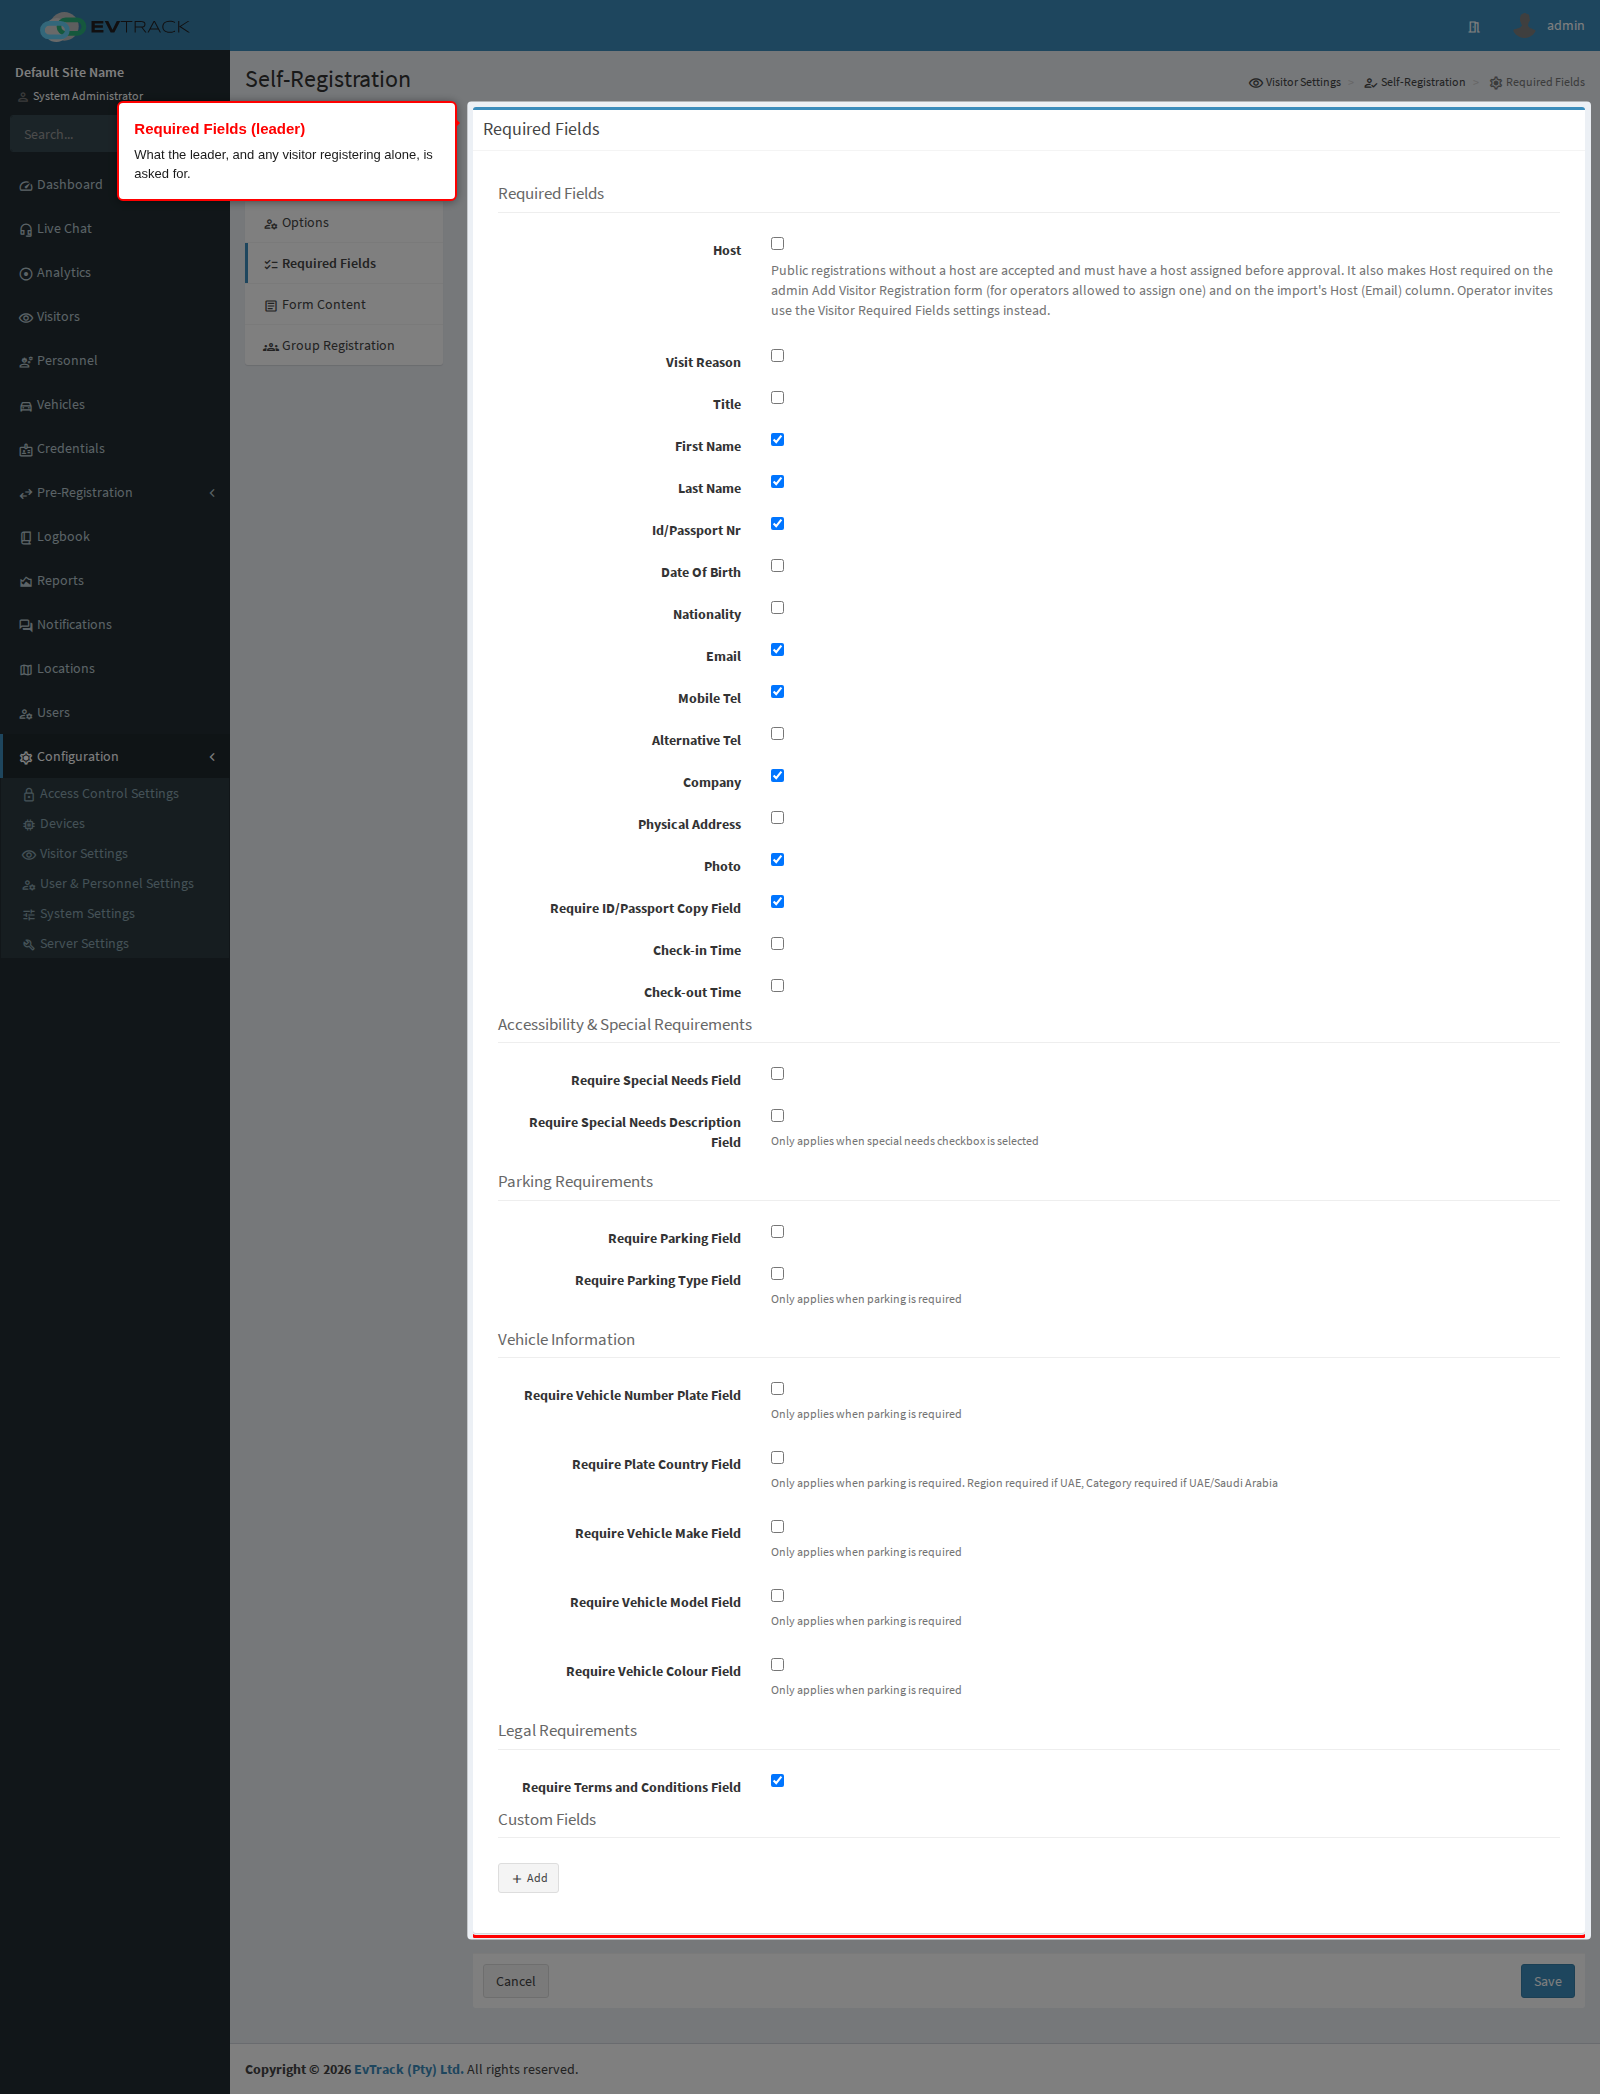
Press Save at the foot of each tab before moving to the next one.
7. Override for one location (optional)
Every location can differ from the system settings for its own registration link. Open Locations, edit the location, and open its Self-Registration panel. The Group Registration section there switches groups on or off for that location and sets its own maximum, its own message and its own member fields. A location that does not override anything follows the system settings.
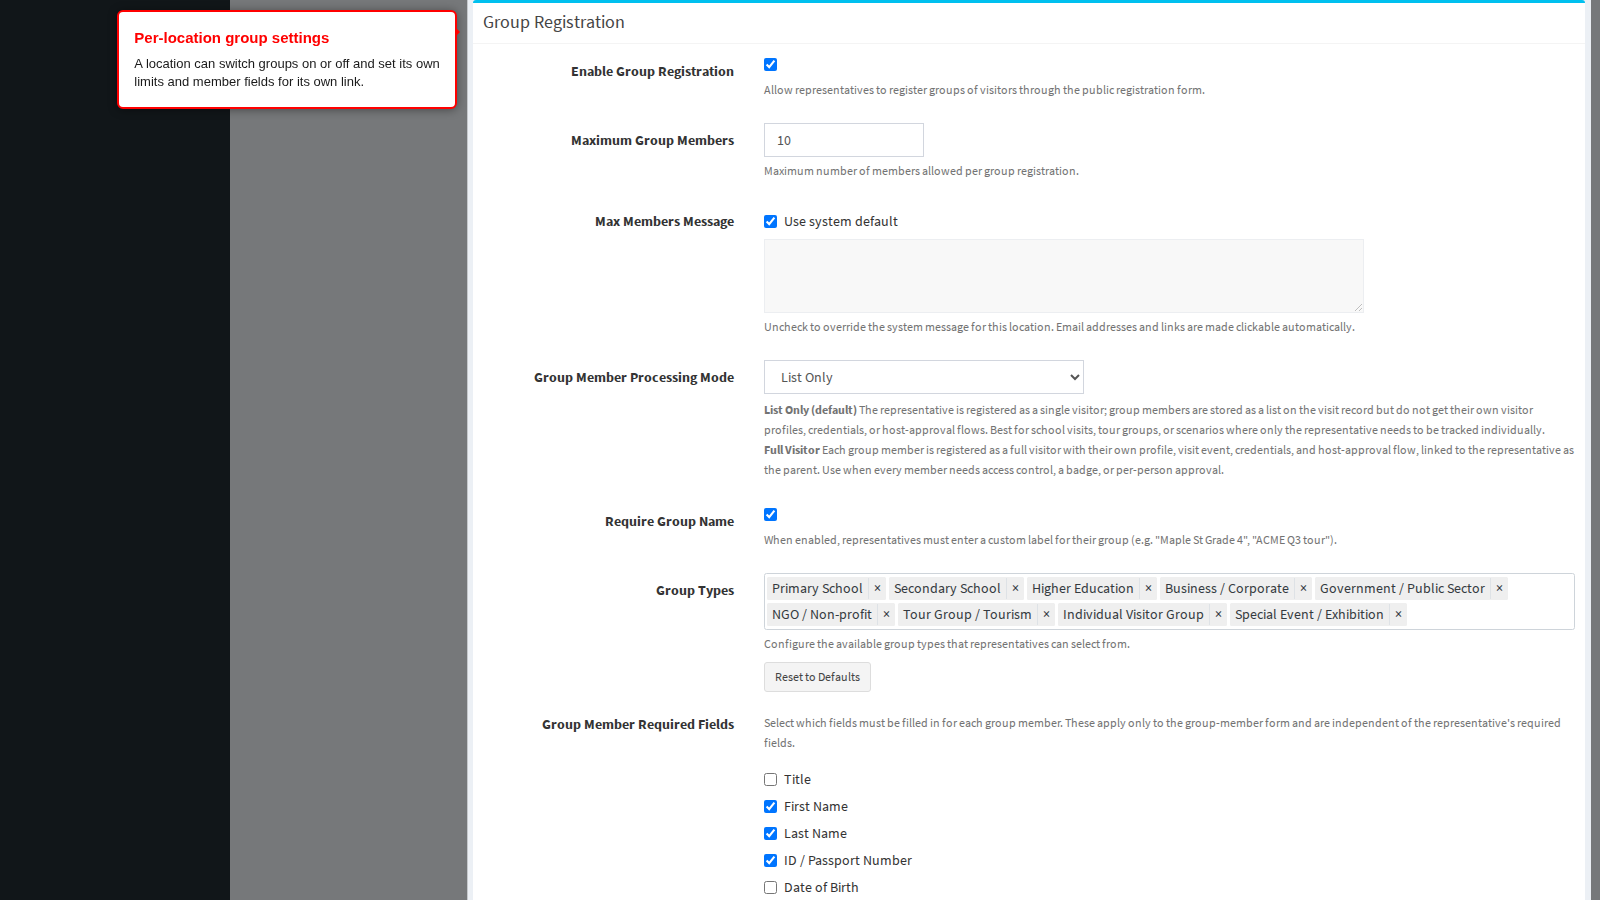
Full settings walkthrough: Self-Registration Settings.
Your form may look different from these captures. The public form only shows a field when your field policy asks for it, so a site that does not collect nationality or vehicle details simply will not display those questions. Anything your site adds as a custom question appears as well. The captures below show a form with names, identity number, contact details, photo and document copy switched on.
Captured once for the group, or once per member
| Captured once, by the leader | Captured for every member |
|---|---|
| Group name, group type and expected number of members | Title, first name and last name |
| Reason for the visit | Identity or passport number, or the student and minor exemption |
| Requested arrival and departure date and time | Date of birth |
| Parking and vehicle details | Nationality and company |
| Any custom questions your site adds | Mobile number and email address |
| Acceptance of the terms and conditions | Photo and identity document copy |
| The verified email address that receives the outcome |
Members inherit the host, the location, the reason for the visit and the visit window from the leader’s answers. They are never asked for those again, and they cannot each request a different arrival time.
Step 1: Choose Group registration
Open the registration link, enter an email address and confirm the one-time PIN that is emailed to it. The verified address becomes the leader’s contact address and is locked on the form later.
After verification the journey asks who is registering. Choose I am registering a group and press Continue. The option is only listed when group registration is switched on, and the note underneath it states the maximum group size.
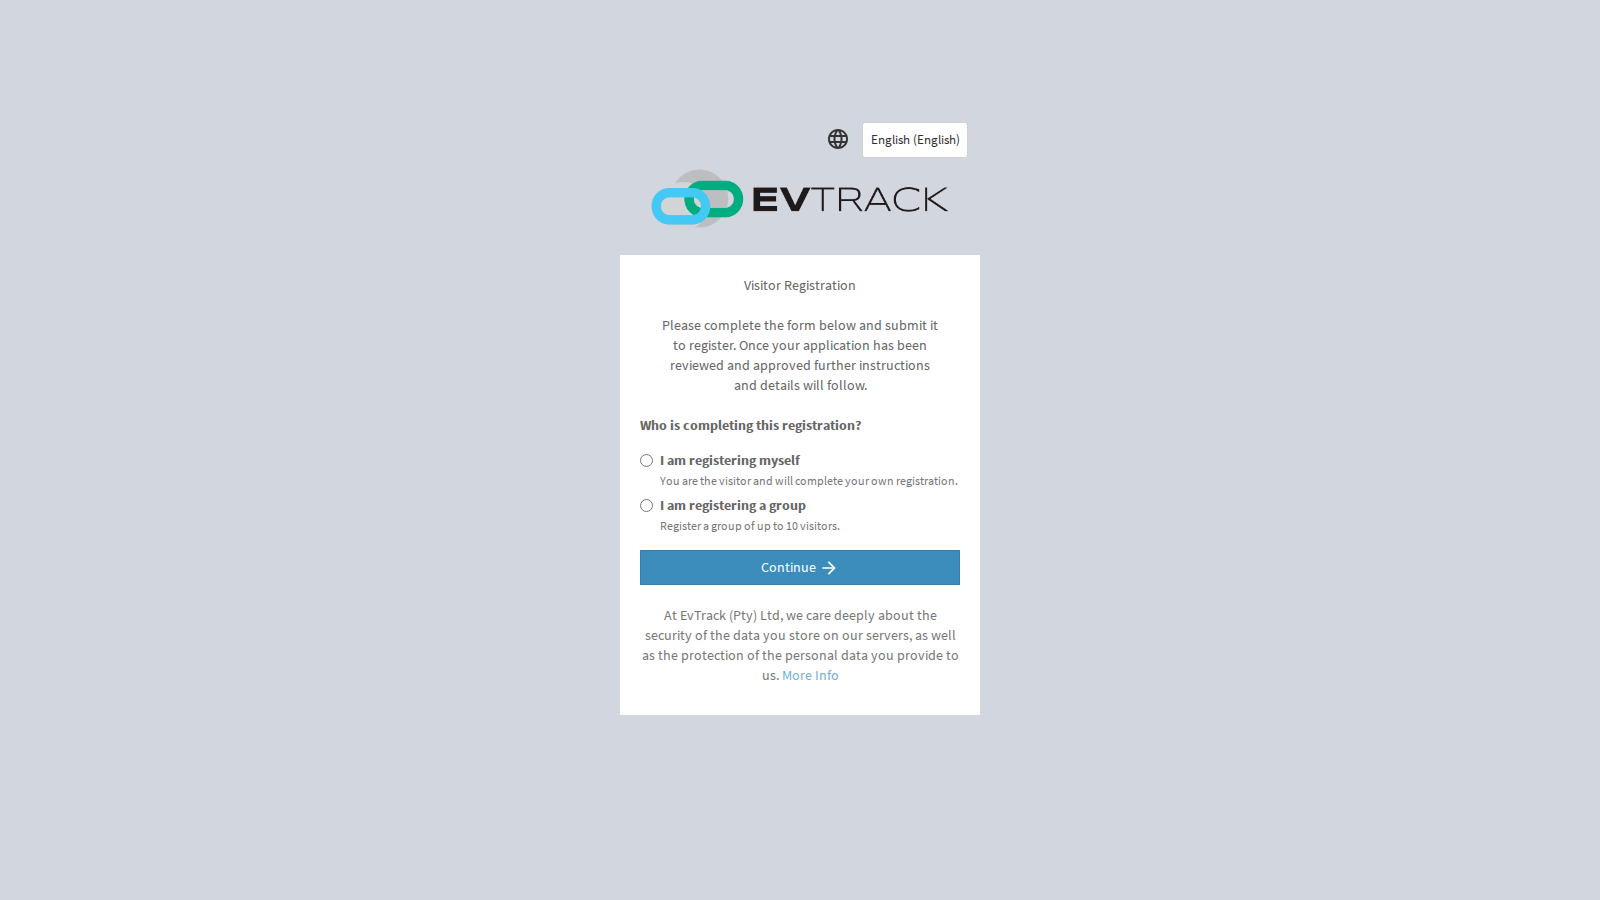
The captures on this page and the next few show the public pages exactly as the leader sees them, with no operator toolbar or menu.
End state: the Tell us about your group page opens.
Step 2: Describe the group
Three questions, then Continue.
- Group / Organisation Name - up to 100 characters. Only shown when Require Group Name is switched on.
- Group Type - required, and it must be one of the types configured for your site. Typing a type that is not on the list is rejected.
- Expected number of group members - required, a whole number of 1 or more, not counting the group leader, and no larger than the maximum allowed for the site.
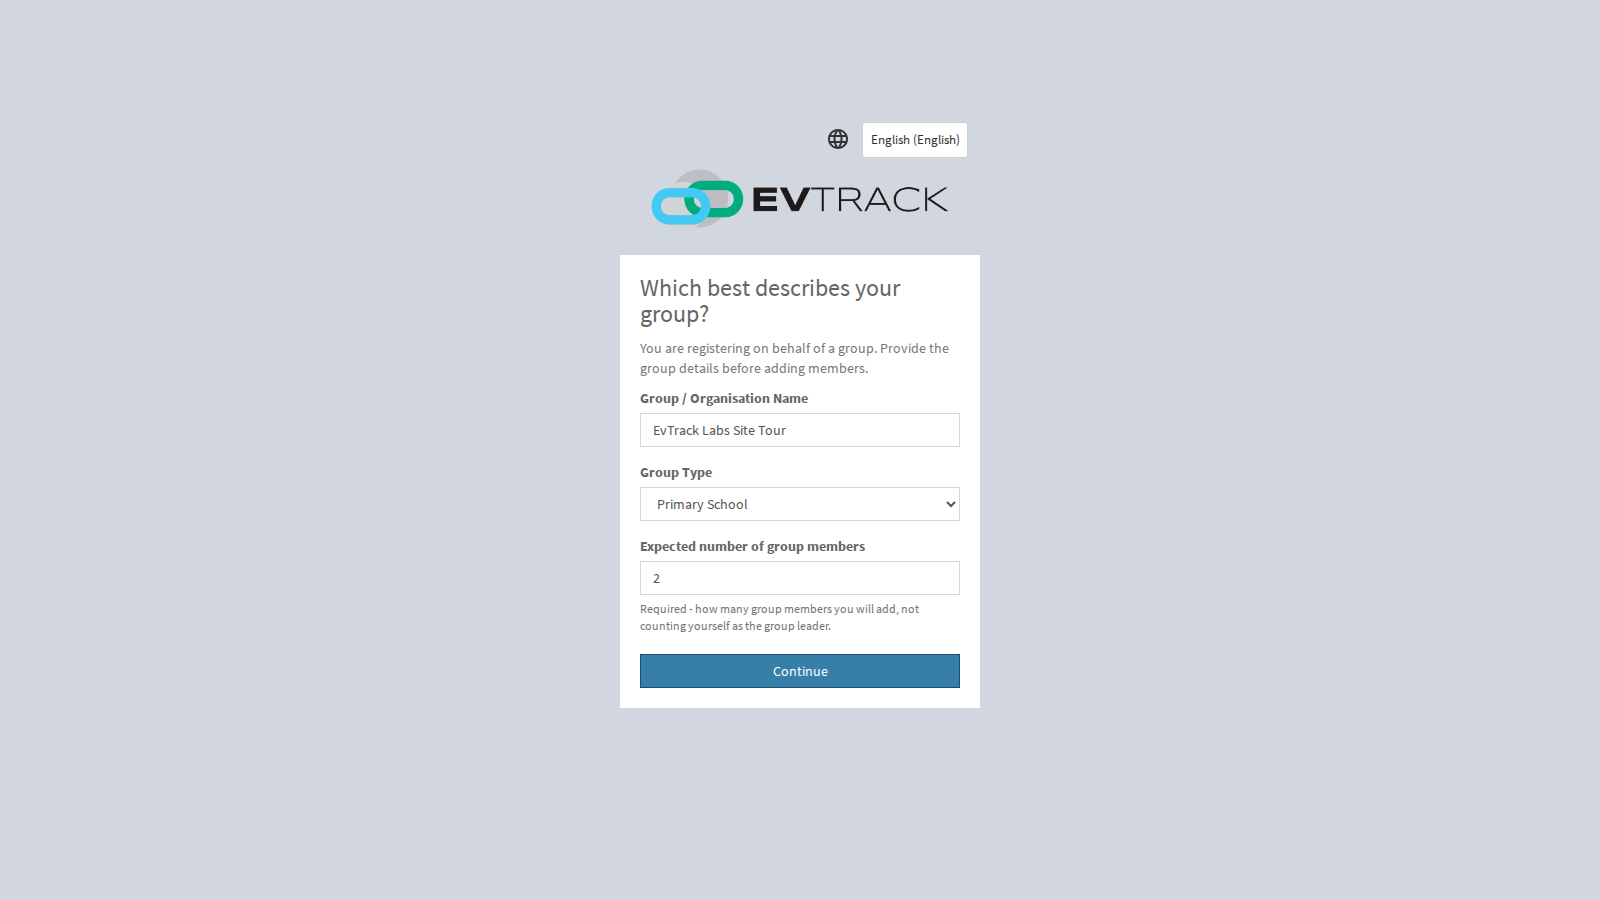
End state: the group’s name and type are stored for the rest of the journey and appear on every later page.
Step 3: Count the members, not yourself
Expected number of group members counts only the people the leader will add, not the leader. A leader travelling with two colleagues enters 2. The number is only a plan: if the roster ends up a different size, the review step shows a warning and the leader can still submit.
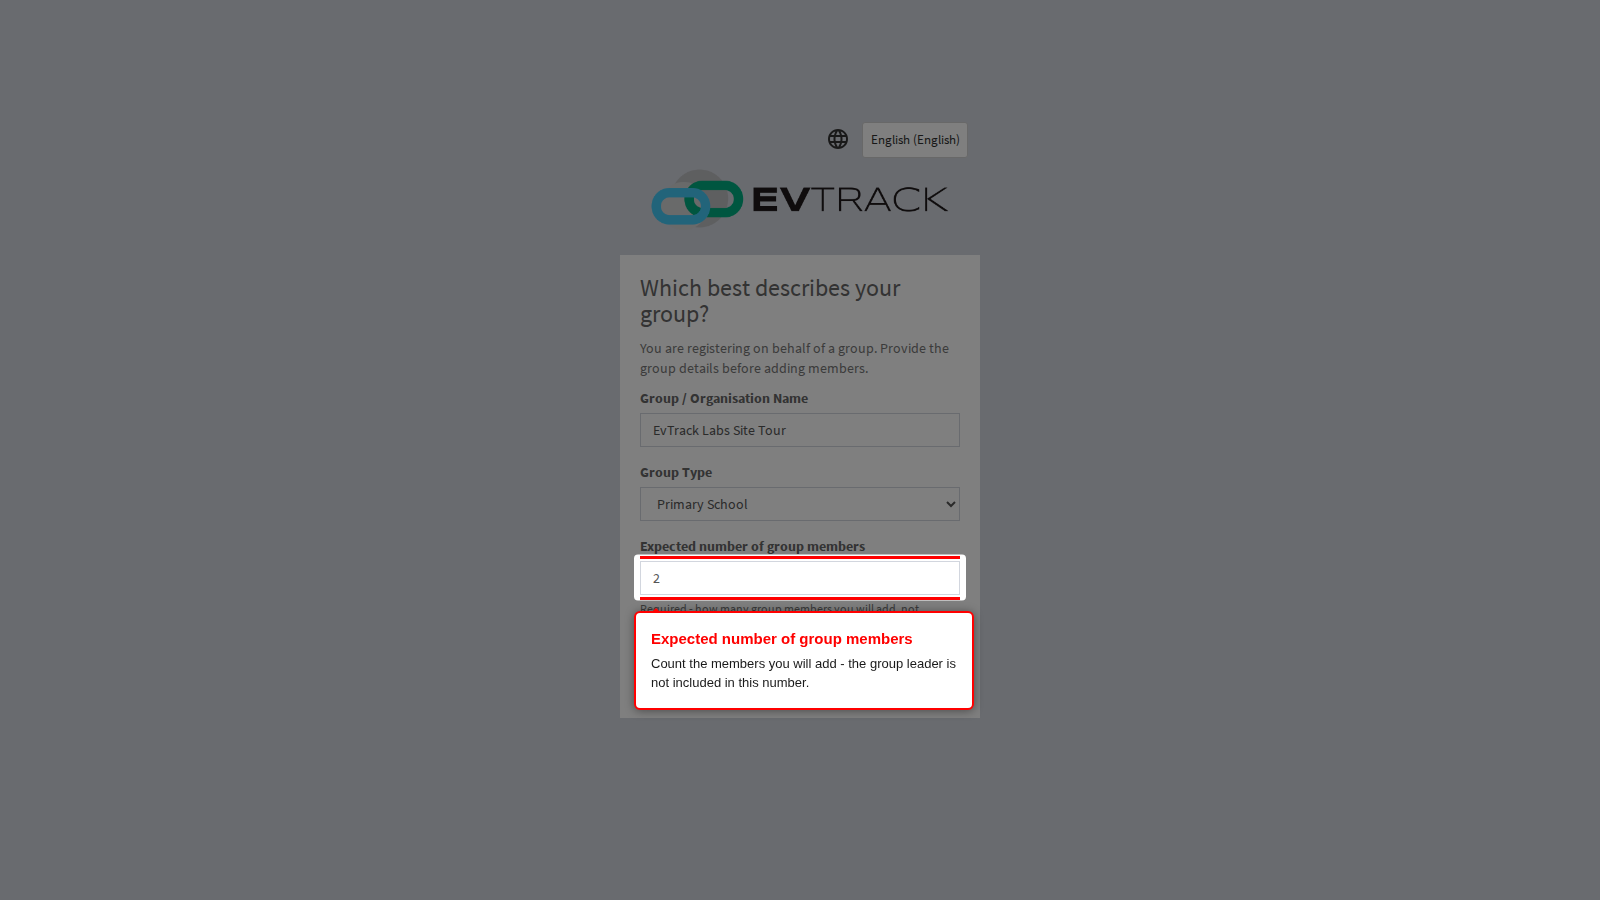
End state: pressing Continue opens the leader’s own details form.
Step 4: Complete the leader’s details
The leader now completes their own visitor details. They are the contact person for the visit, and their answers set the visit for the whole group.
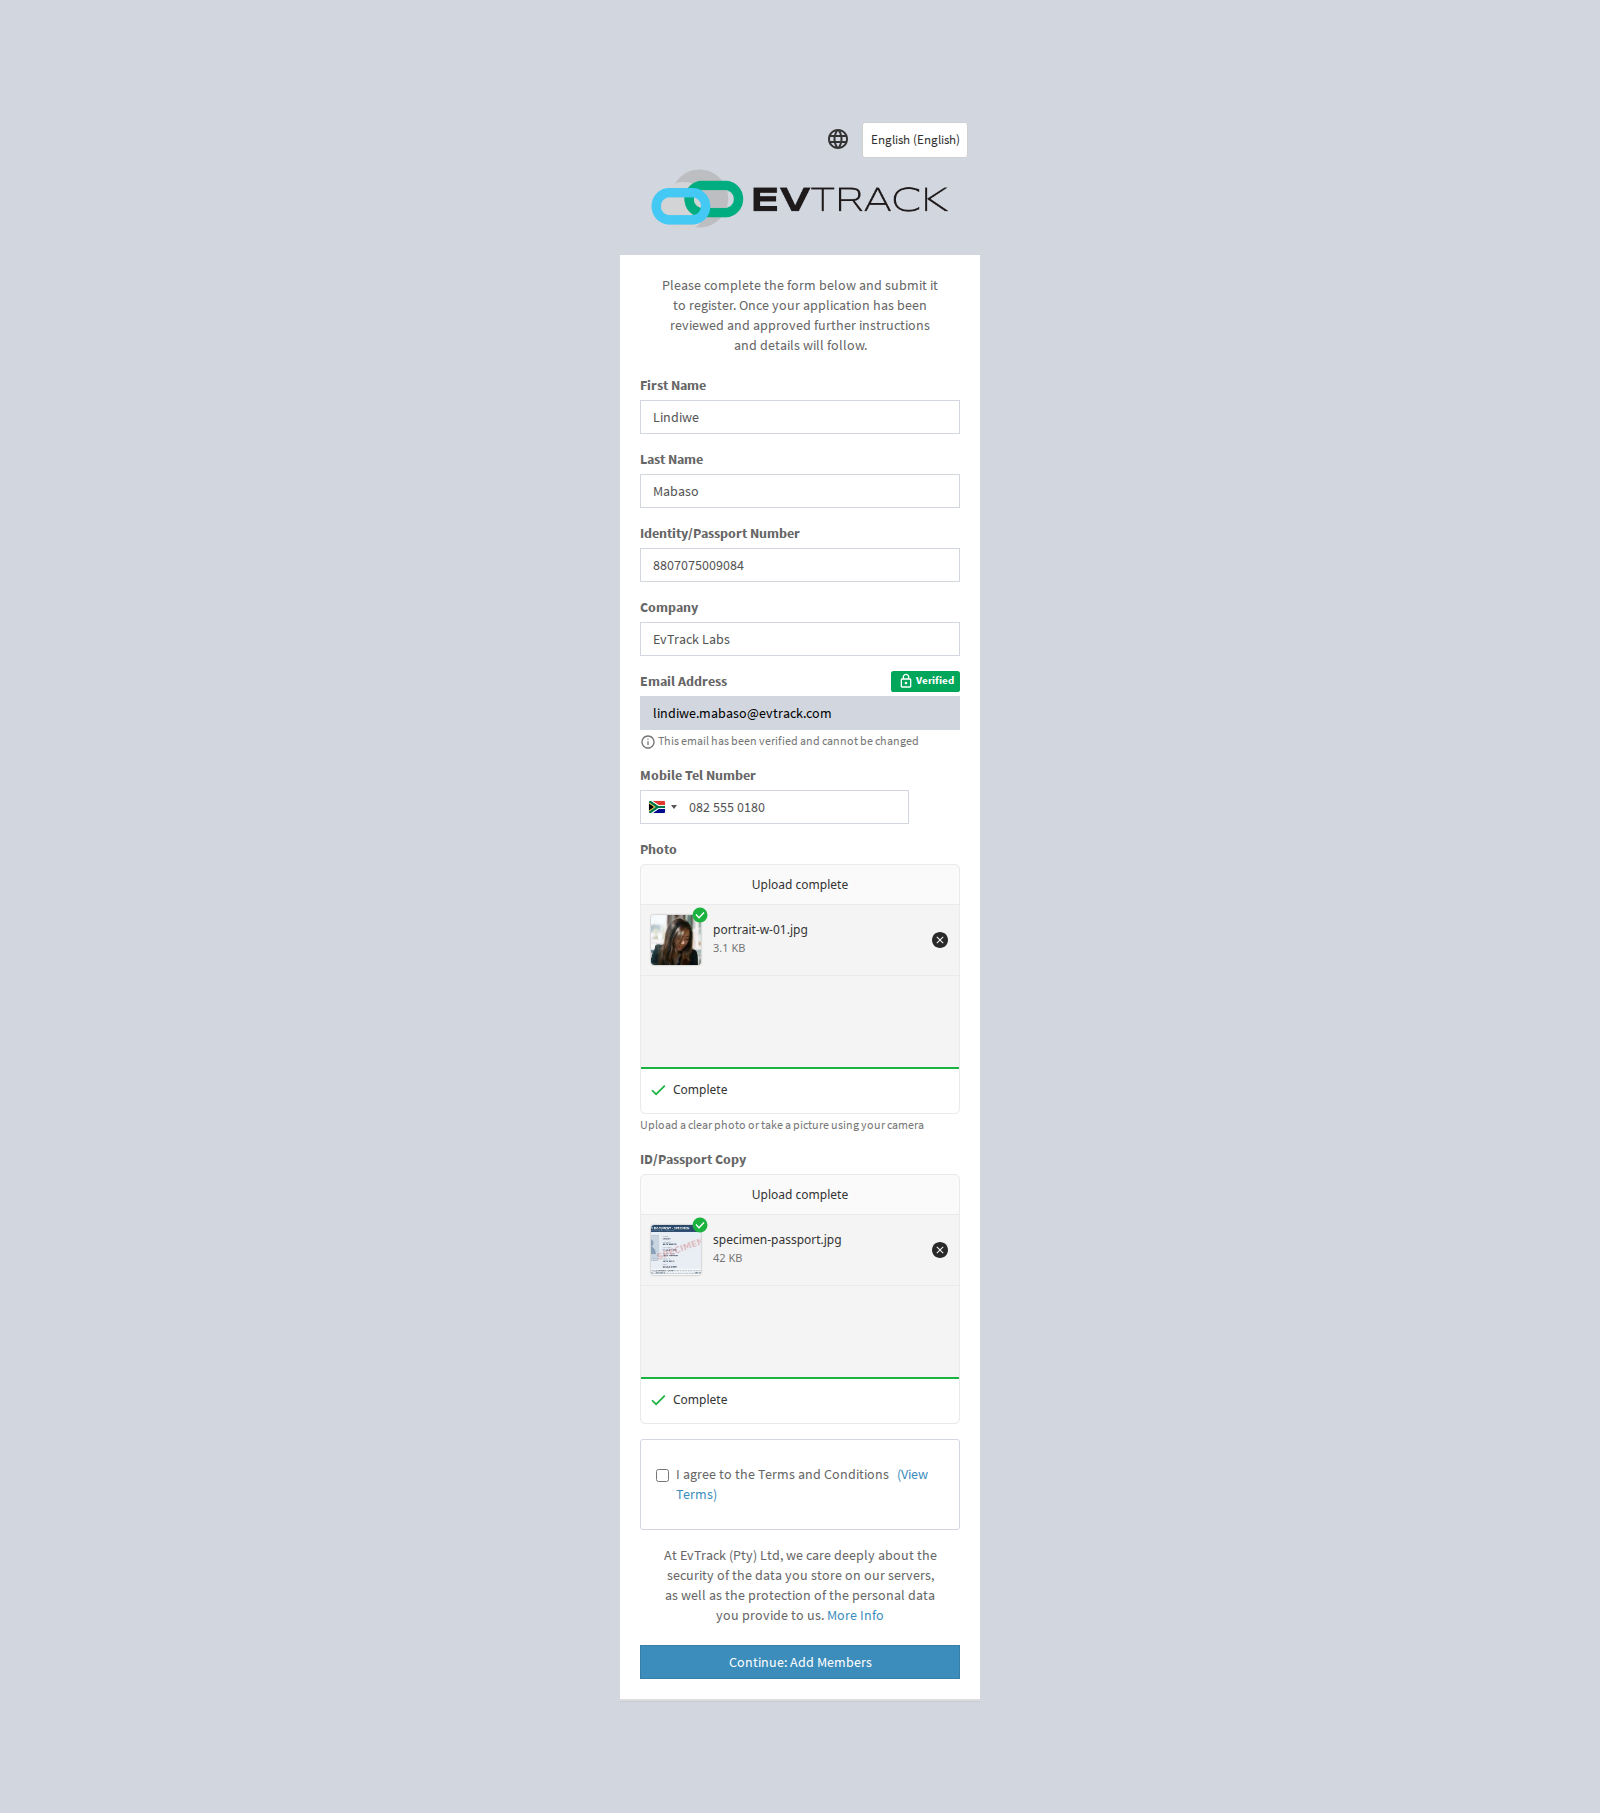
Every field the form displays is required, apart from the tick boxes (student and minor, parking, accessibility, terms) and any custom question that is not marked as mandatory. The full list is in Every field on the leader form below.
End state: the form is complete but not yet submitted. The next four steps look at the parts that most often cause questions.
Step 5: Identity or passport number
One field takes either document. It accepts 6 to 20 characters and is checked against the document rules configured for your site, so a number that does not match those rules is refused with a message explaining the problem.
Two conveniences are built in:
- Typing a 13-digit South African identity number fills in Date Of Birth automatically, unless a date has already been typed.
- If your site allows it, a Student / Minor tick box appears just above. Ticking it hides the document field for visitors who have no identity document, and makes Date Of Birth required instead. The date must fall inside the age range your site allows for that exemption.
Date Of Birth itself is entered as year, month and day. It cannot be in the future and cannot be more than 120 years ago.
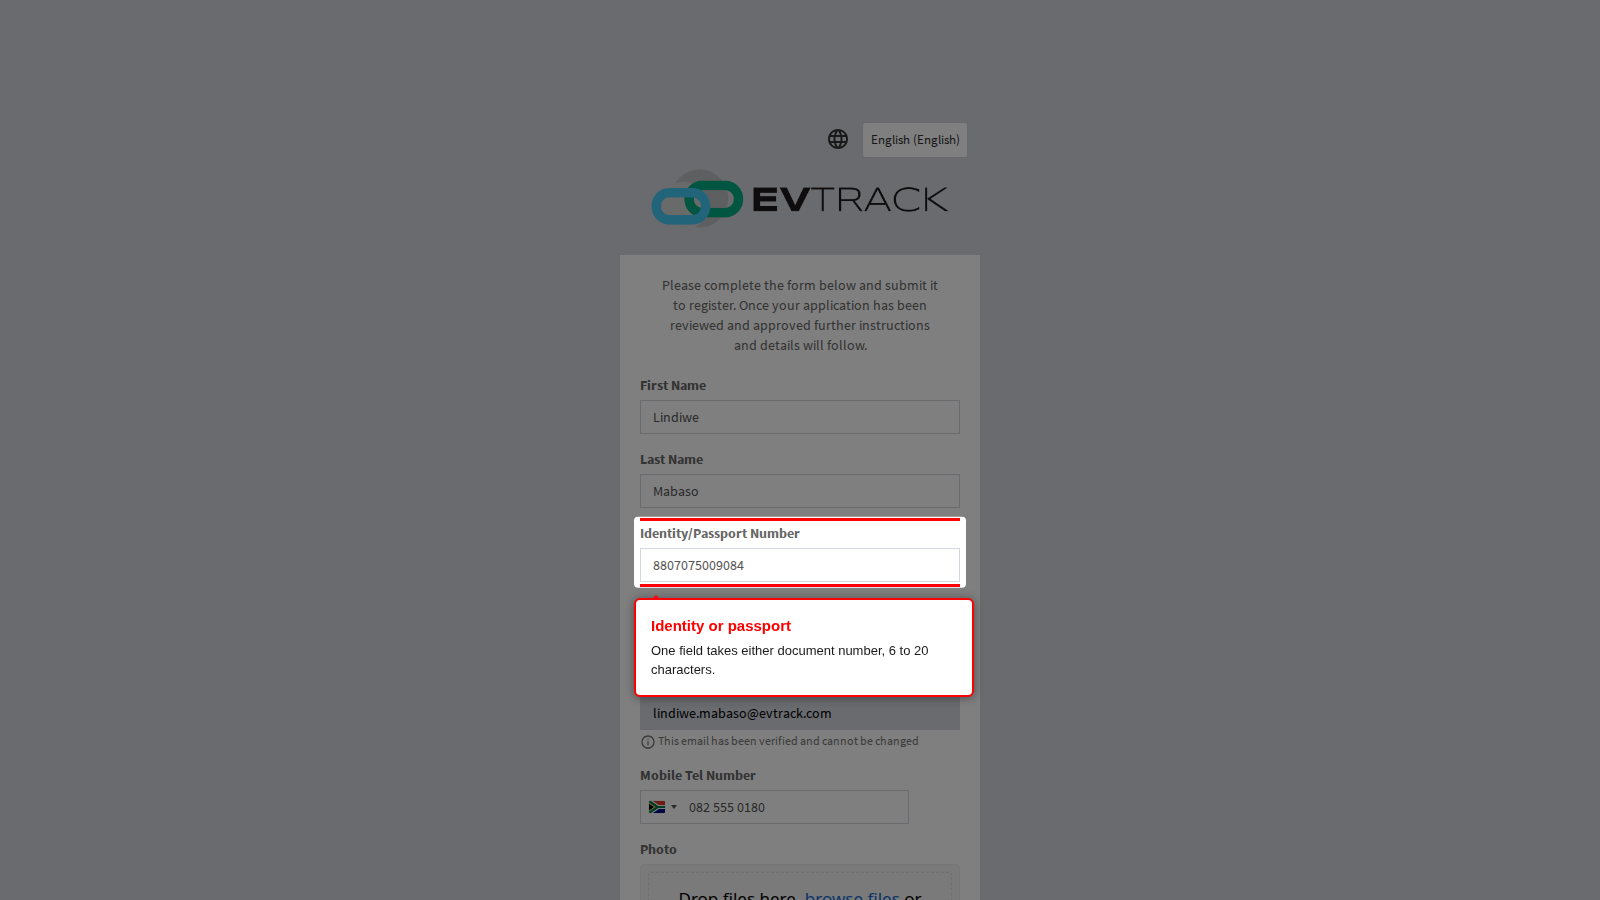
End state: the identity question is answered, either with a document number or with the student and minor exemption plus a date of birth.
Step 6: Contact details
The email address is already filled in and cannot be changed: it is the address that received the one-time PIN, and it carries a Verified badge. Everything the system sends about this group goes there.
Mobile Tel Number is entered with a country selector in front of the field. Choose the country, then type the number as it is dialled locally; it is stored in full international form. A number the selected country does not recognise is refused with Please enter a valid phone number.
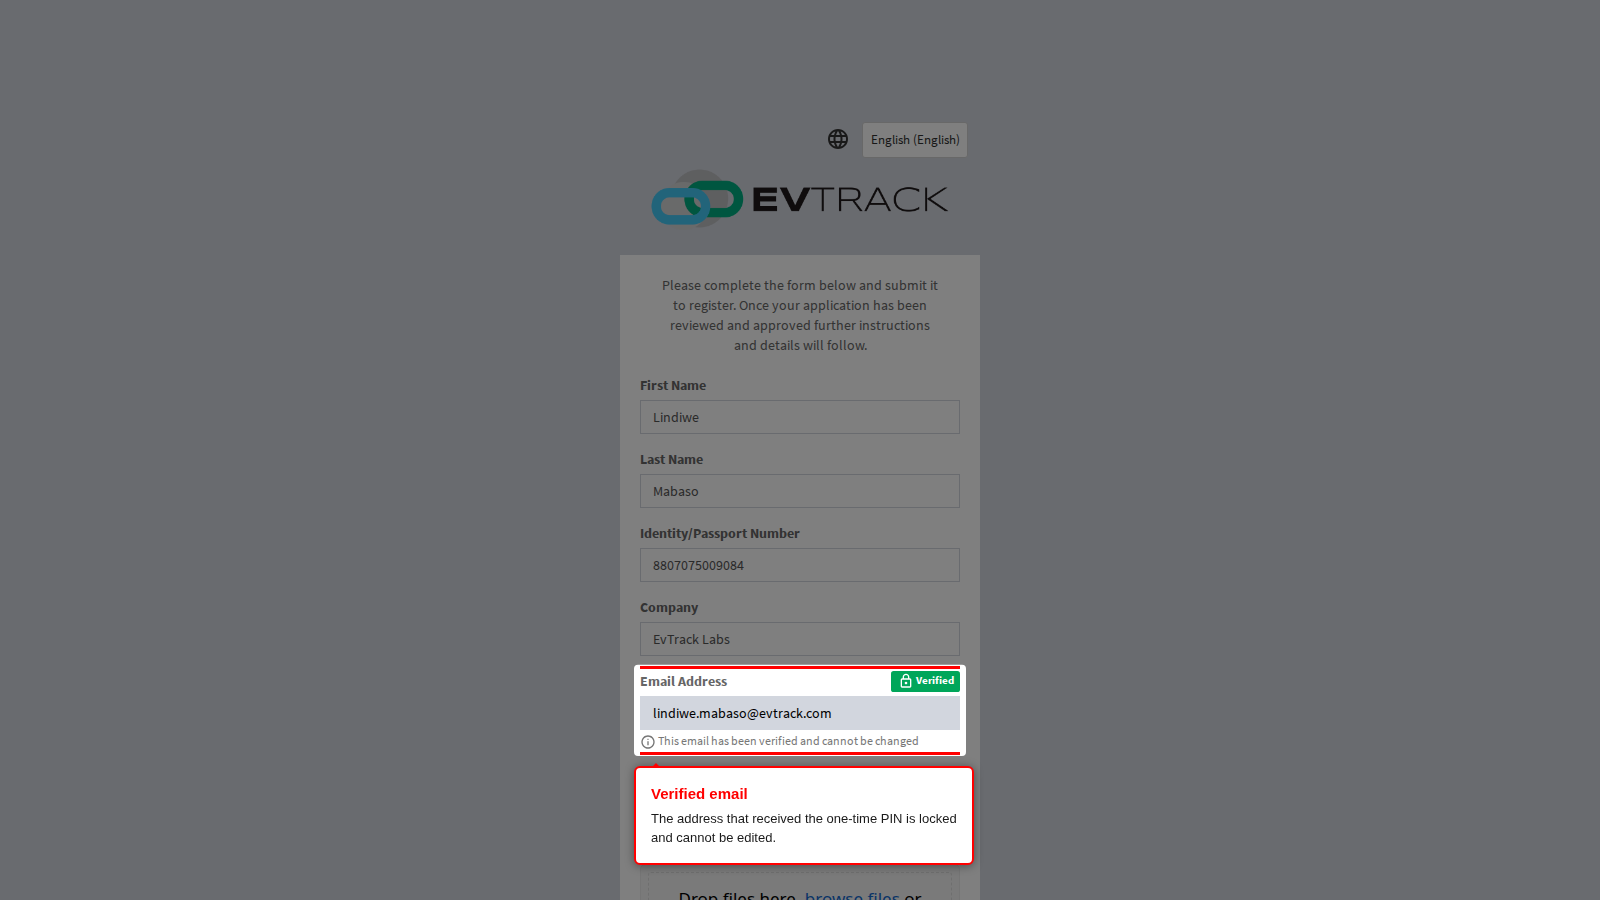
End state: the group has one reachable contact person.
Step 7: The photo
The photo panel accepts an image in three ways: drag a file onto it, use its browse link to pick a file, or use the camera option to take a picture there and then. On a phone the camera option uses the phone’s camera; on a laptop it uses the built-in webcam. A note under the panel says whether the picture is Required. Built-in picture questions are always required when they are shown at all; only a custom picture question your site adds can be Optional.
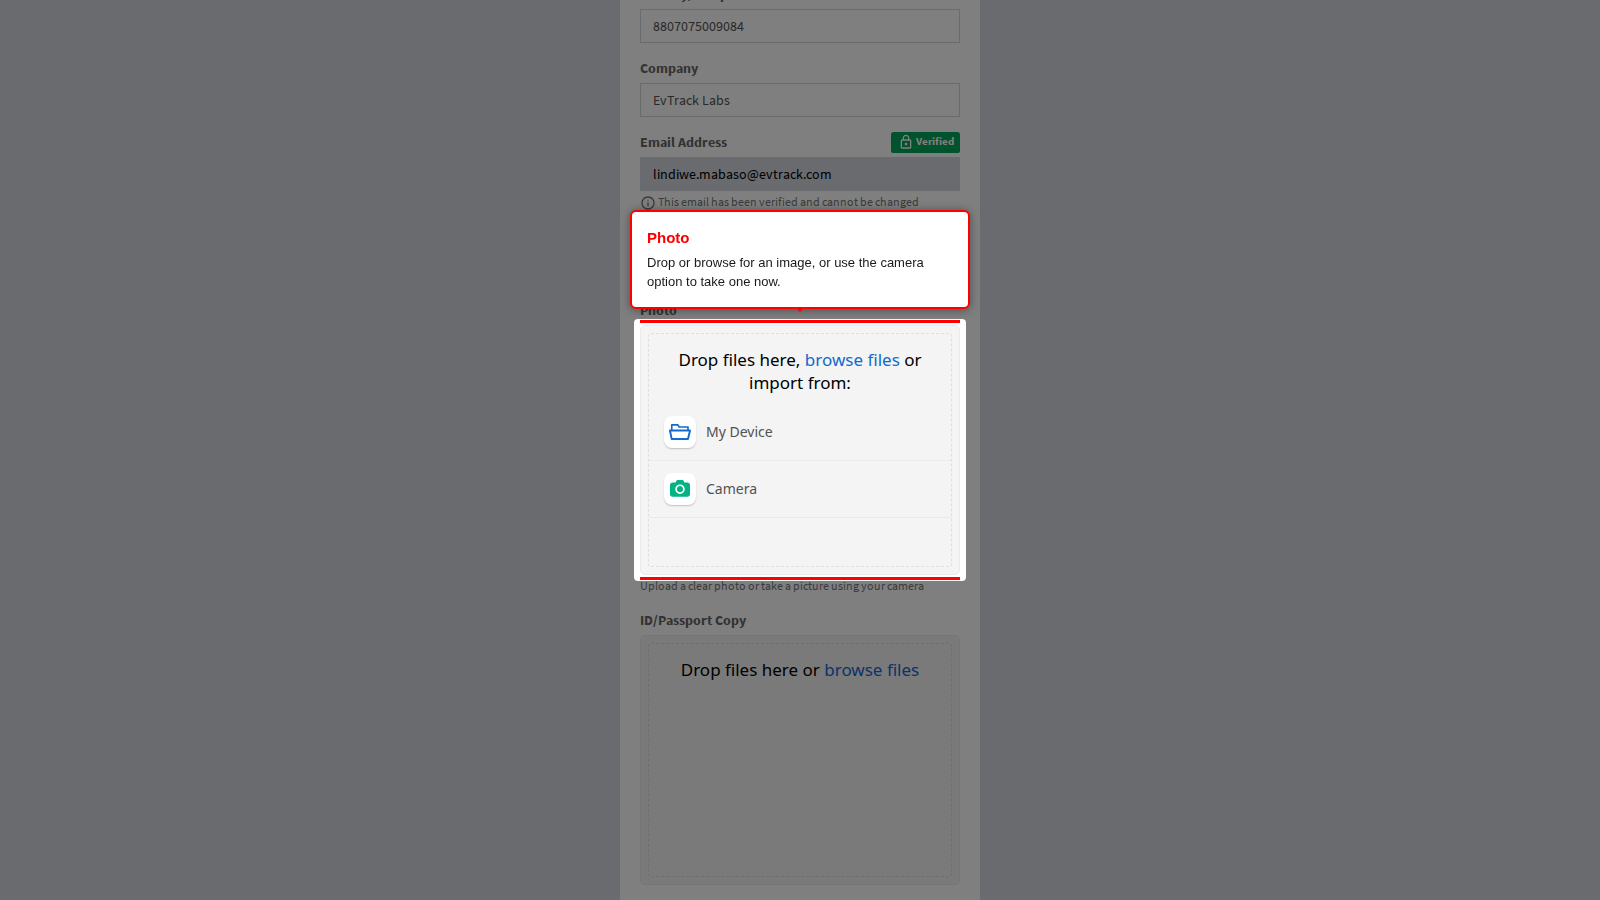
This capture shows the panel before anything is attached, because the drop area, the browse link and the camera option are replaced by a thumbnail of the picture as soon as one is chosen.
Uploading starts immediately, without a separate upload button. A progress bar runs across the panel, and when it finishes the picture is shown with a remove button so a bad shot can be replaced. See Photos and document copies in detail for the accepted file types, the size limits and what happens when a picture is refused.
End state: the visitor’s face photo is attached and shown in the panel.
Step 8: The identity document copy
ID/Passport Copy is a picture of the document itself: an identity card, or the photo page of a passport. It uses the same panel as the photo, with one difference: there is no camera option, so photograph the document first and then attach the picture.
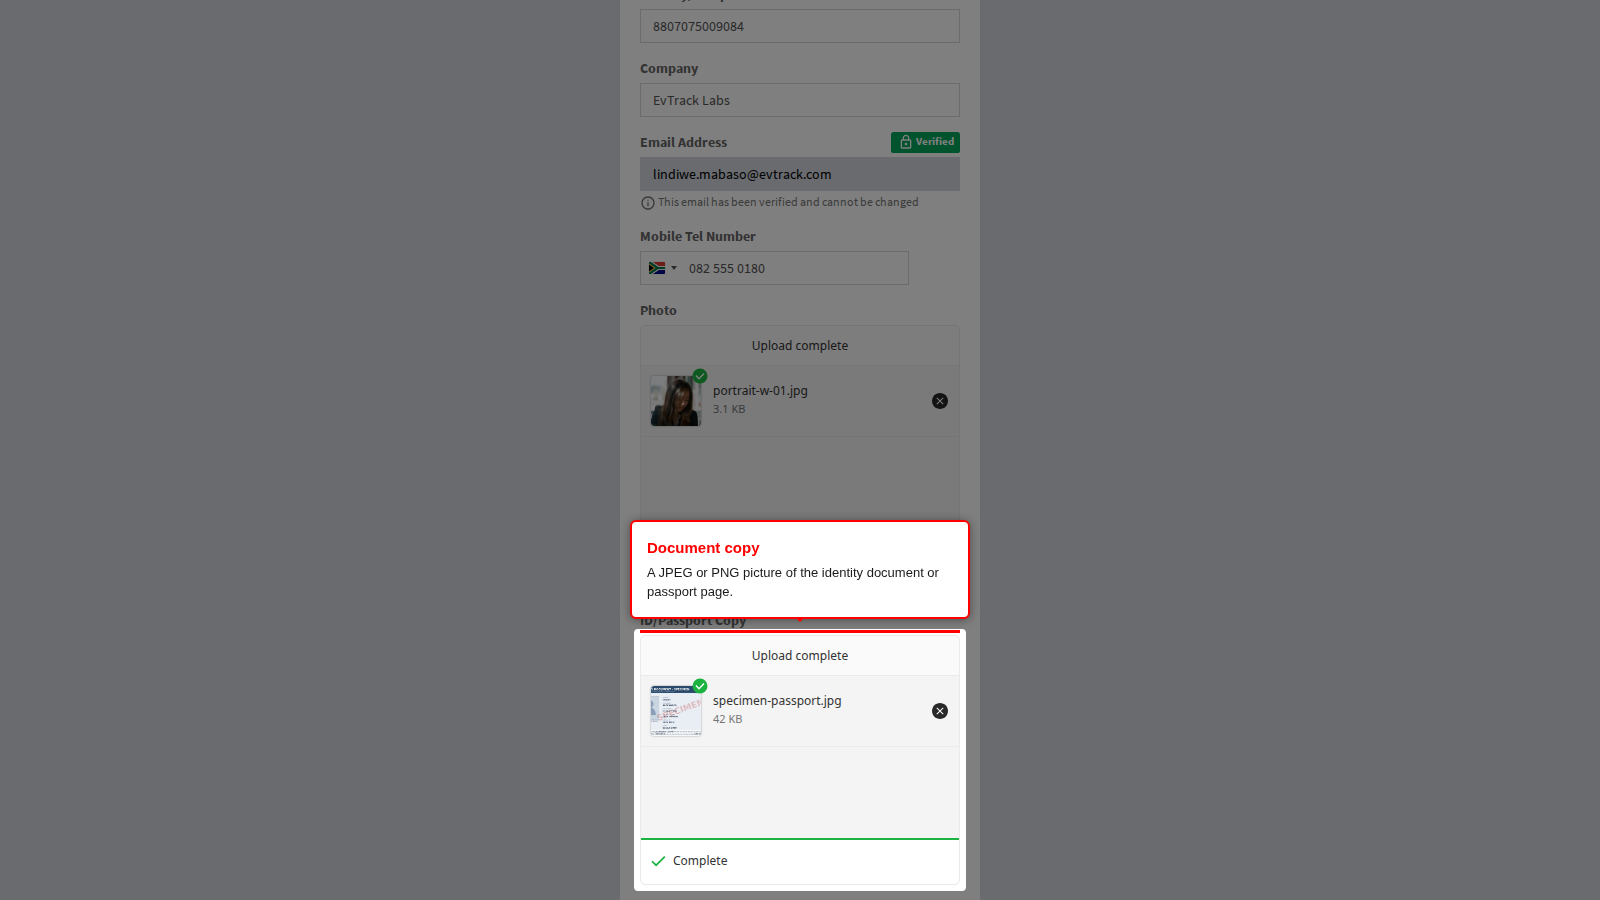
End state: both images are attached. Pressing Continue: Add Members at the foot of the form saves the leader and opens the member roster.
Step 9: What each member is asked for
Press + Add Member on the roster to open the member form. It asks only for the fields your site marks as required for group members, and every field it shows must be filled in.
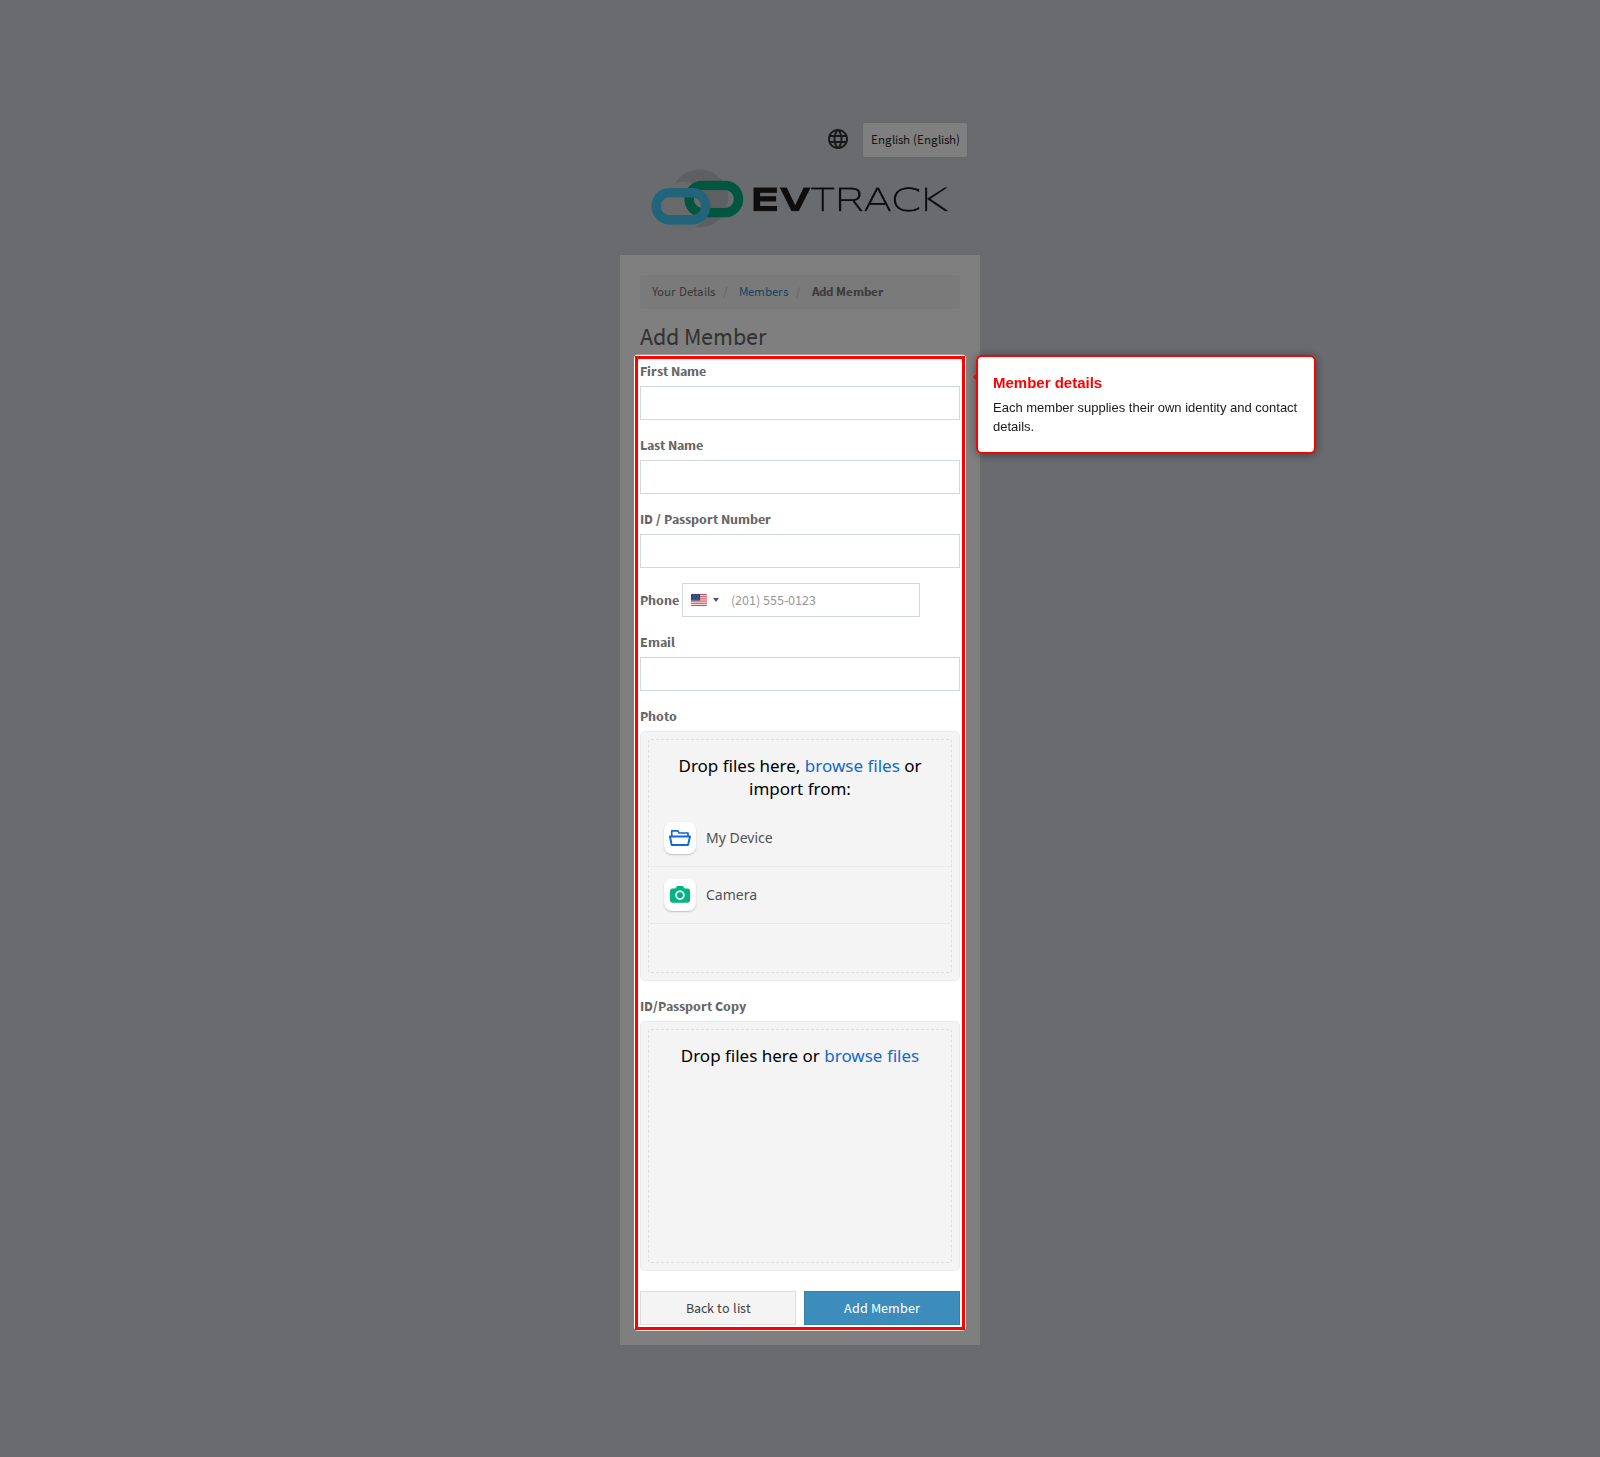
The member form is deliberately shorter than the leader’s. It never asks for the reason for the visit, the arrival and departure times, parking, custom questions or the terms and conditions: those were answered once by the leader and apply to everyone. The full list is in Every field on the member form below.
End state: an empty member form, ready to complete.
Step 10: A photo for every member
When your site asks members for a photo and a document copy, each member gets their own pair of panels, with exactly the same behaviour, file types and limits as the leader’s.
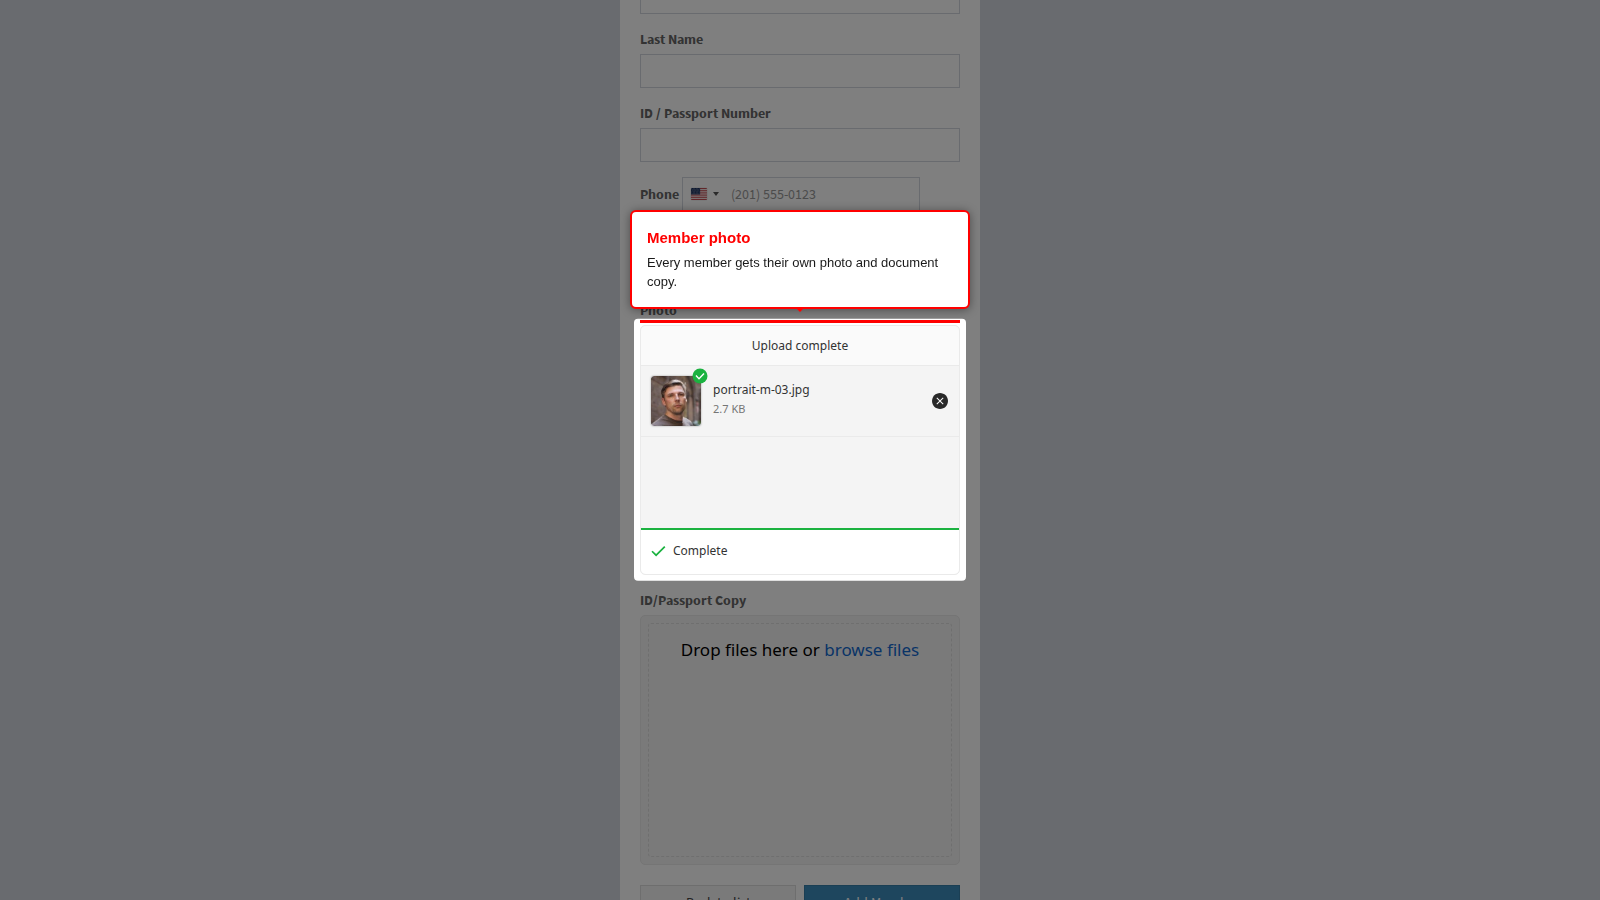
Complete the member’s details and press Add Member. If a required picture is missing, the form comes back with that panel marked as required, and any picture that was already attached is still there: uploads do not have to be repeated.
End state: the member is added and the roster reopens.
Step 11: Check the roster
The roster lists the group leader first, badged as You (Group Leader), then every member added so far. A progress line counts the members against the expected group size, and each row has a Remove button that asks for confirmation.
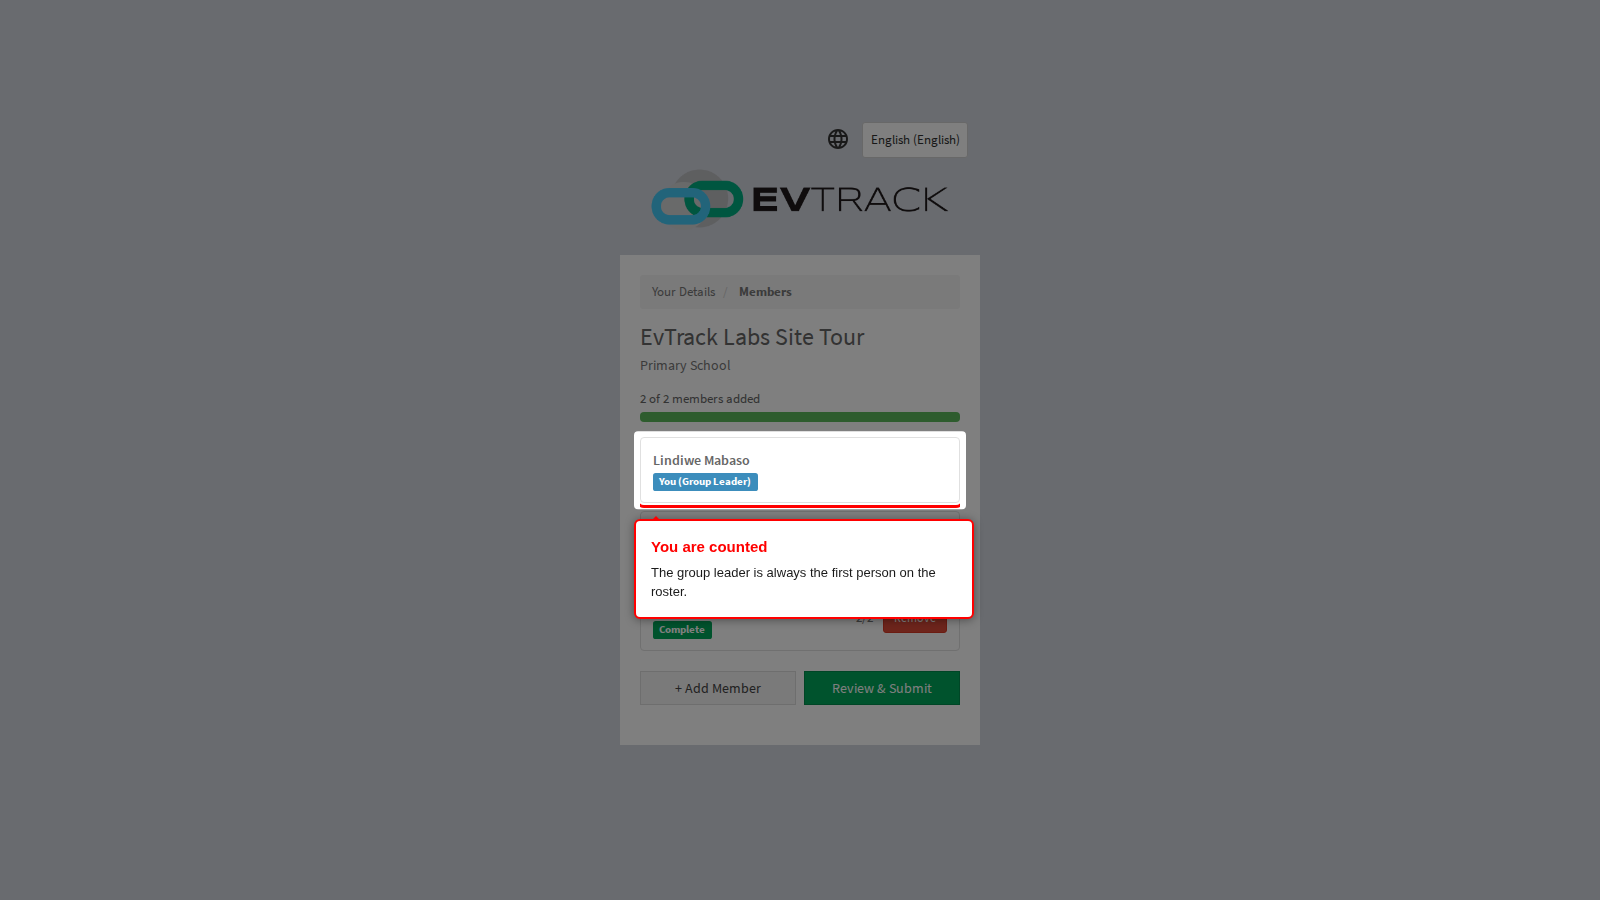
Use + Add Member until everyone is on the list. The button disappears once the maximum group size is reached, and a message explains the limit if a leader tries to go past it.
End state: every traveller is on the roster.
Step 12: Review and submit
Review & Submit shows the group name, the group type and the complete list of people. If the roster does not match the expected group size, a warning says so, and the leader may still submit.
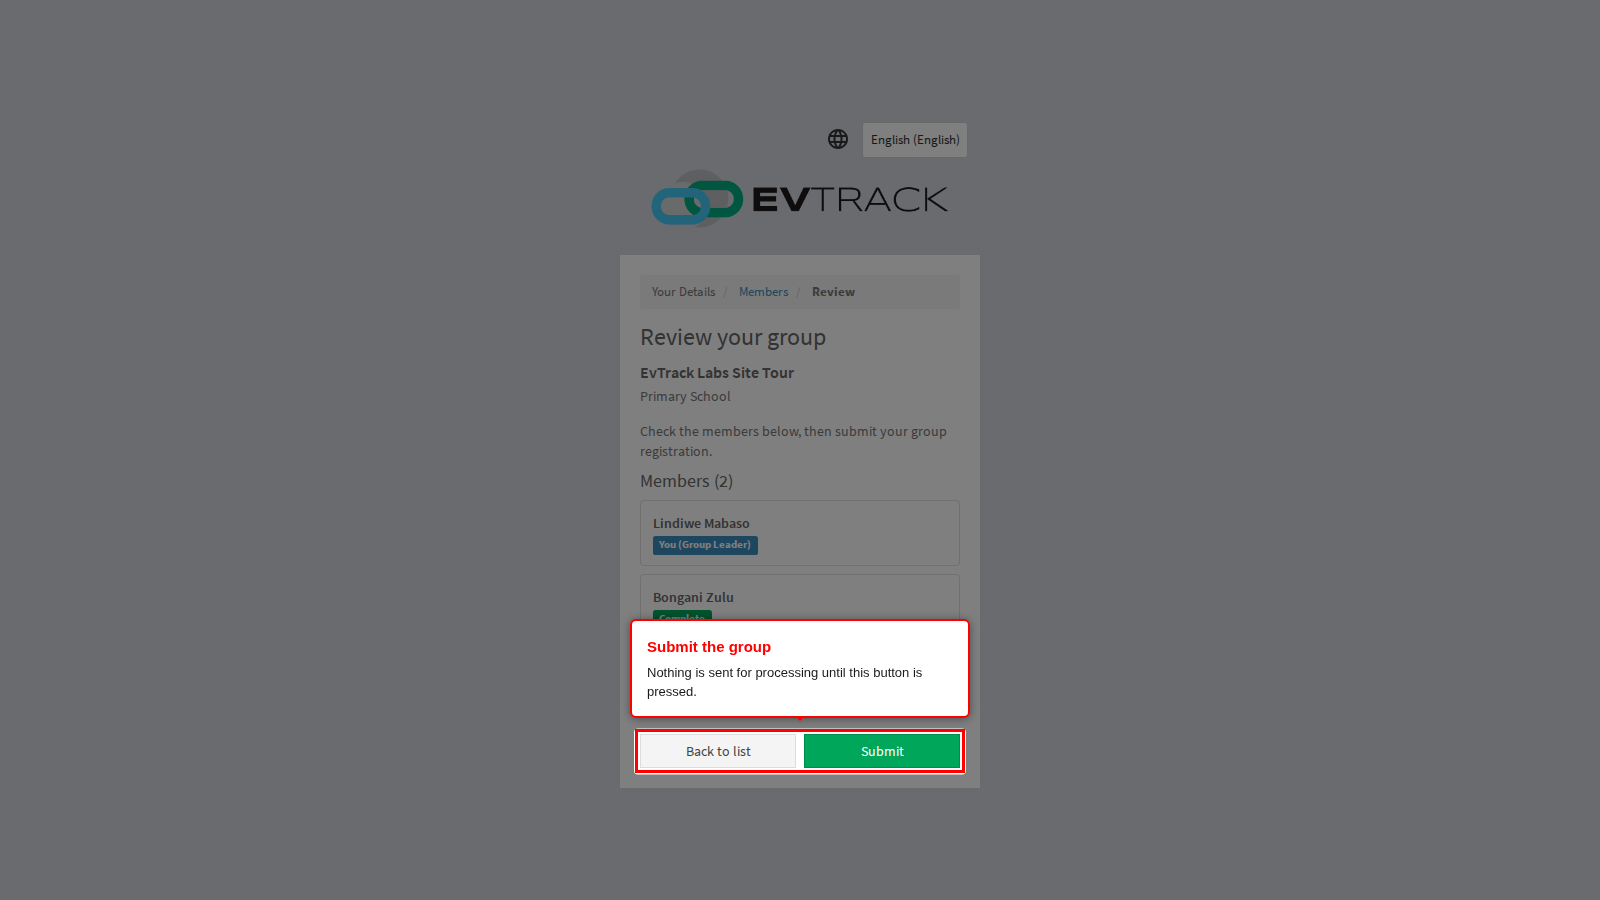
End state: pressing Submit sends the whole group for processing. At least one member is required, so a group of one cannot be submitted.
Step 13: The confirmation
The leader sees a confirmation and receives an email. Nothing is approved yet.
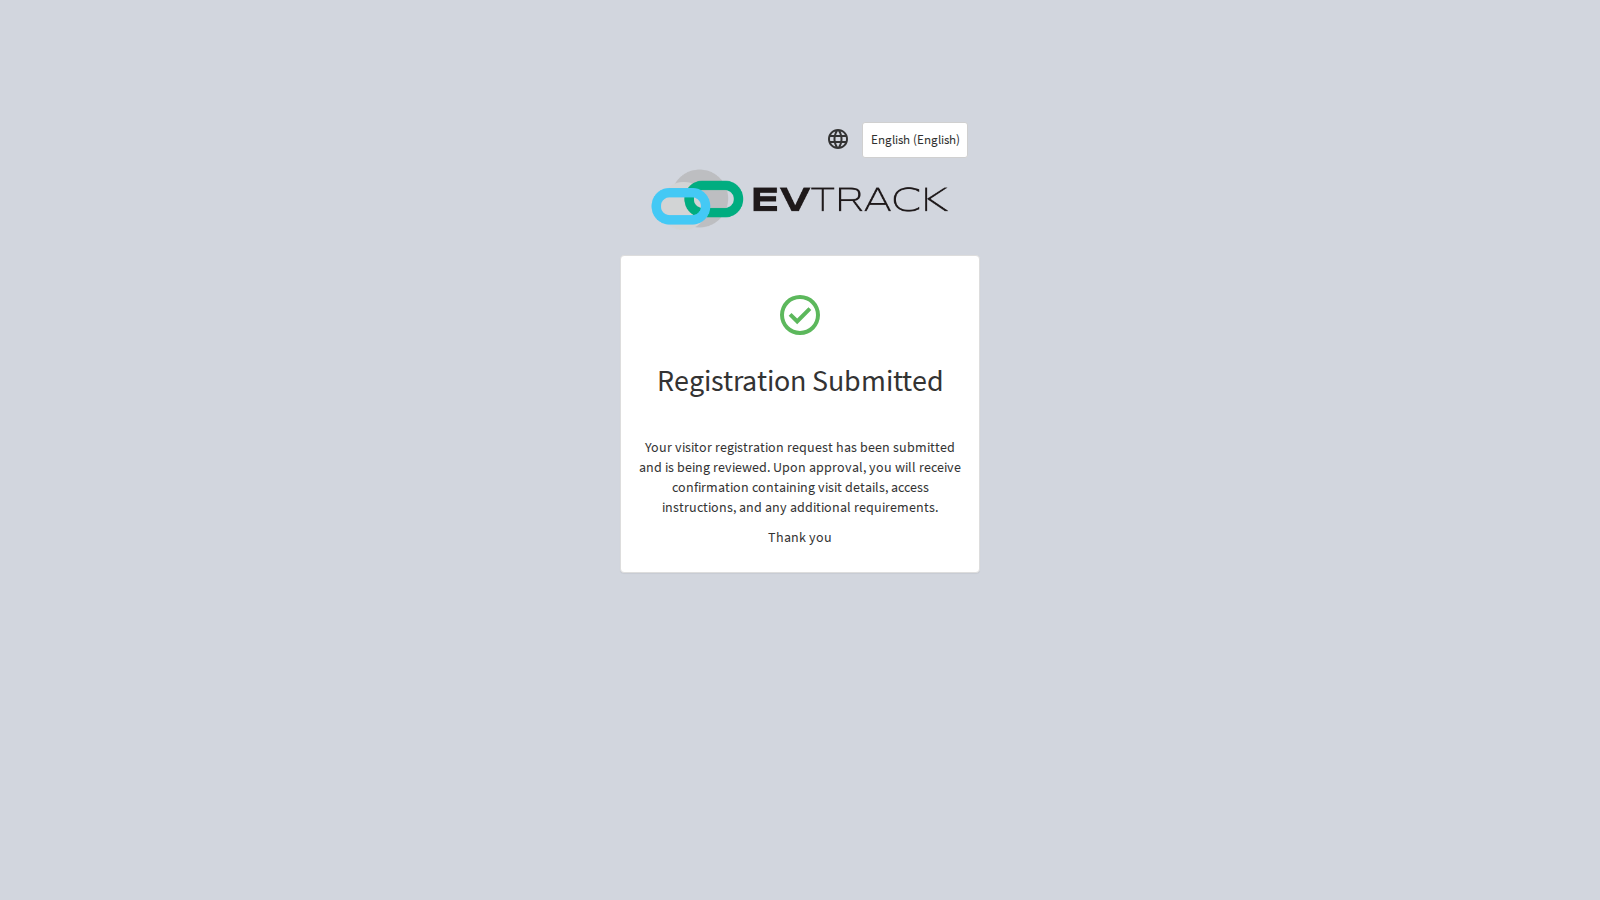
End state: the request is waiting in the operator’s Registration list.
Step 14: Find the request in the Registration list
Back in the operator console, select Visitors in the sidebar and open Registration. The group request appears under the leader’s name with status Pending.
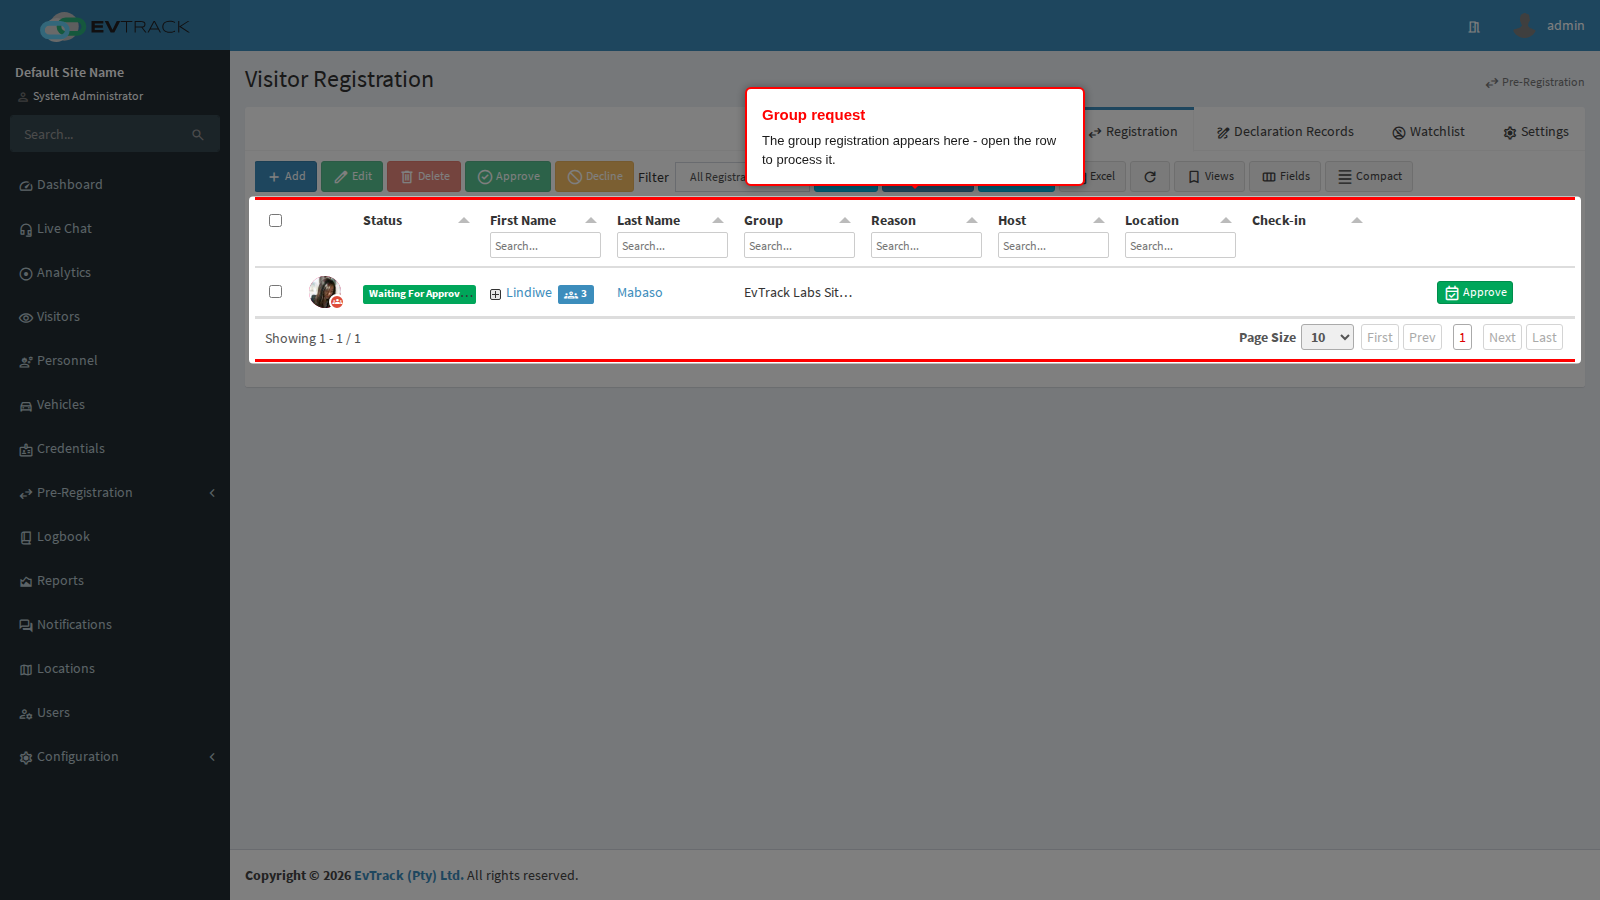
End state: the request row is on screen.
Step 15: Open the processor
Click the request’s row. The processor shows the group section with the leader and every member, alongside the visit reason, location and validity fields the approval needs.
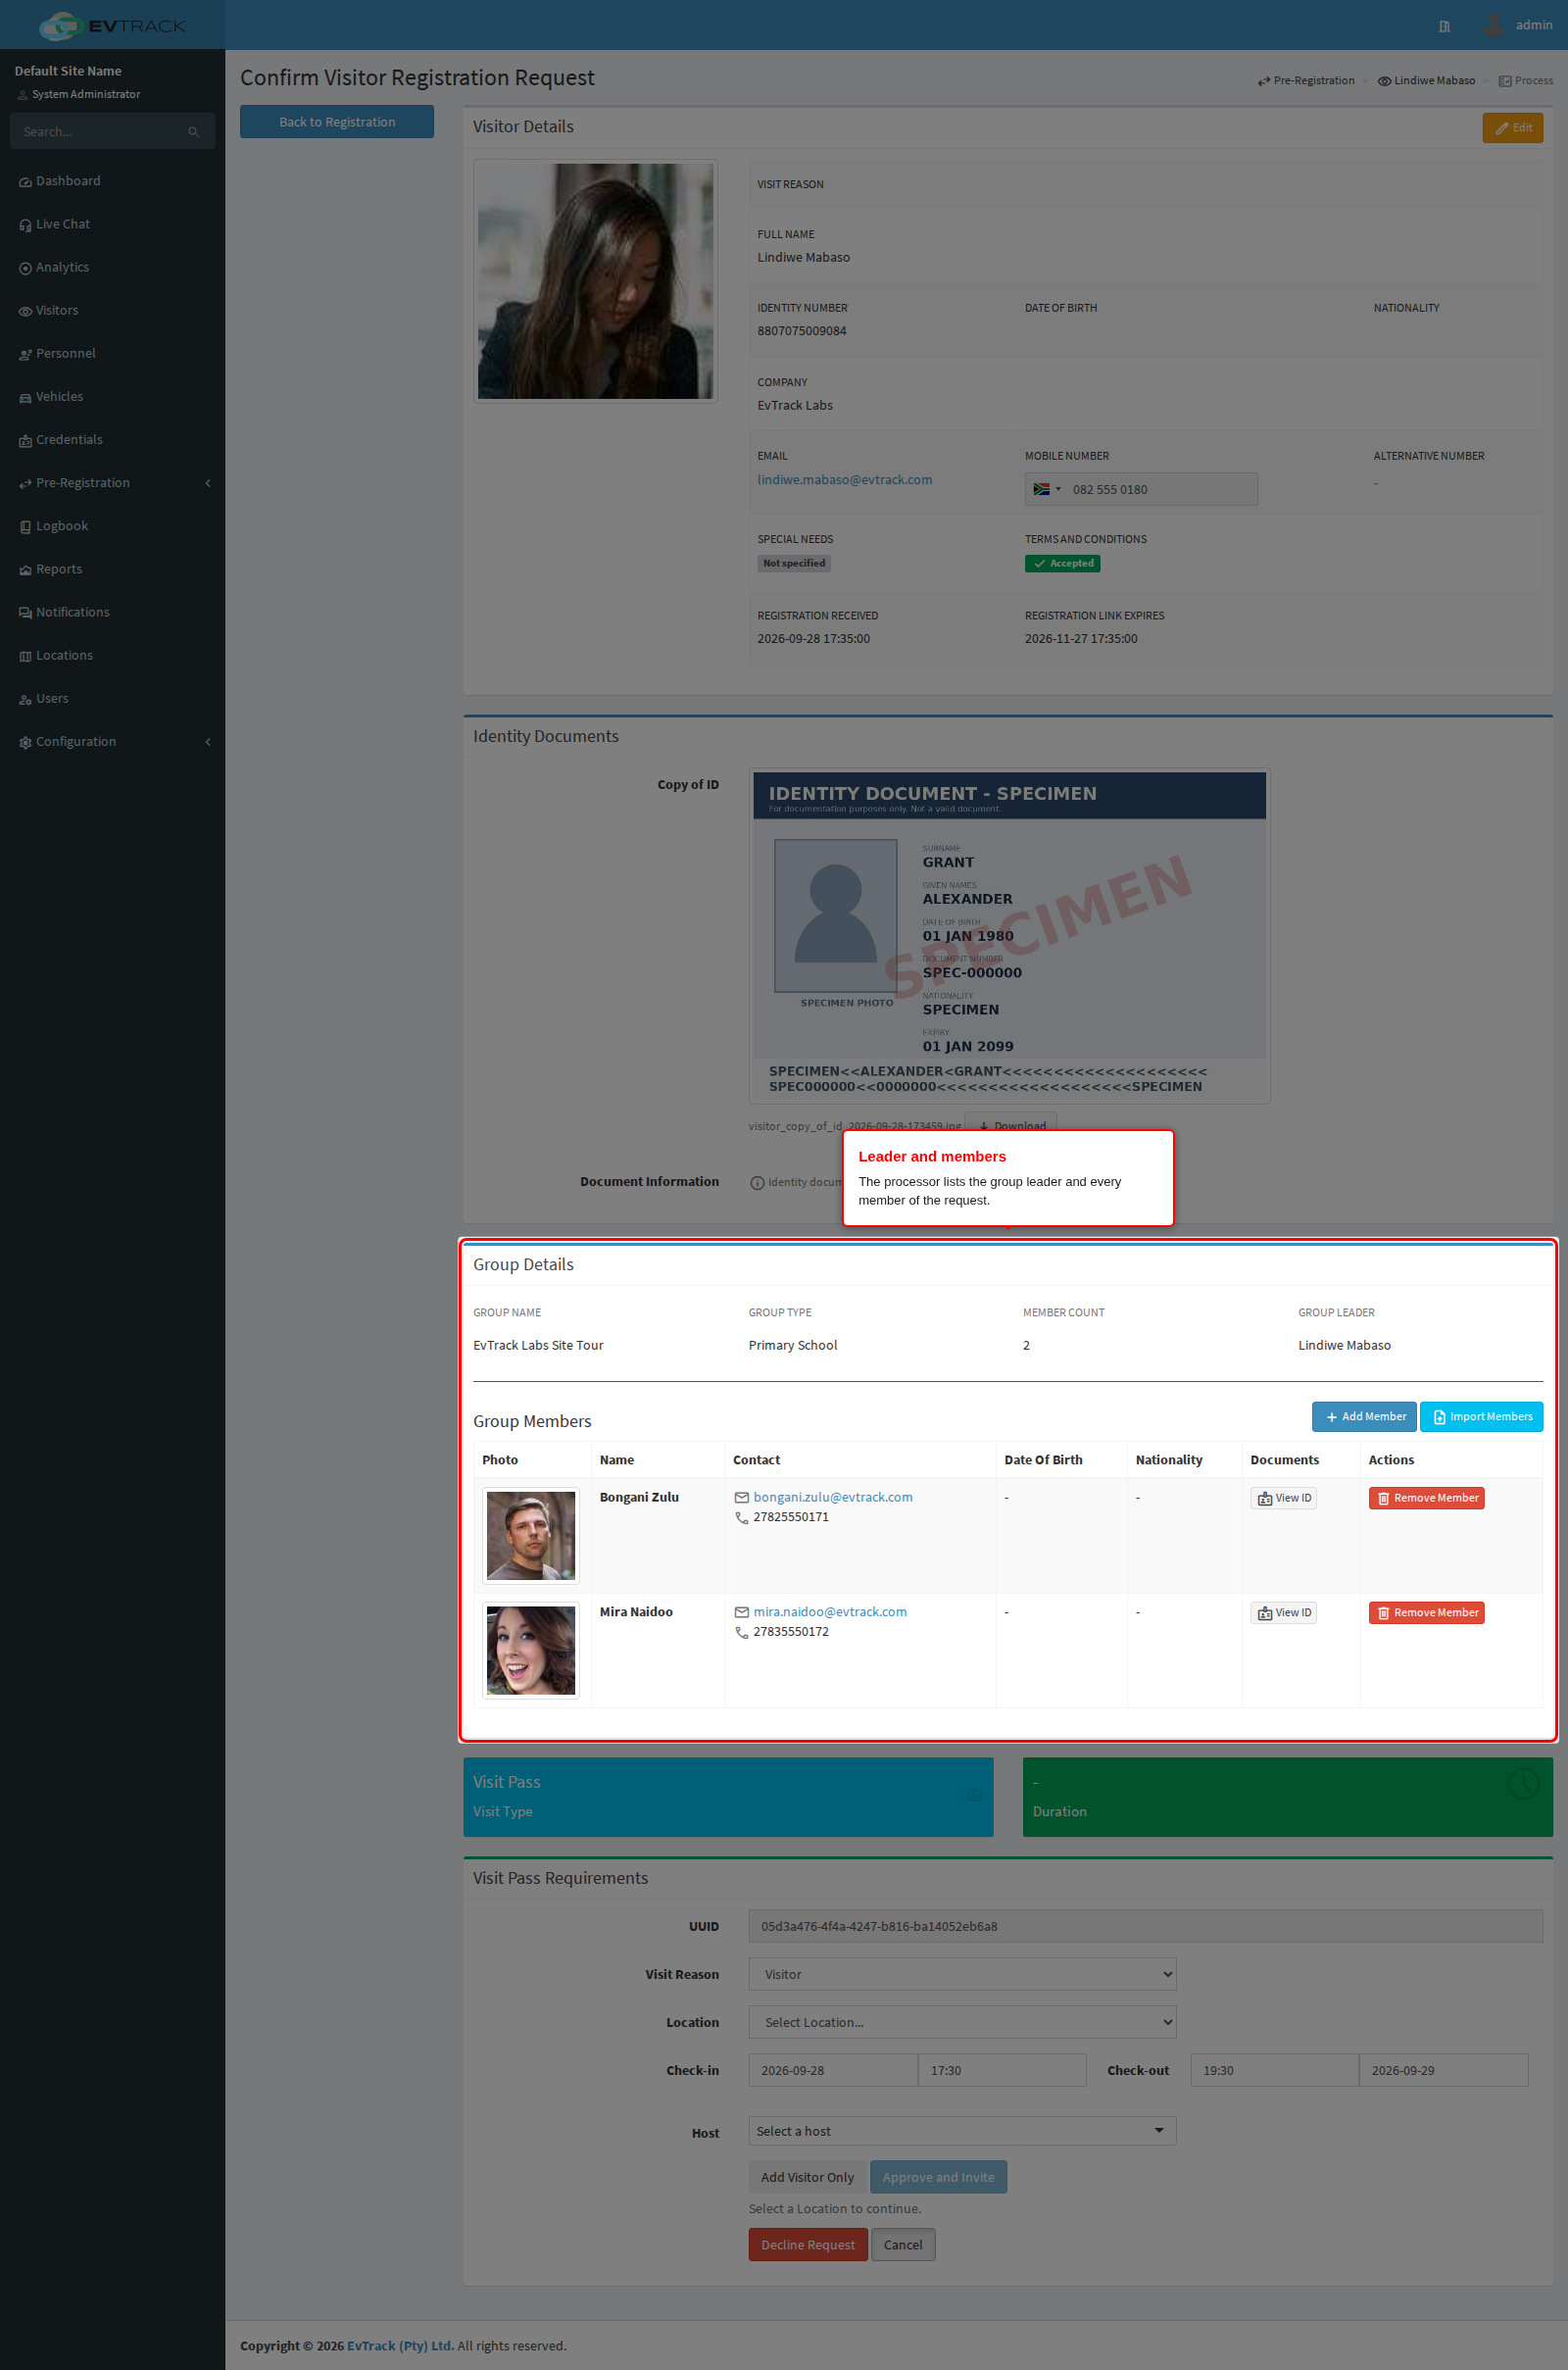
End state: the operator can see everything the group supplied, including the photos and document copies.
Step 16: Approve
Select the visit reason, the location and the visit’s start and end date and time, then click Approve.
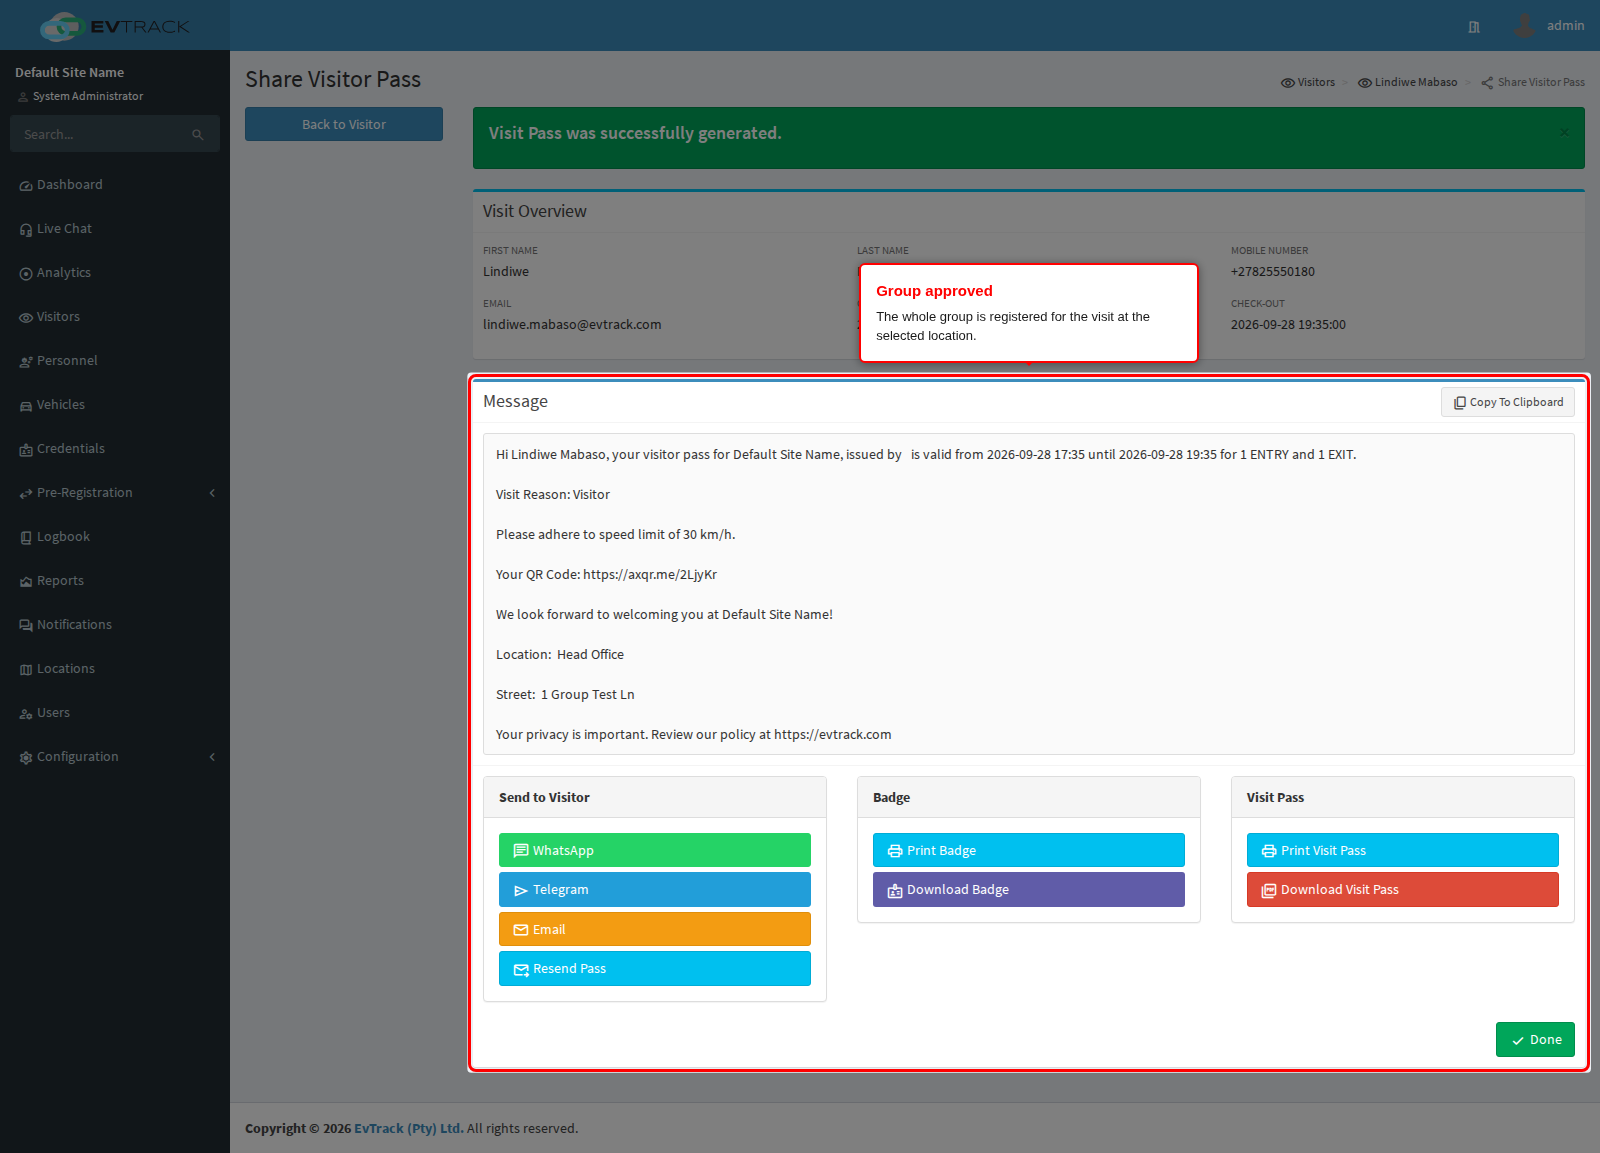
End state: the whole group is registered for the visit at the selected location and the leader is notified. What happens next, including host approval, is described in Approval Workflow.
Every field on the leader form
Only the fields your site asks for are displayed, and every displayed field is required unless the table says otherwise.
| Field | Notes |
|---|---|
| Select the reason of your visit | Chosen from the visit reasons configured for your site. Applies to the whole group. |
| Title | Up to 20 characters. |
| First Name | 2 to 50 characters. |
| Last Name | 2 to 50 characters. |
| Student / Minor | Optional tick box, shown only when your site allows registration without an identity document. Hides the document field and makes date of birth required. |
| Identity/Passport Number | 6 to 20 characters, either document. Checked against the document rules configured for your site. A South African identity number fills in the date of birth. |
| Date Of Birth | Year, month and day. Not in the future, and not more than 120 years ago. |
| Select your Nationality | Chosen from the country list. |
| Company | 2 to 50 characters. |
| Email Address | Pre-filled with the verified address and locked. Up to 100 characters. |
| Mobile Tel Number | Country selector plus the local number, stored in international form. |
| Alternative Telephone Nr | A second number, entered the same way. |
| Physical Address | Up to 2000 characters. |
| Accessibility question | Optional tick box, plus a description of up to 500 characters. Its wording is configurable for your site. |
| Photo | JPEG or PNG picture of the visitor’s face. See below. |
| ID/Passport Copy | JPEG or PNG picture of the identity document. See below. |
| Check-in Date/Time | Date, plus a time chosen in half-hour steps. Applies to the whole group. |
| Check-out Date/Time | Date, plus a time chosen in half-hour steps. Applies to the whole group. |
| Request Parking | Optional tick box. Ticking it reveals the vehicle questions below. |
| Select Parking Type | Normal or disabled parking. |
| Plate Country | Chosen from the country list. Selecting the United Arab Emirates adds an Emirate/Authority list and a Plate Code/Category of 1 to 3 characters. |
| Enter Vehicle Number Plate | 2 to 12 characters. |
| Enter Vehicle Make | 2 to 50 characters. |
| Enter Vehicle Model | 2 to 50 characters. |
| Enter Vehicle Colour | 2 to 30 characters. |
| Custom questions | Anything your site adds: short text, long text, a number, a dropdown, tick boxes, a photo or a file. Each one is required only if it was marked as mandatory. |
| Terms and Conditions | Tick box with a (View Terms) link that opens the full text. |
Every field on the member form
| Field | Notes |
|---|---|
| Title | Up to 20 characters. |
| First Name | At least 2 characters, up to 50. |
| Last Name | At least 2 characters, up to 50. |
| ID / Passport Number | 6 to 20 characters, checked against the document rules configured for your site. A South African identity number fills in the date of birth. |
| Student / Minor | Optional tick box, shown only when your site allows registration without an identity document and the document field is being asked for. |
| Date of Birth | Year, month and day. Always required for a member marked as a student or minor, and their age must fall inside the allowed range. |
| Company | Up to 100 characters. |
| Nationality | Chosen from the country list. |
| Mobile Number | Country selector plus the local number, stored in international form. |
| Up to 100 characters. | |
| Photo | JPEG or PNG picture of the member’s face. |
| ID / Passport Copy | JPEG or PNG picture of the member’s identity document. |
A member’s email address is not verified with a one-time PIN. Only the leader verifies an address, and the leader is the person the system corresponds with.
Photos and document copies in detail
All the picture panels behave the same way, on the leader’s form, on the member form and for custom photo and file questions.
How a picture gets in
- Drag an image onto the panel.
- Use the panel’s browse link and pick a file.
- Use the camera option to take a picture immediately. This is offered on the visitor photo panel only, and it works on a phone camera as readily as on a laptop webcam.
- Only one picture per panel. Attaching a second replaces the first.
What is accepted
- JPEG and PNG images only. The file’s real content is inspected, so renaming a document or a PDF to end in
.jpgdoes not get it past the check. - The browser refuses anything above 20 MB outright.
- Before uploading, the picture is automatically resized to fit within 1600 by 1600 pixels and recompressed. This is what keeps modern phone photographs, which are frequently far larger, inside the 5 MB and 4096-pixel limits the server accepts.
- Very large repeated uploads from the same network connection are slowed down deliberately. If a visitor sees an upload refused after several attempts in quick succession, waiting a minute clears it.
While it uploads
- Uploading starts as soon as the picture is chosen. There is no separate upload button.
- A progress bar runs across the panel, then the picture is shown with a remove button.
- Submitting the form while a picture is still uploading is blocked with a message asking the visitor to wait. This matters most on a slow mobile connection.
When something goes wrong
- A file of the wrong type or an oversized file is refused inside the panel, and nothing is attached. Pick another picture.
- Submitting the leader’s form with a required picture missing raises a message naming the missing picture, and the form is not sent.
- Submitting the member form with a required picture missing returns the form with that panel marked as required.
- After any refused submission, pictures that were already uploaded are still attached: only the fields that were flagged need attention.
- If the visitor leaves the form open for a long time, the verification behind the journey can expire. Uploads are then refused and the panel reports that the upload failed, and the registration has to be started again from the one-time PIN. Long registrations are best completed in one sitting.
Which questions your visitors see
The public form is controlled from the tabs described under Configuration above, and both can be overridden for an individual location so that one site can ask for more than another:
- Configuration > Visitor Settings > Self-Registration > Required Fields switches the built-in questions on and off for the leader, and holds the Custom Fields builder where you add questions of your own, including custom photo and file uploads. See Self-Registration Settings.
- Configuration > Visitor Settings > Self-Registration > Group Registration holds Group Member Required Fields, the separate list that decides what each member is asked for. At least two identifying fields must be required whenever group registration is switched on, so a group can never be submitted as a list of nameless people.
Required Fields is a different policy again: it governs what an operator must capture when adding a visitor in the console, not what the public form asks for.
Related pages
- Managing Group Registrations (Admin) to build and process a group entirely from the operator console, without the public form.
- Approval Workflow for what happens to the request after it is submitted.
- Visitor Self-Registration for the same public journey when a single visitor registers alone.
- Self-Registration Settings for the links, the field policy and the group options.
- Required Fields for the operator-side capture policy.