Every visit moves through a lifecycle of statuses, and operators drive those transitions from the Visitors Dashboard. Every status change is recorded in the logbook with the operator, timestamp and visit details.
The visit lifecycle
A visit is always in exactly one status. The diagram shows the route a typical visit takes; the paths that end a visit early branch off to the right.
stateDiagram-v2
    EXPECTED: Expected
    IN_PARKING: In Parking
    CHECKED_IN: Checked-in
    ON_SITE: On-Site
    HOSTED: Hosted
    CHECKED_OUT: Checked-out
    CHECKED_OUT_AUTO: Auto Checked-out
    NO_SHOW: No Show
    EXPIRED: Expired
    DENIED: Denied
    CANCELLED: Cancelled

    [*] --> EXPECTED: invite, pre-registration or walk-in

    EXPECTED --> IN_PARKING: arrives at the parking reader
    EXPECTED --> CHECKED_IN: pass accepted
    IN_PARKING --> CHECKED_IN
    CHECKED_IN --> ON_SITE
    ON_SITE --> HOSTED: host collects the visitor
    HOSTED --> CHECKED_OUT
    ON_SITE --> CHECKED_OUT: pass accepted on the way out
    CHECKED_IN --> CHECKED_OUT

    CHECKED_IN --> CHECKED_OUT_AUTO: auto check-out sweep
    ON_SITE --> CHECKED_OUT_AUTO: auto check-out sweep
    EXPECTED --> NO_SHOW: end time passes
    EXPECTED --> EXPIRED: pass validity runs out
    EXPECTED --> DENIED: refused at the checkpoint
    EXPECTED --> CANCELLED: cancelled with a reason

    CHECKED_OUT --> CHECKED_IN: re-check-in
    CANCELLED --> CHECKED_IN: re-check-in

    CHECKED_OUT_AUTO --> [*]
    NO_SHOW --> [*]
    EXPIRED --> [*]
    DENIED --> [*]
Three rules govern the whole diagram, and they matter more than the individual arrows:
- While a visit is live, an operator can set any status directly. The arrows show the usual route, but Expected, In Parking, Checked-in, On-Site and Hosted can be moved between in any order from the dashboard. Setting a visit to the status it already has does nothing at all - the change is discarded, along with any edits submitted with it.
- Six statuses finalise a visit: Checked-out, Auto Checked-out, No Show, Expired, Denied and Cancelled. Once a visit reaches one of these, no further status change is accepted.
- Only two of those six can be re-opened: Checked-out and Cancelled, through re-check-in, and only while the pass is still within its validity window. A visit that was closed by the auto check-out sweep cannot be re-opened - the visitor needs a new visit.
| Status | Meaning | Typical next step |
|---|---|---|
| Expected | Visit confirmed, pass issued, visitor not yet arrived | Check-in on arrival |
| In Parking | Visitor’s vehicle has been admitted, visitor not yet at reception | Check-in at reception |
| Checked-in | Visitor has been admitted | Check-out on departure |
| On-Site | Visitor is inside, past reception | Hand over to the host, or check out |
| Hosted | Host has collected the visitor | Check-out on departure |
| Checked-out | Visit completed | Re-check-in if the visitor returns within the pass validity |
| Auto Checked-out | Closed by the auto check-out sweep rather than by a person | None - a returning visitor needs a new visit |
| No Show | Visitor never arrived and the visit’s end time passed | None |
| Expired | Pass validity ran out | None |
| Denied | Refused at the checkpoint | None |
| Cancelled | Visit will not take place | Re-check-in if it goes ahead after all |
A visitor returning the same day can be checked in again while their pass is valid; each entry and exit is logged separately. Cancelling an invite withdraws the visitor’s credentials (configurable under Visitors > Settings).
Step 1: Open the Visitors Dashboard
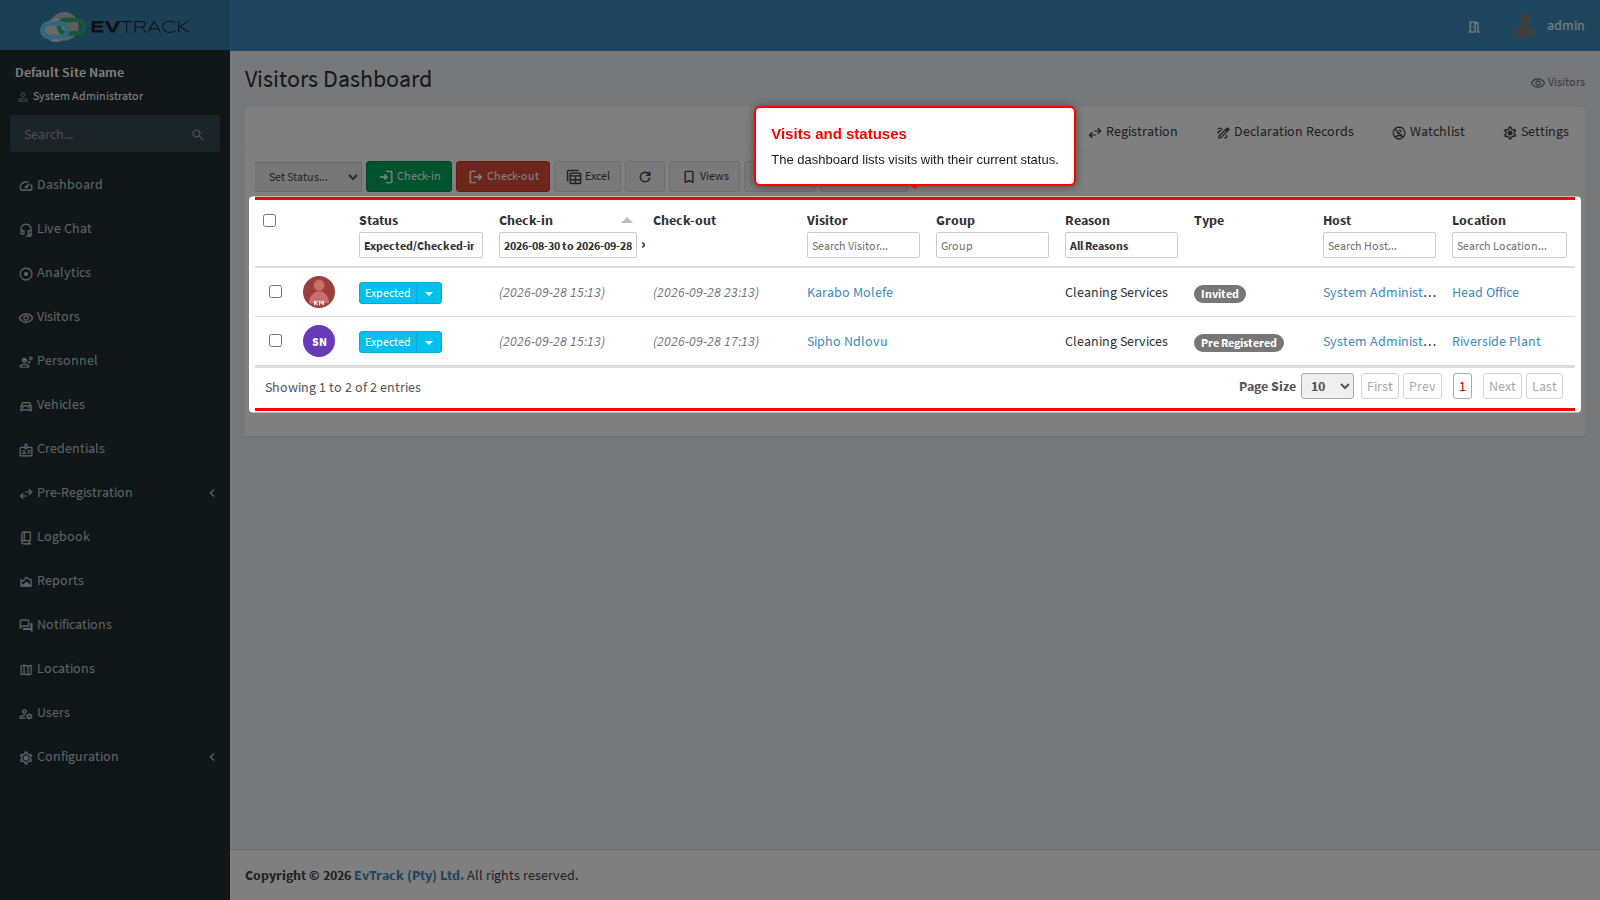
Select Visitors in the sidebar - the dashboard opens and lists today’s visits with their current status. A visit must already exist (from an invite, pre-registration or walk-in registration) before it can be checked in.
Step 2: Select the visit and click Check-in
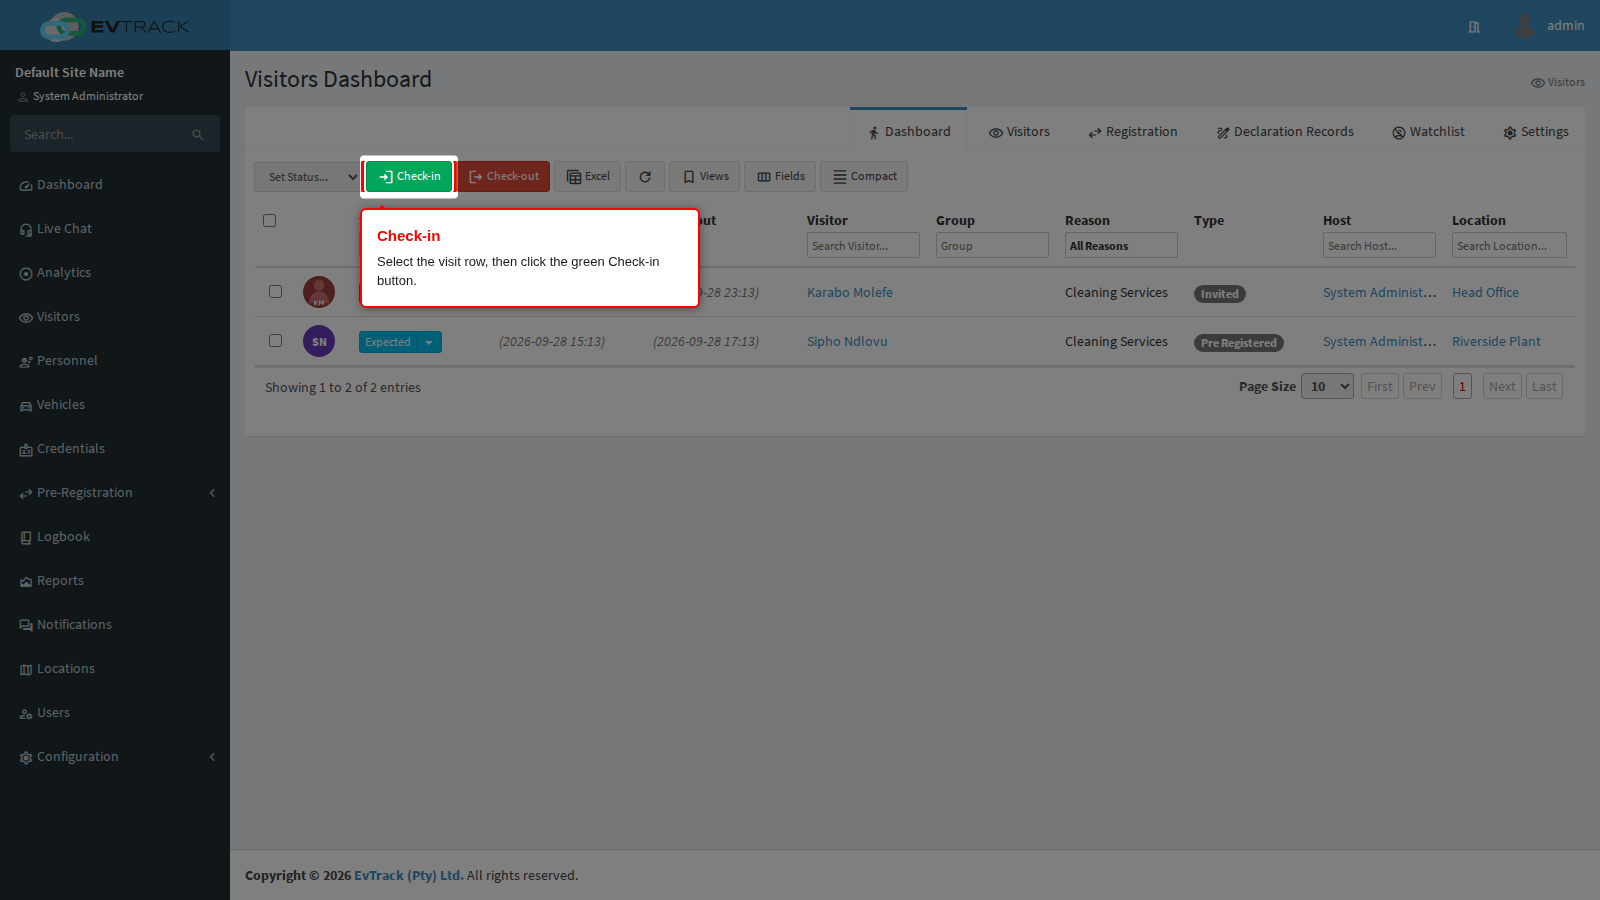
Click the visit’s row to select it, then click the green Check-in button in the toolbar above the list.
Step 3: Confirm the check-in
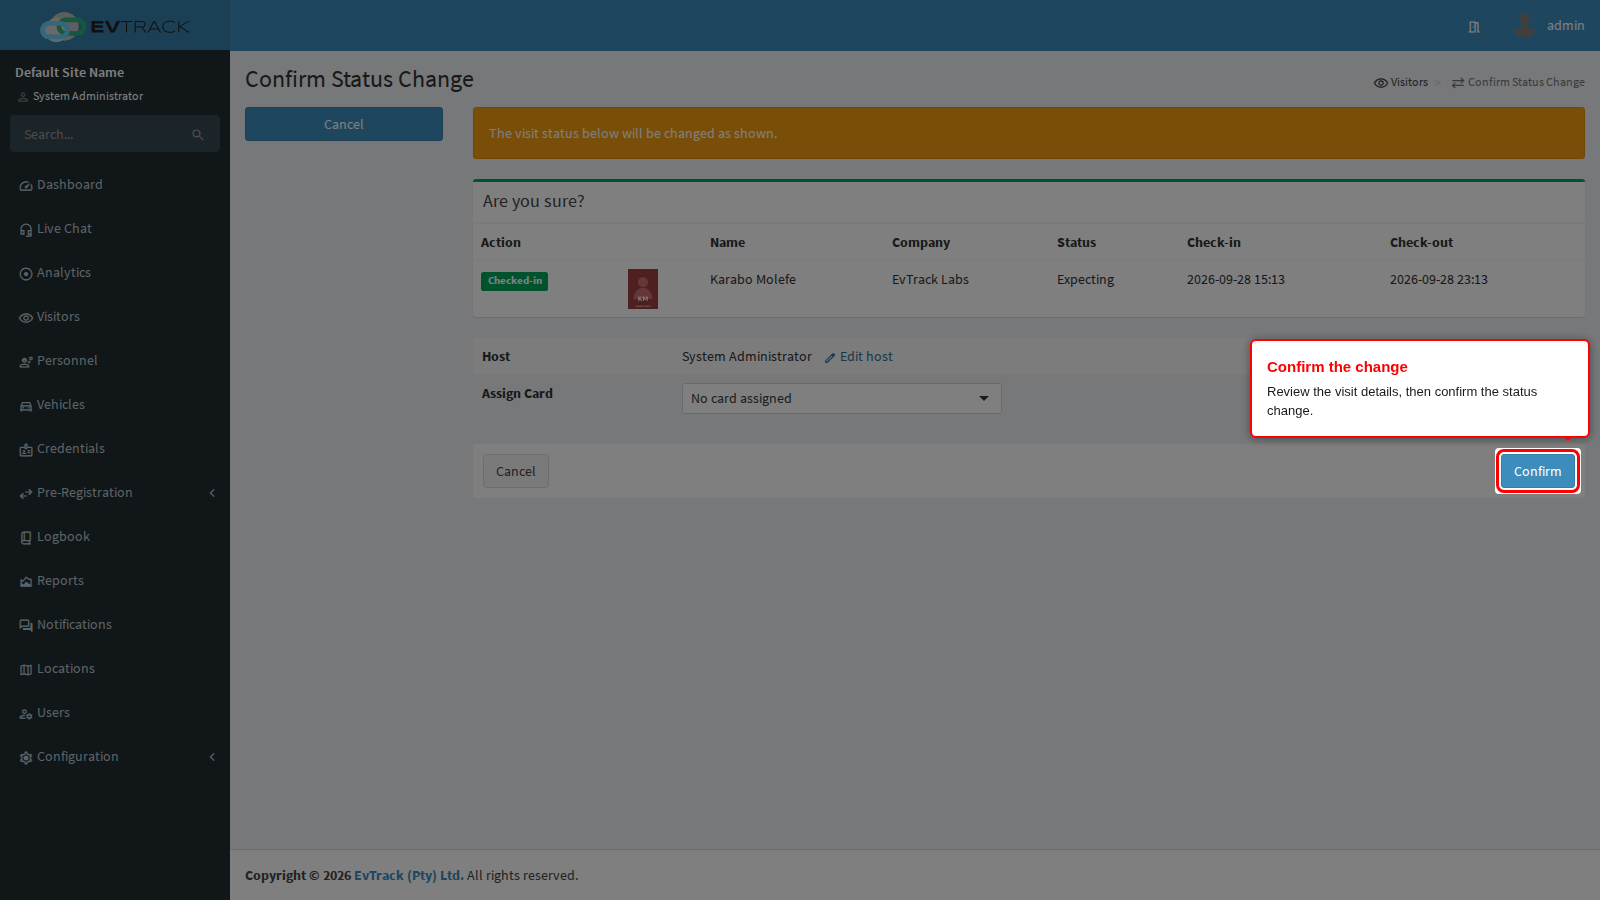
A confirmation page shows the visit details before the status is applied. Click the confirm button to check the visitor in.
Step 4: The visitor is on site
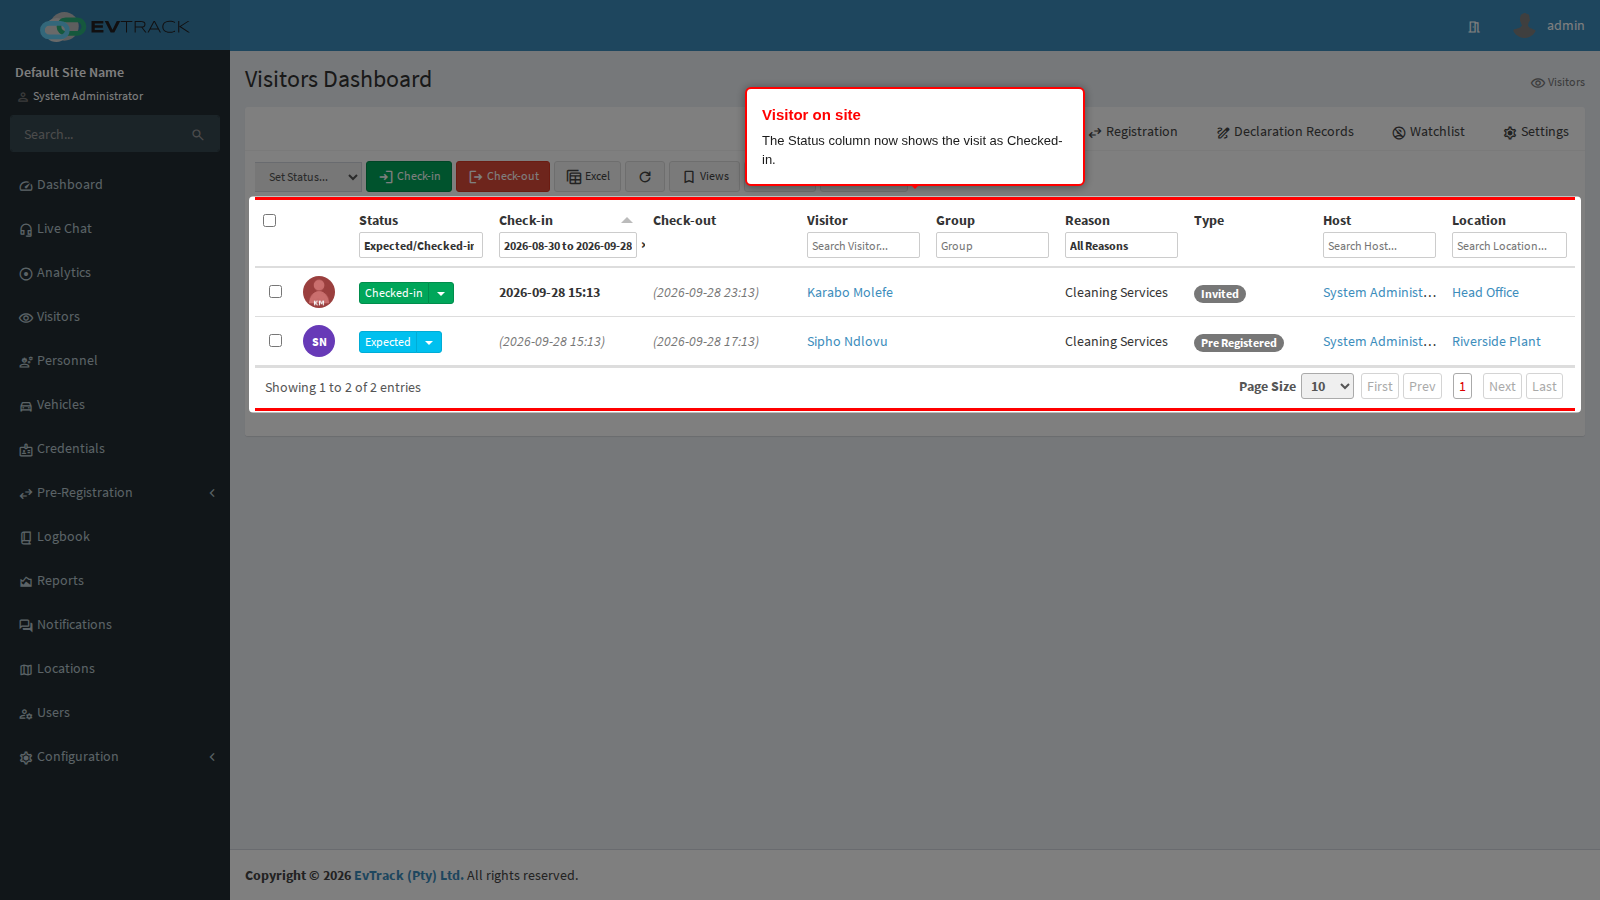
The dashboard reopens and the visit’s Status column now shows Checked-in.
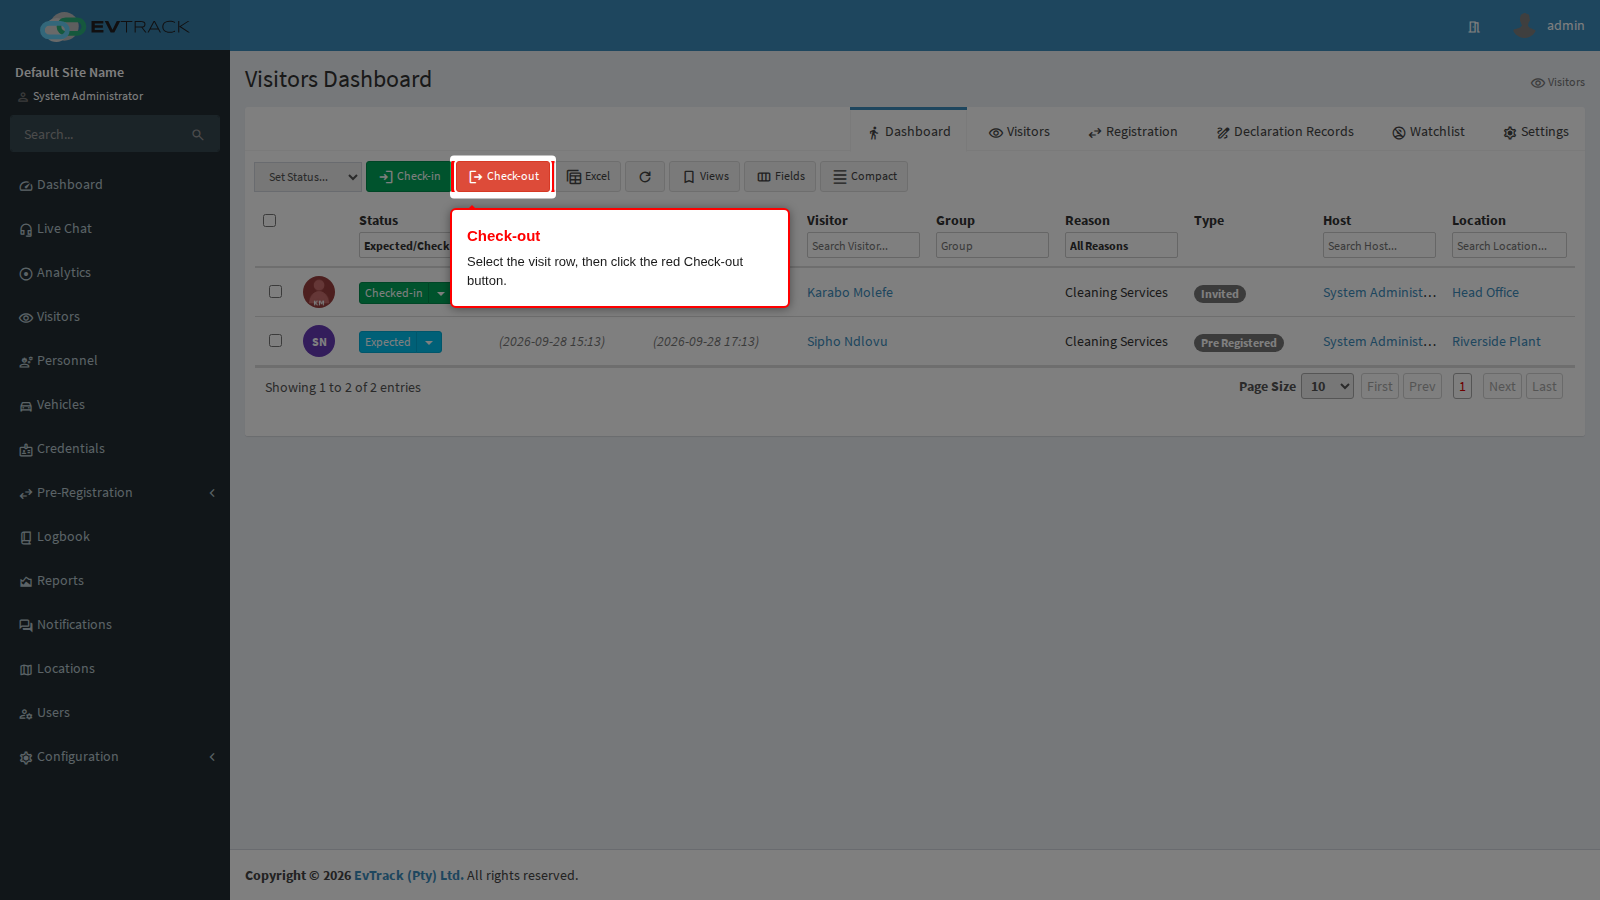
Step 5: Select the visit and click Check-out
On departure, select the visit row again and click the red Check-out button in the toolbar.
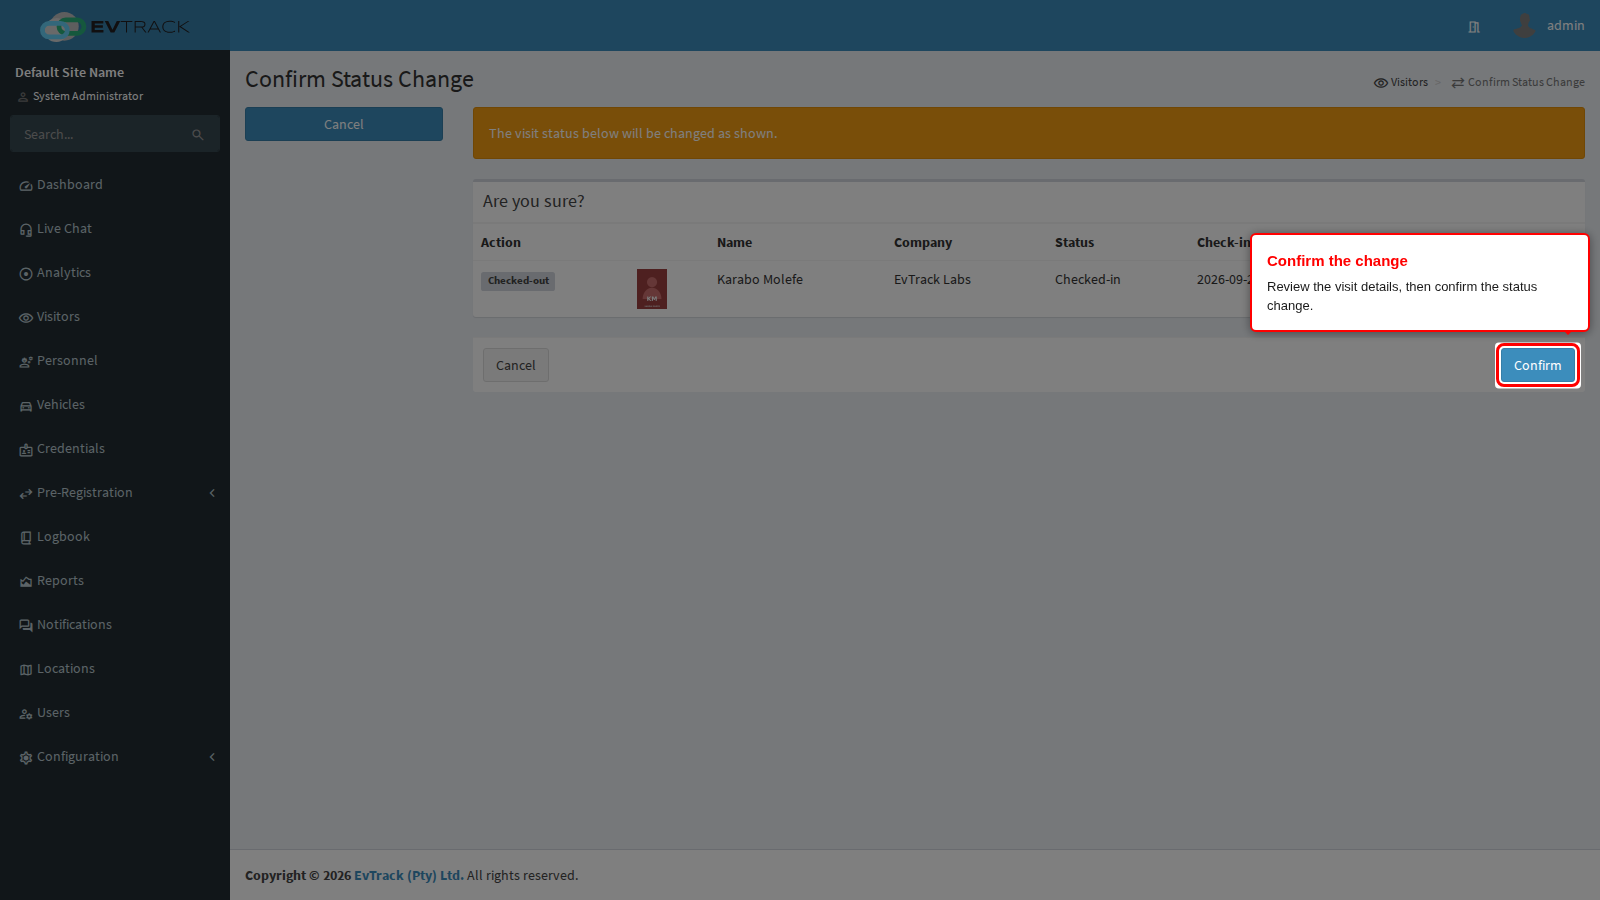
Step 6: Confirm the check-out
The confirmation page shows the visit details. Click the confirm button to check the visitor out.
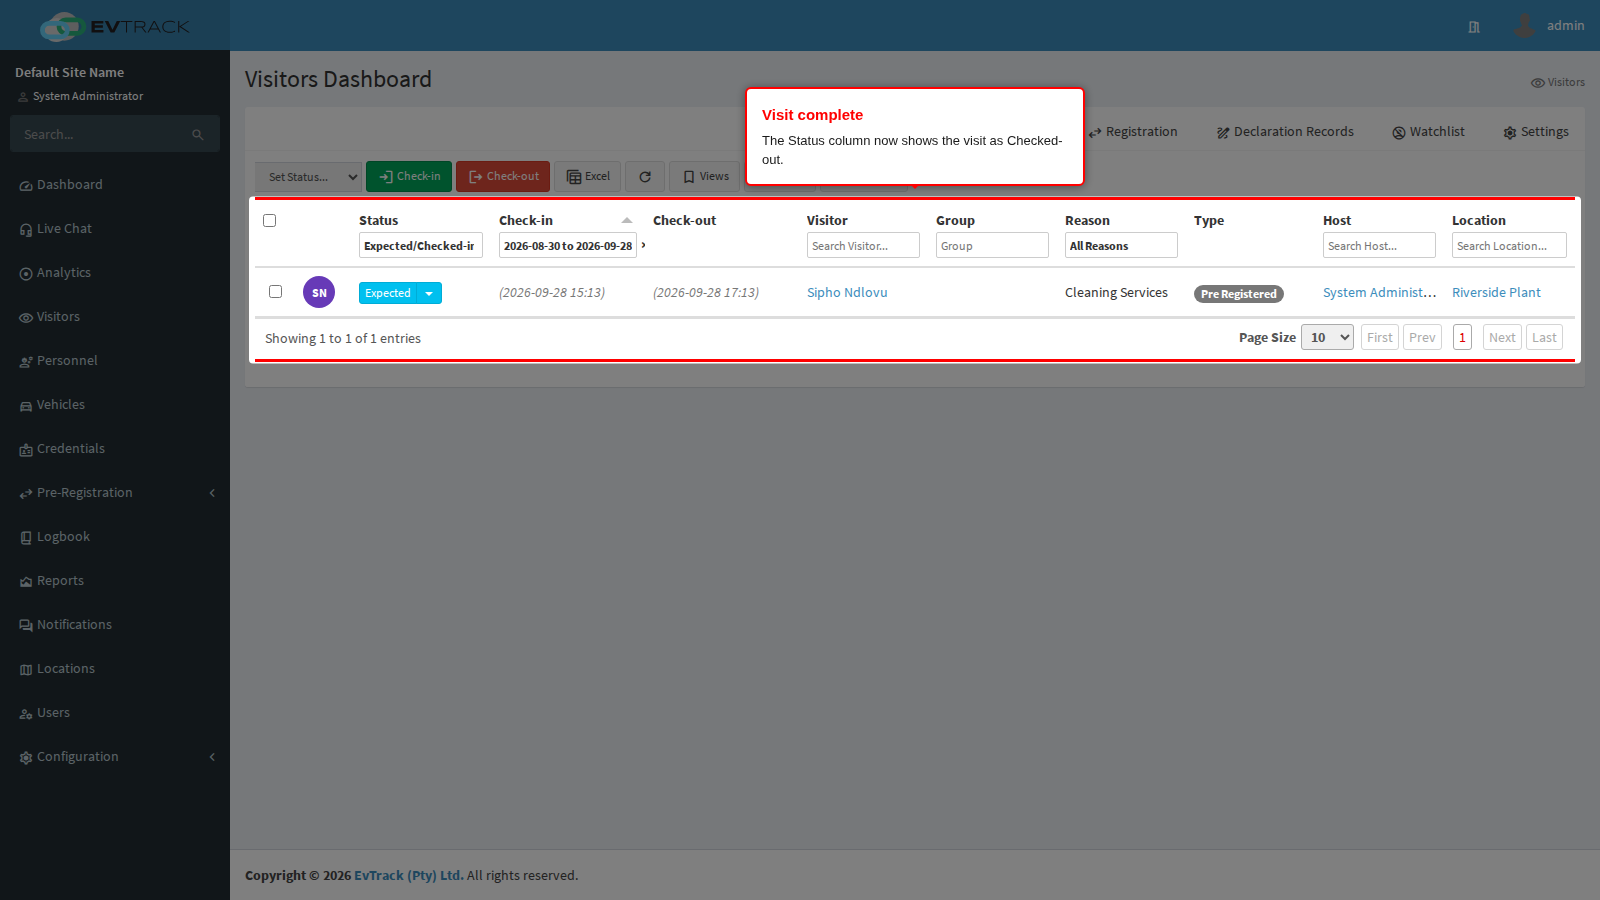
Step 7: The visit is complete
The visit shows as Checked-out and the full entry/exit history is available in the Logbook.
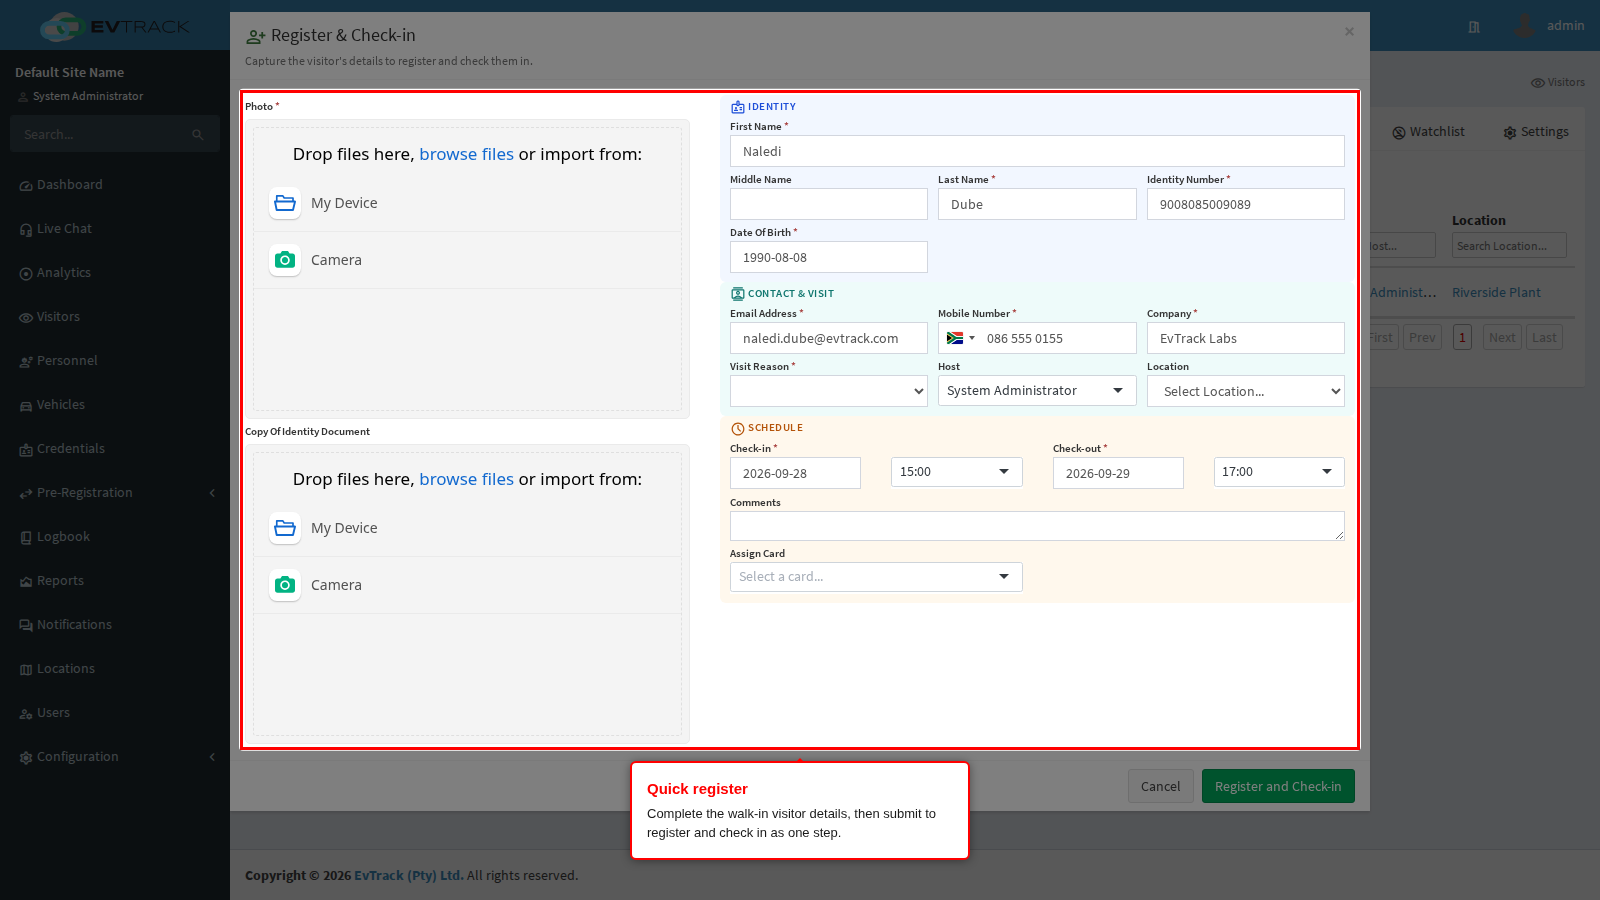
Quick Register and Check-in (walk-ins)
For walk-in visitors, the dashboard’s quick action registers and checks a visitor in from a single dialog. With no row selected, click the green quick-action button in the dashboard toolbar (the same green button shown in Step 2) and look the visitor up by mobile number - a returning visitor is found and checked straight in. If no match is found, choose Create new visitor, complete the required details and submit - the visitor is registered and checked in as one step.
Assigning a loan badge
When Assign Card from Pool is enabled under Required Fields, the dialog also offers Assign Card. Open the picker to choose from the available cards, or scan the badge - a scanned serial selects its card automatically. Each entry shows the card number, its name and the pool it comes from. The card is checked out to the visitor as part of the check-in, and a normal check-out returns it to its pool.
Which cards are offered depends on the visit’s Location: a pool tied to a location only serves visits at that location, while a pool on No specific location serves every visit. If no location is selected and the available cards all belong to location pools, the picker says so and asks for a location to be chosen first. See Card Pools for the pool setup and what happens to cards when a visit is cancelled or closed automatically.
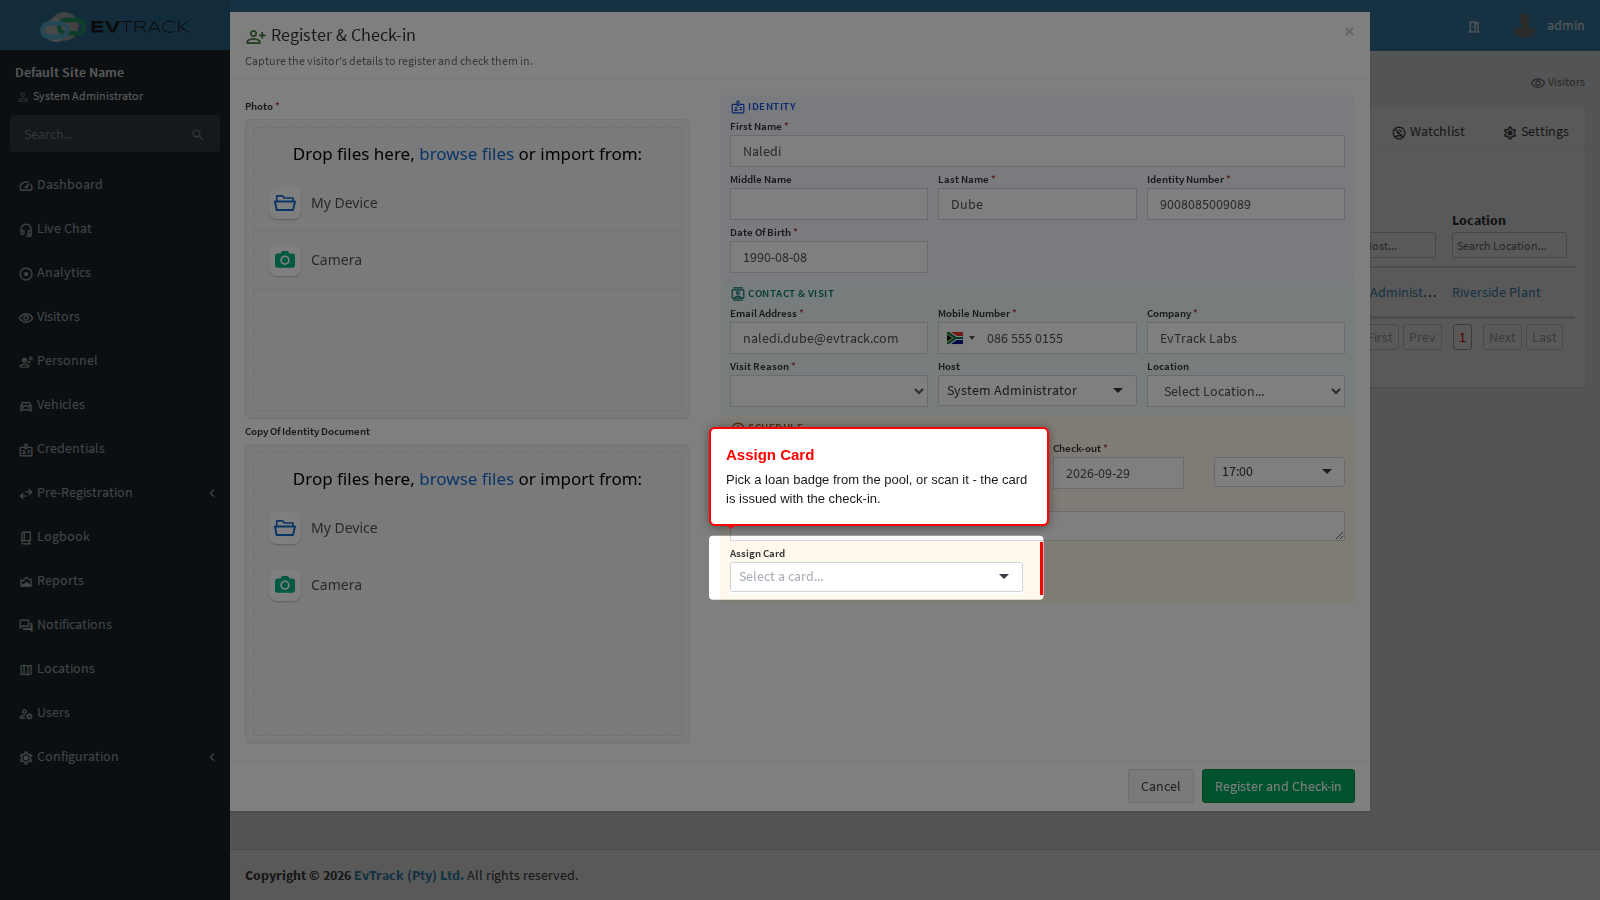
On submit the visitor is registered and the visit appears on the dashboard already checked in.
Notes
Check-in and check-out do not have to happen at the dashboard. Visitors can also check themselves in and out at a self-service kiosk - scanning their pass QR code or their ID card or passport, or completing a manual check-in with a selfie and their details - or be processed by security staff with the guard app. Those entries update the same visit status and appear in the same dashboard and Logbook as operator-driven check-ins.