Somebody arrives at reception with no invitation and no pre-registration. The Visitors Dashboard handles that case in one dialog: you look the person up, complete whatever details are missing, hand them a card, and they are registered and checked in without ever leaving the dashboard. This page walks that dialog from the first click to the checked-in visit, and explains every answer it can give you.
Before you start:
- Your role needs the dashboard quick check-in permission, plus permission to add a visitor and to issue a visit pass. If you can see the dashboard but the green Check-in button is missing, or it opens the search but never offers to create a visitor, ask an administrator to extend your role.
- At least one visit reason must exist, because the reason is compulsory out of the box. See Visit Reasons.
- To hand out a physical card you need a card pool that is enabled and marked Can be assigned to a visitor, and Assign Card from Pool must be set to Optional or Required under Required Fields. See Card Pools.
- This dialog is for the straightforward walk-in. If an approval step is switched on, it refuses the check-in and sends you to Add Visitor instead. The last section on this page lists every refusal.
Step 1: Open the Visitors Dashboard
Click Visitors in the left sidebar to open the visitor list, then click the Dashboard tab at the top right.
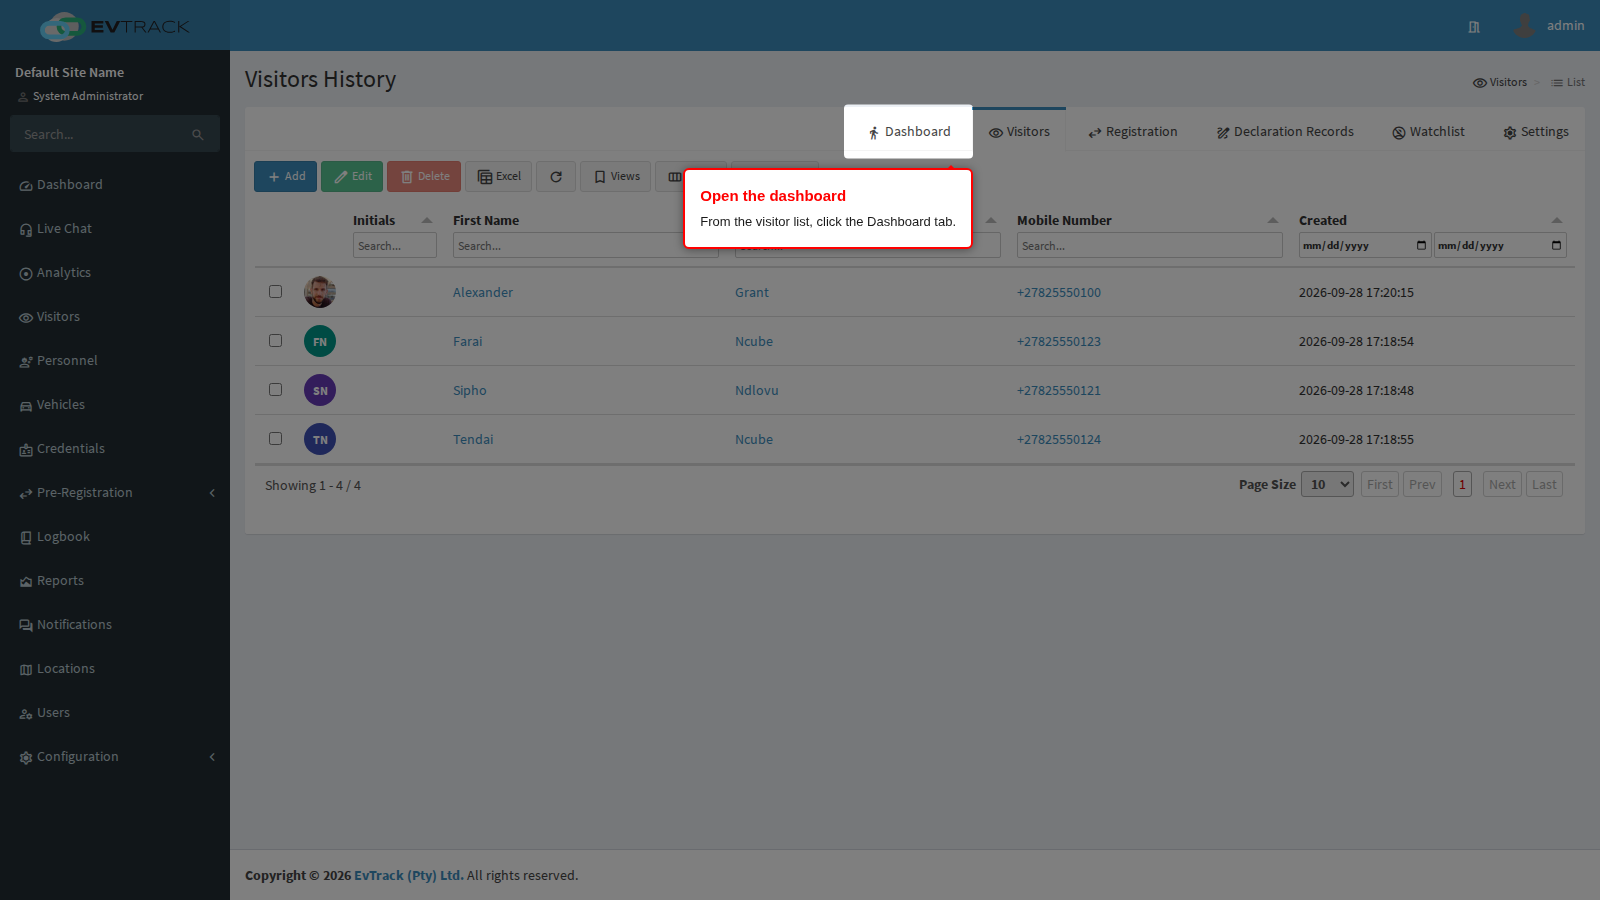
End state: the dashboard opens with today’s visits listed.
Step 2: Click Check-in with nothing selected
The green Check-in button does one of three things, depending on how many rows are ticked:
- No row selected - it opens the visitor search described here. This is the walk-in path.
- Exactly one row selected - it skips the search and goes straight to the check-in confirmation for that visit, described in Check-in and Check-out.
- Two or more rows selected - it tells you to use the Set Status… list instead.
So make sure no row is ticked, then click Check-in.
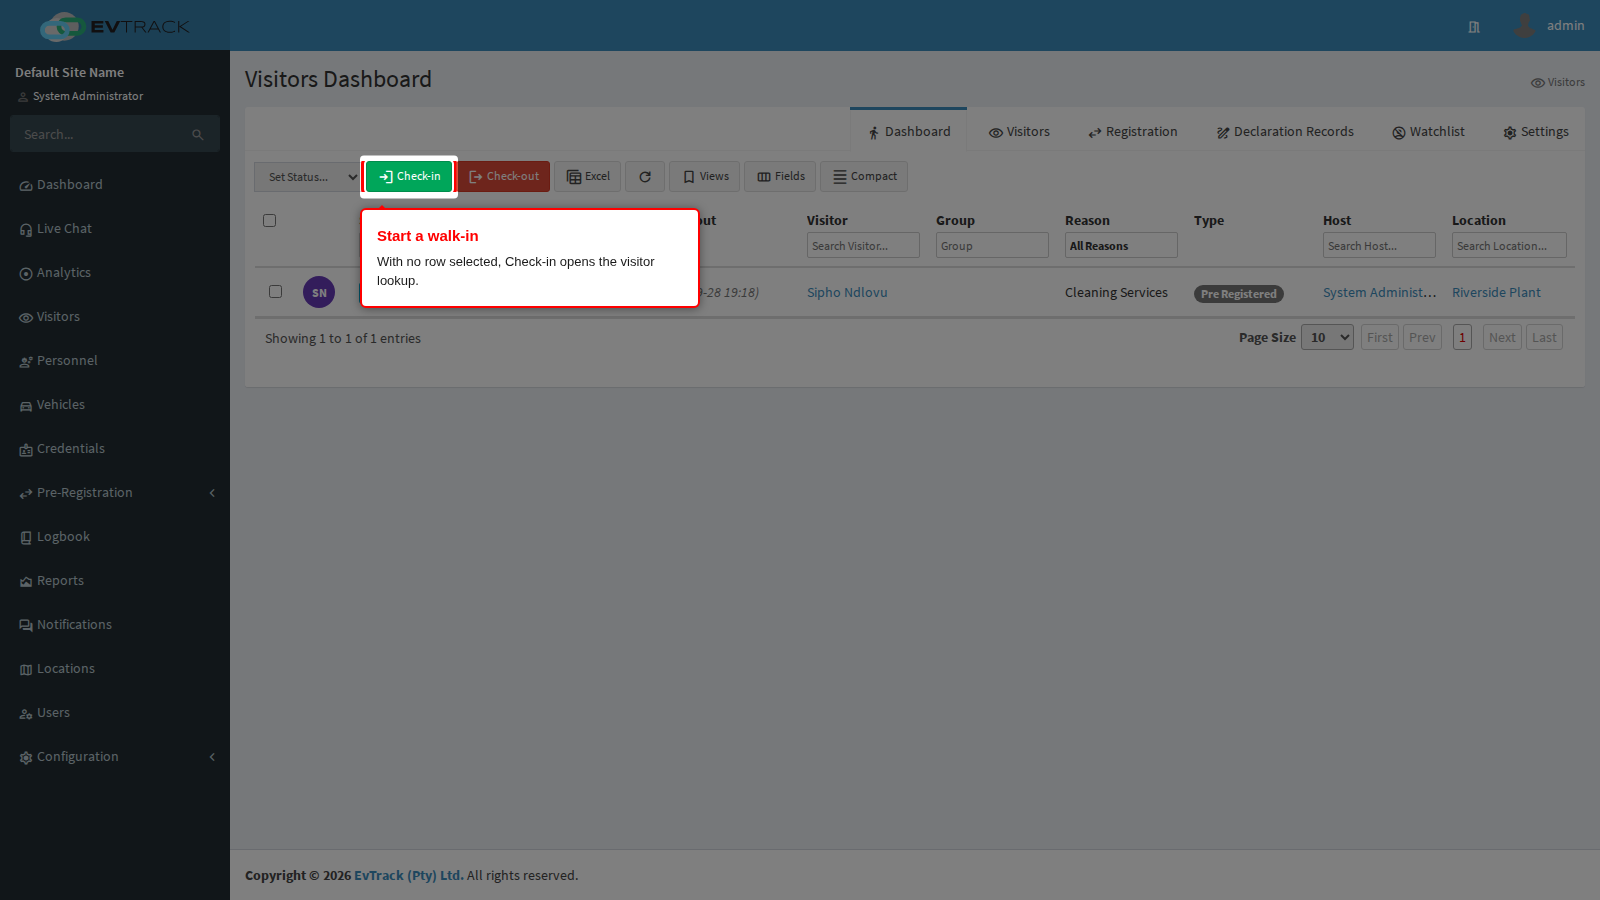
End state: the Find a visitor dialog opens with the cursor already in the search box, ready for a scanner.
Step 3: Look the visitor up first
Always search before you type a new record. It takes two seconds and it is what stops the same person being registered four times.
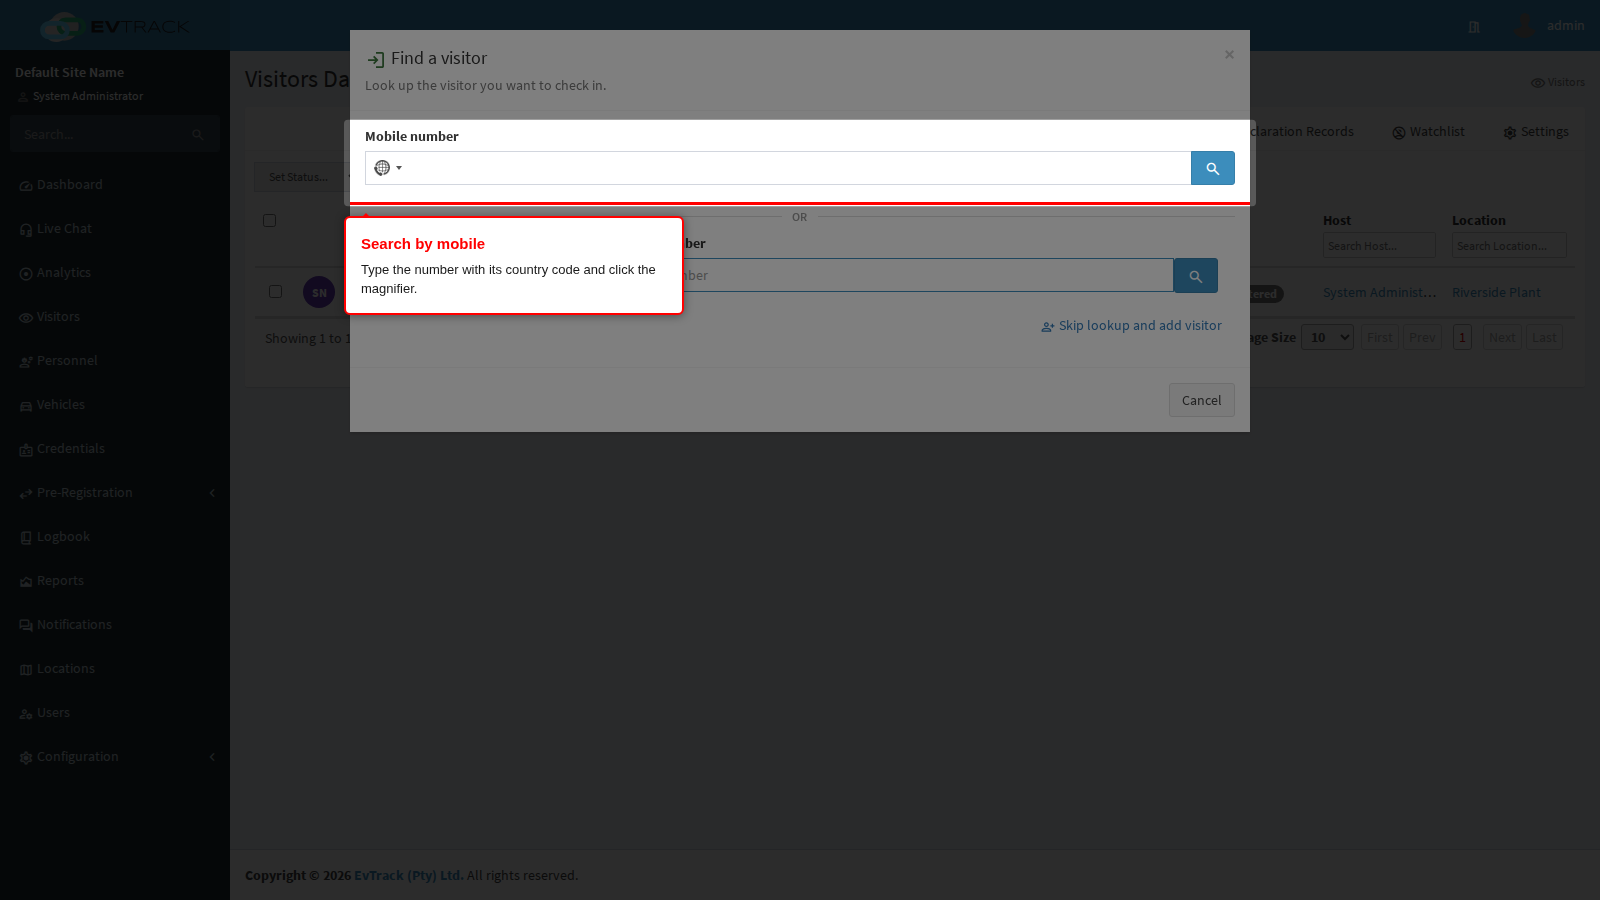
The dialog offers two ways to search, and either one is enough:
Mobile number. Type the number with its country code and click the magnifier, or press Enter. The number must be complete and international, because it is matched exactly.
The second box takes anything else the visitor can present. Its label tells you what your system accepts, which depends on what you issue: a pass QR code, a visit PIN, an ID or passport number, or the number of a card you have already issued. A card can also be found by its name, so scanning or typing “Reception Badge 01” finds whoever is holding it. Keyboard-style QR scanners work here without any setup: they type the code and press Enter for you.
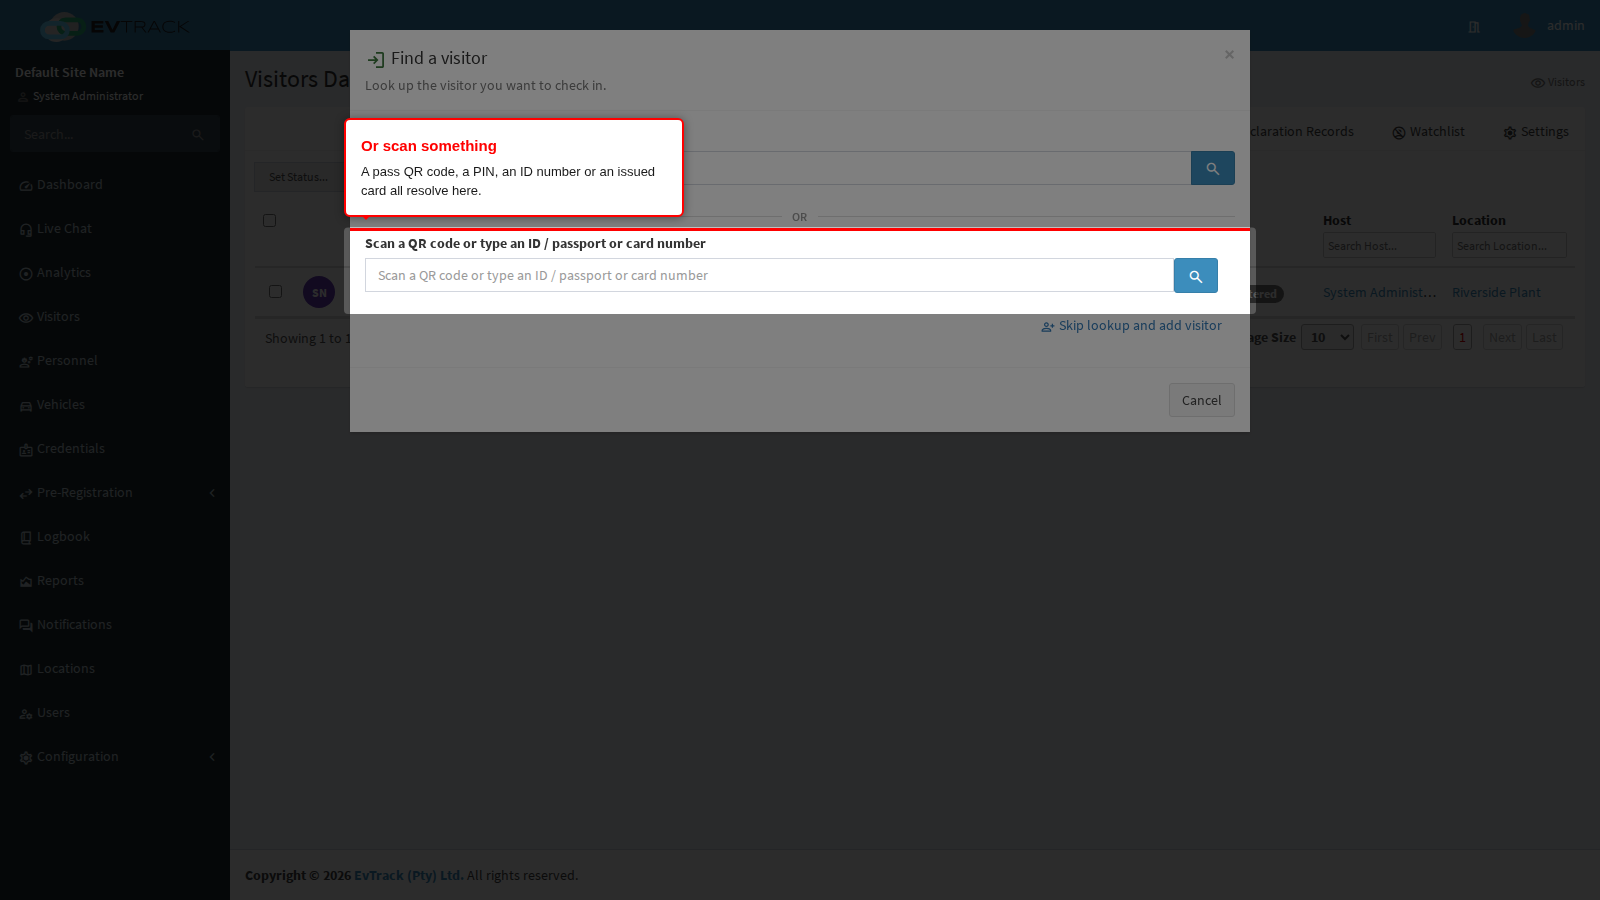
If one of the two boxes is missing, it has been switched off under Required Fields: the mobile box disappears when the mobile number is not collected, and the second box disappears when neither identity numbers nor cards nor codes are in use.
Two buttons may appear alongside the second box when the matching hardware is connected to the workstation: an Emirates ID reader and a document scanner. Both read the document, fill the search for you, and carry the portrait and the scanned page into the registration form if nobody matches.
Step 4: Pick the person who matched
Matches come back as cards, in two groups:
- Currently on-site - these visitors already have an open visit.
- No open visit - these visitors are on file but are not expected or on site right now.
Each card shows the name, a partly hidden mobile number and identity number, and the photo on file. At most twenty matches are shown, so search on something specific rather than a value many people share.
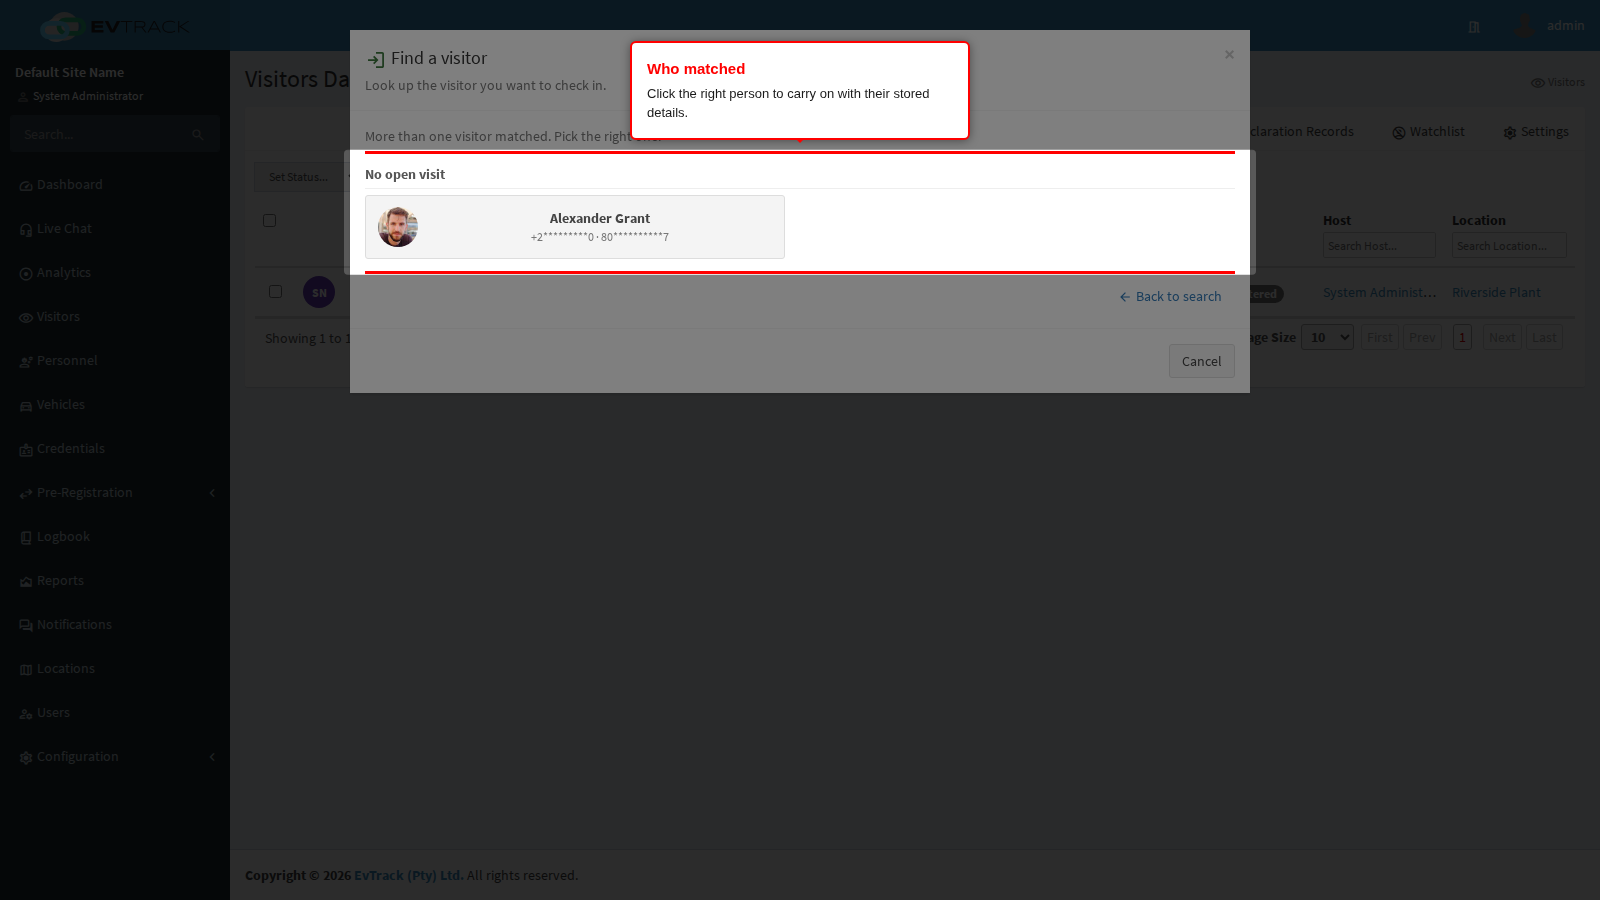
What happens when you click a card depends on which group it is in:
- Currently on-site - you go straight to the check-in confirmation page for that open visit. Nothing new is created.
- No open visit - the registration form opens already filled in from their stored record, ready to be checked in as a fresh visit. Their details are updated with anything you change, and no second copy of the visitor is created.
Back to search returns you to the two search boxes so you can try another value.
Step 5: When nothing matches
If the search finds nobody, the dialog does not jump straight into a blank form. It stops and offers you two choices, because a mistyped digit is far more common than a genuinely new visitor.
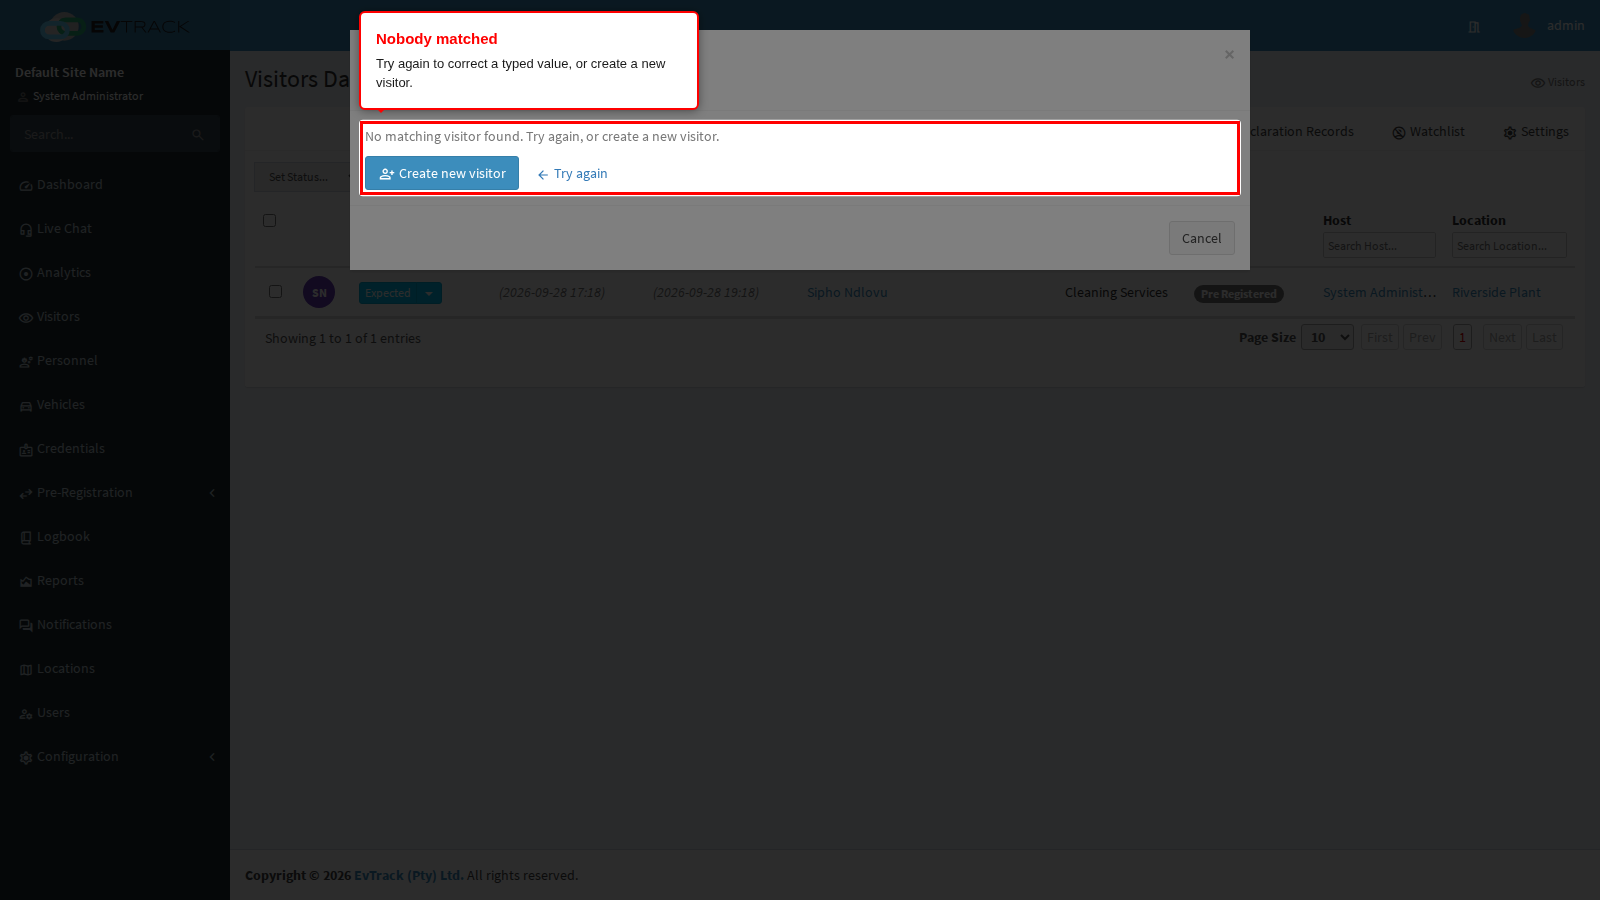
- Try again returns to the search boxes with what you typed still there, so you can correct it.
- Create new visitor opens the registration form, carrying whatever you typed into it as a starting value.
Step 6: Skipping the search
When you already know the visitor is new, Skip lookup and add visitor at the bottom of the search takes you straight to the registration form.
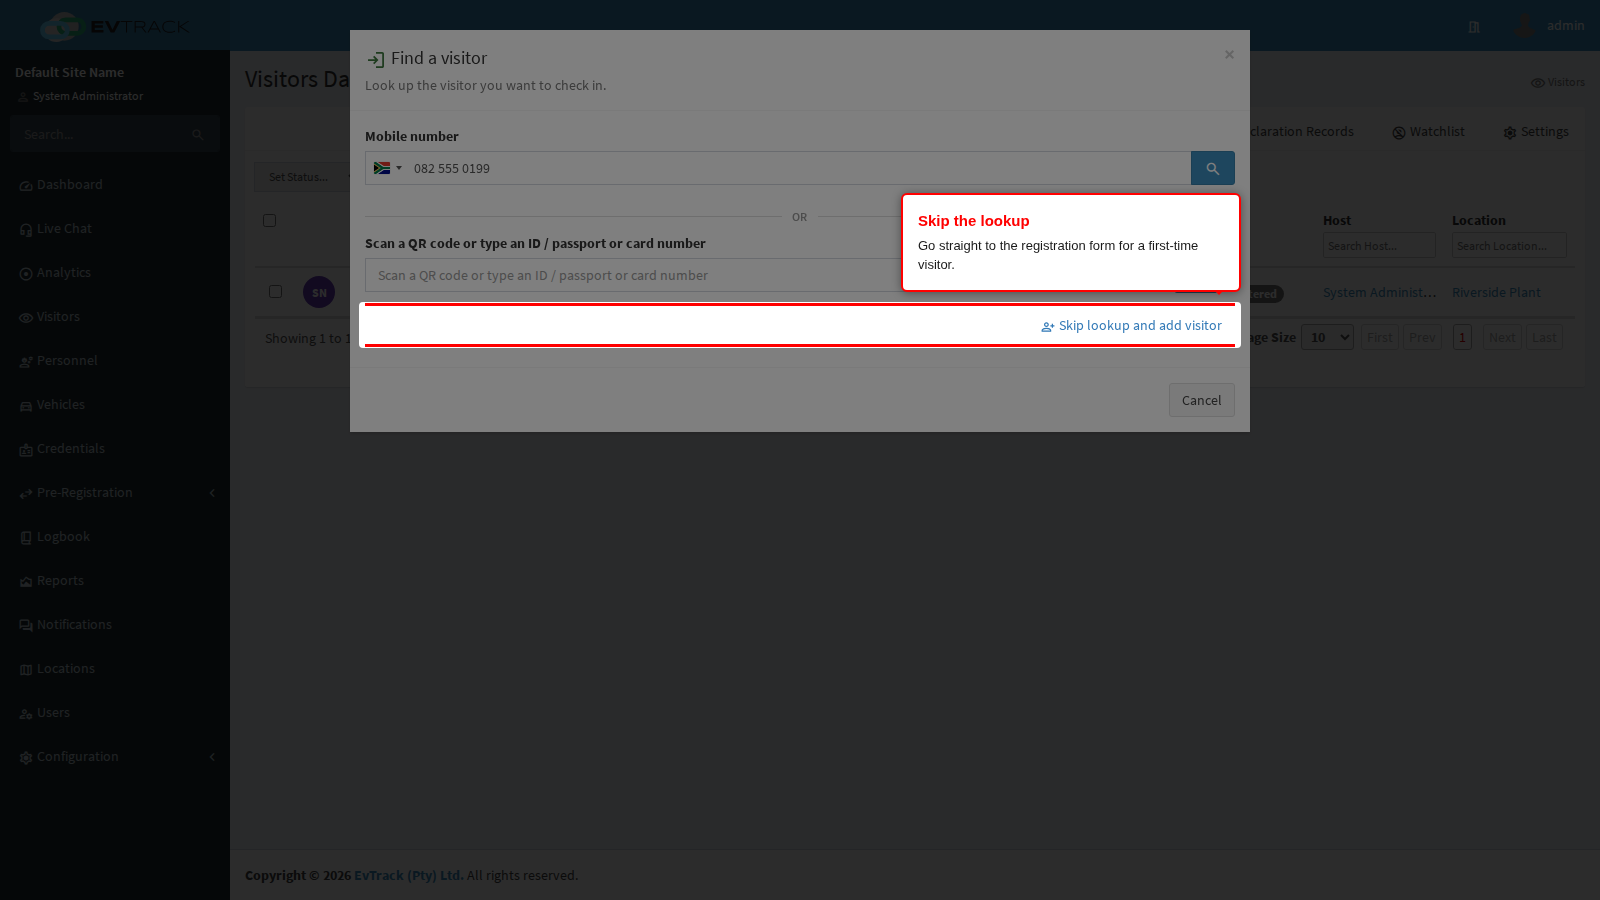
Use it sparingly. Skipping the search does not skip duplicate detection, which runs when you submit (step 13), but it does mean you find out about the duplicate later rather than sooner.
Step 7: Photo and identity document
The registration form opens with a narrow column on the left for the visitor’s images and three groups of fields on the right.
Drop a file onto a panel or click it to browse. The photo is what appears on the badge, on the visit record and on the card that reception sees when the visitor returns. The Copy of ID panel stores a picture of the document you were handed. A Signature panel appears as well if your system collects one.
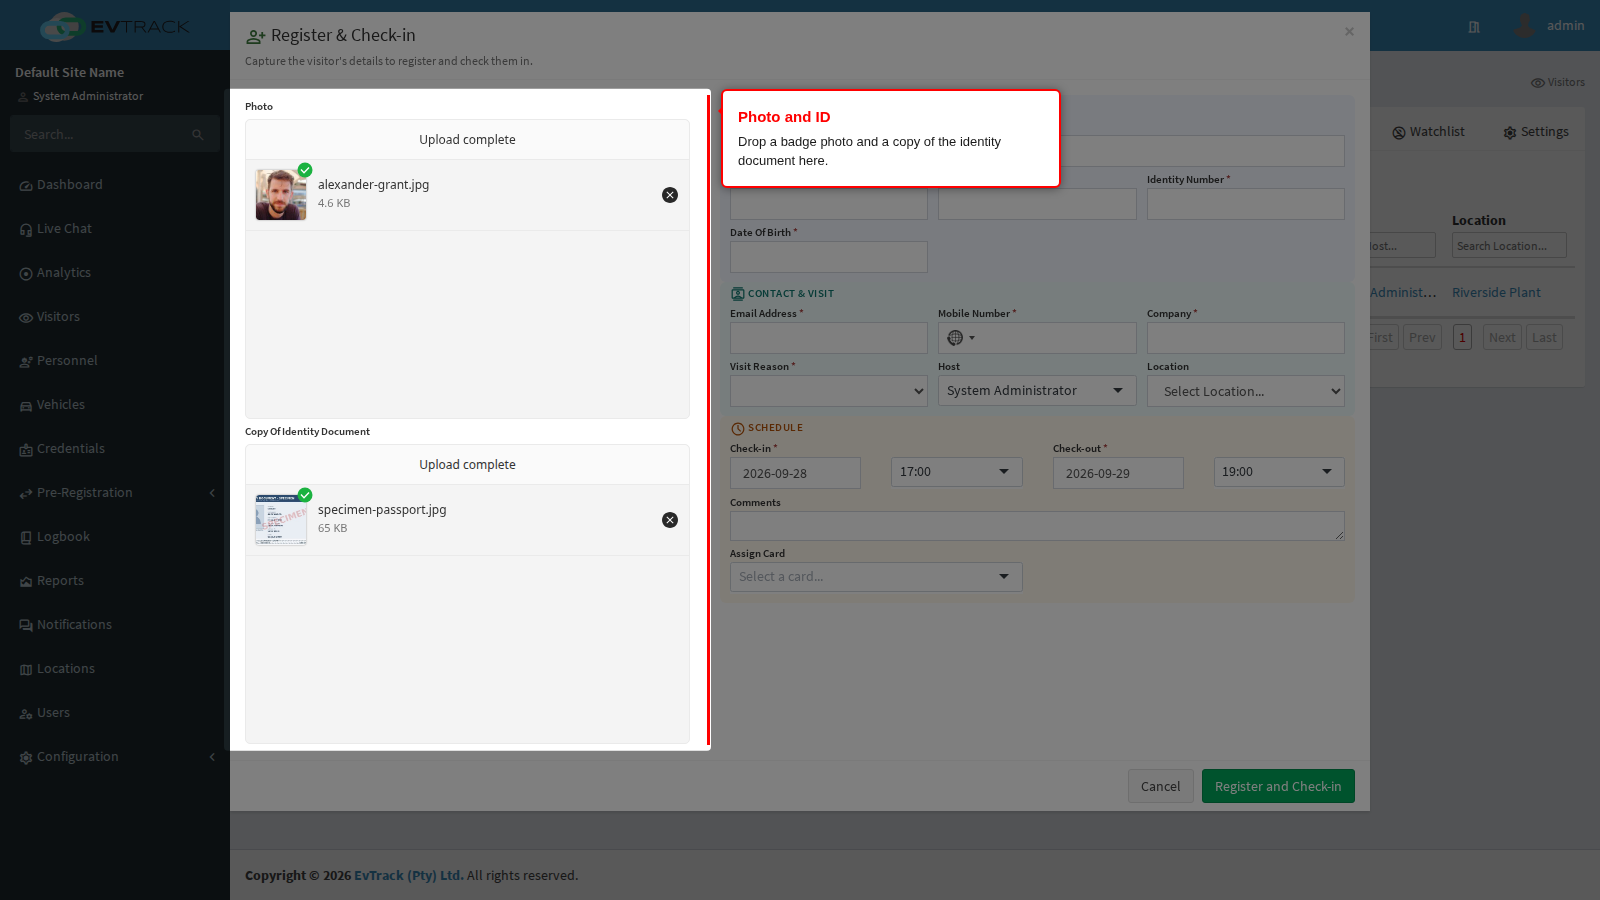
Which of the three panels are shown, and which of them are compulsory, is decided under Required Fields. A panel that is not shown is simply not collected on this form.
If you reached this form from an existing visitor (step 4) or from a duplicate match (step 14), images already on file appear as thumbnails instead of upload panels. Leave them alone and the stored image is kept. Click the small cross to delete a thumbnail and the upload panel comes back so you can capture a fresh one. There is no undo.
Step 8: Identity
The Identity group is who the visitor is. A red asterisk marks a compulsory field; without a value there, the form refuses to submit and marks the field in red.
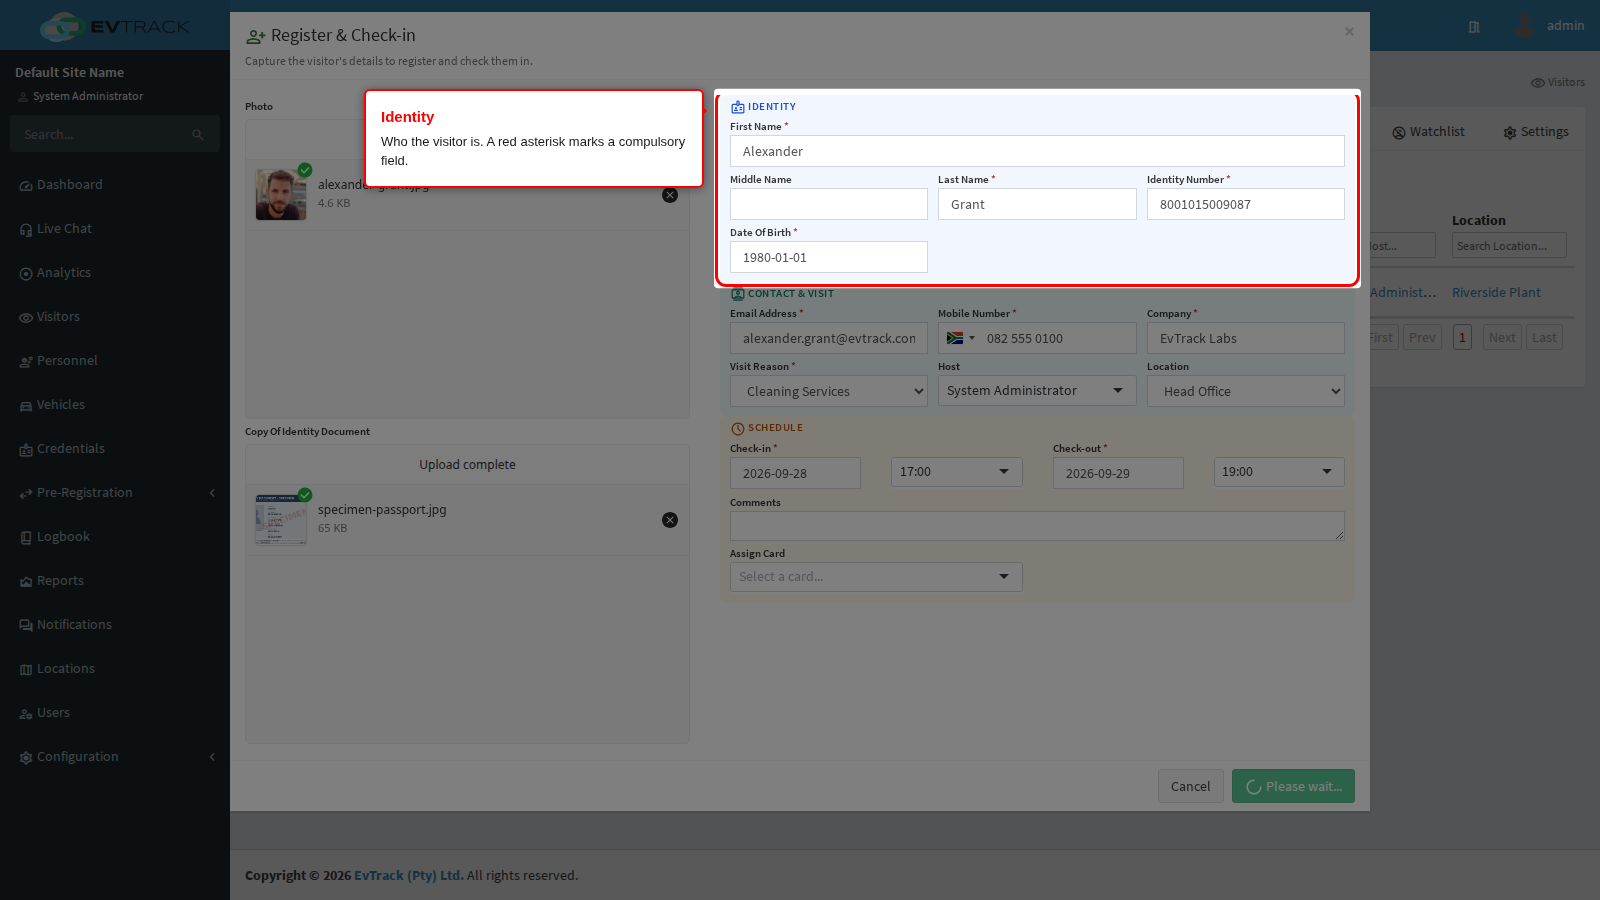
Out of the box, First Name, Last Name, Identity Number and Date of Birth are compulsory and the remaining identity fields are not collected at all. Every one of them can be turned on, made optional or hidden under Required Fields, which governs this form exactly as it governs Add Visitor.
The identity number is also checked against the document rules your system enforces, so a number of the wrong shape is rejected with a message on the field.
Step 9: Contact and visit
The Contact & Visit group is how to reach the visitor and what this visit is.
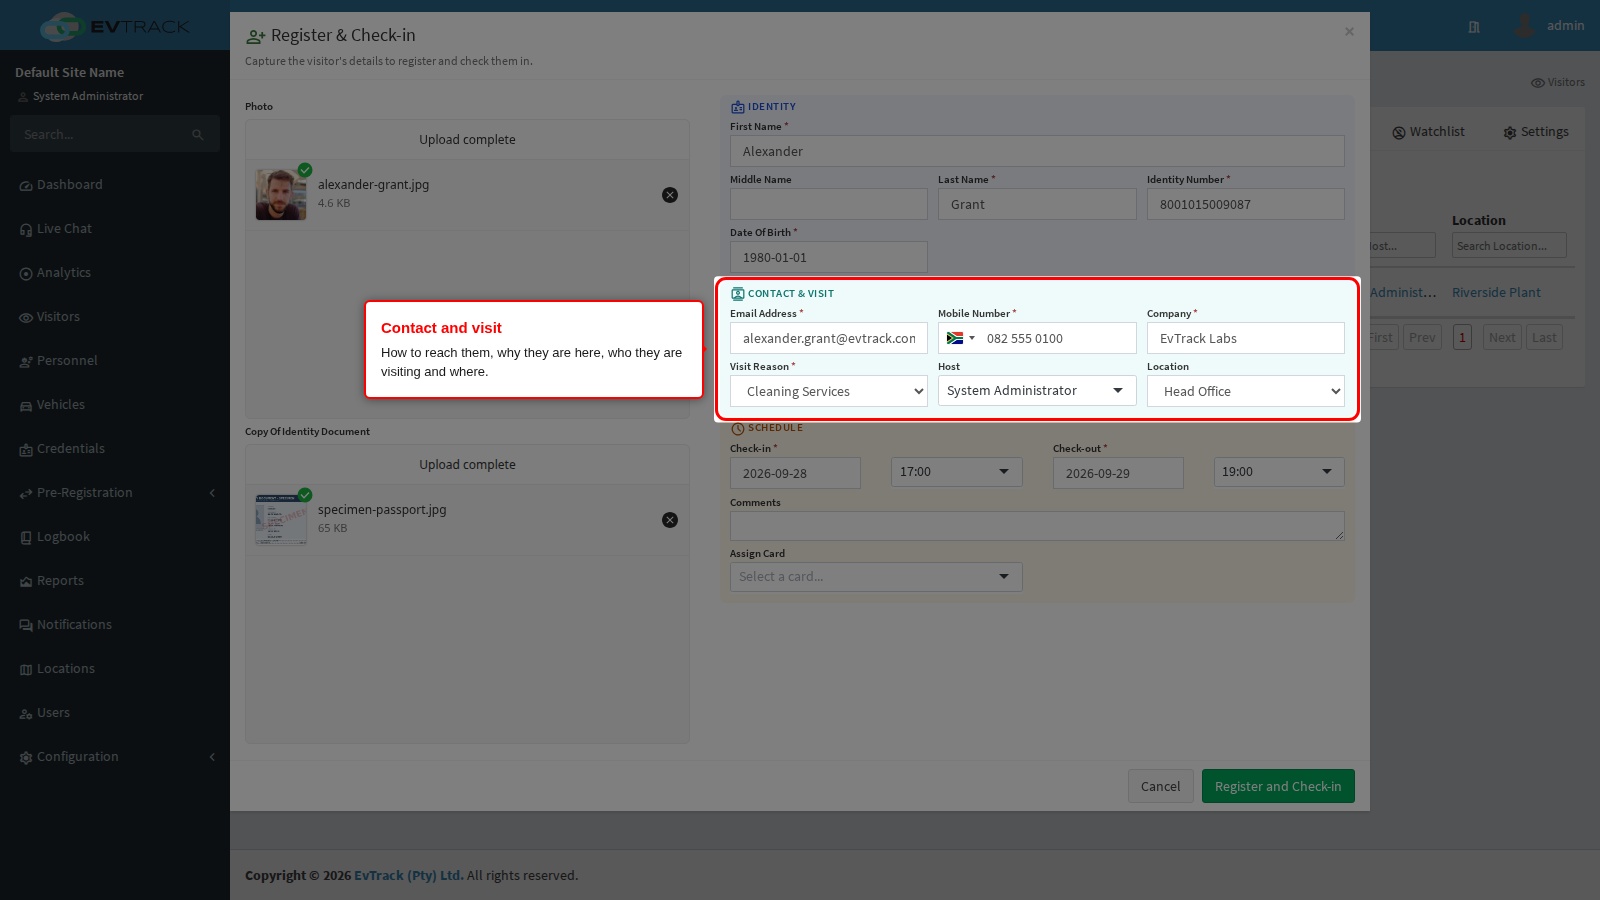
- Email and Mobile Number are compulsory out of the box. The mobile number must carry its country code; the field checks it as you type.
- Visit Reason is compulsory out of the box and comes from your configured list. The reason can also carry its own access rules, so pick the one that matches what the visitor is here to do.
- Host is the person being visited. It is pre-filled with you, and you can only change it if your role may assign a host to somebody else. If your system makes the host compulsory, nothing is pre-filled and you must choose deliberately; for a returning visitor the host of their last visit is offered.
- Location is the site the visit belongs to. Inherited - Default Visitor Access List leaves the choice to the system defaults. Sites are grouped: the ones under Requires Manager Review cannot be used here, because a visitor going to one of those has to be approved before being let in (see the refusals at the end of this page).
A note on what you leave out: the search in step 3 can only find a value that was stored. A visitor registered without a mobile number will not be found by the mobile box next time, and one registered without an identity number will not be found by their document. They can still be found by the pass, the PIN or the card you issue them.
The visitor’s access is not chosen on this form. It comes from the site you pick here, the host, the visit reason and the rules for the status the visit is in. See Access Control Lists and Status Based Access.
Step 10: The visit window
Check-in and Check-out are the start and the end of the visit. The pass, and any card you issue with it, work between those two moments and not outside them.
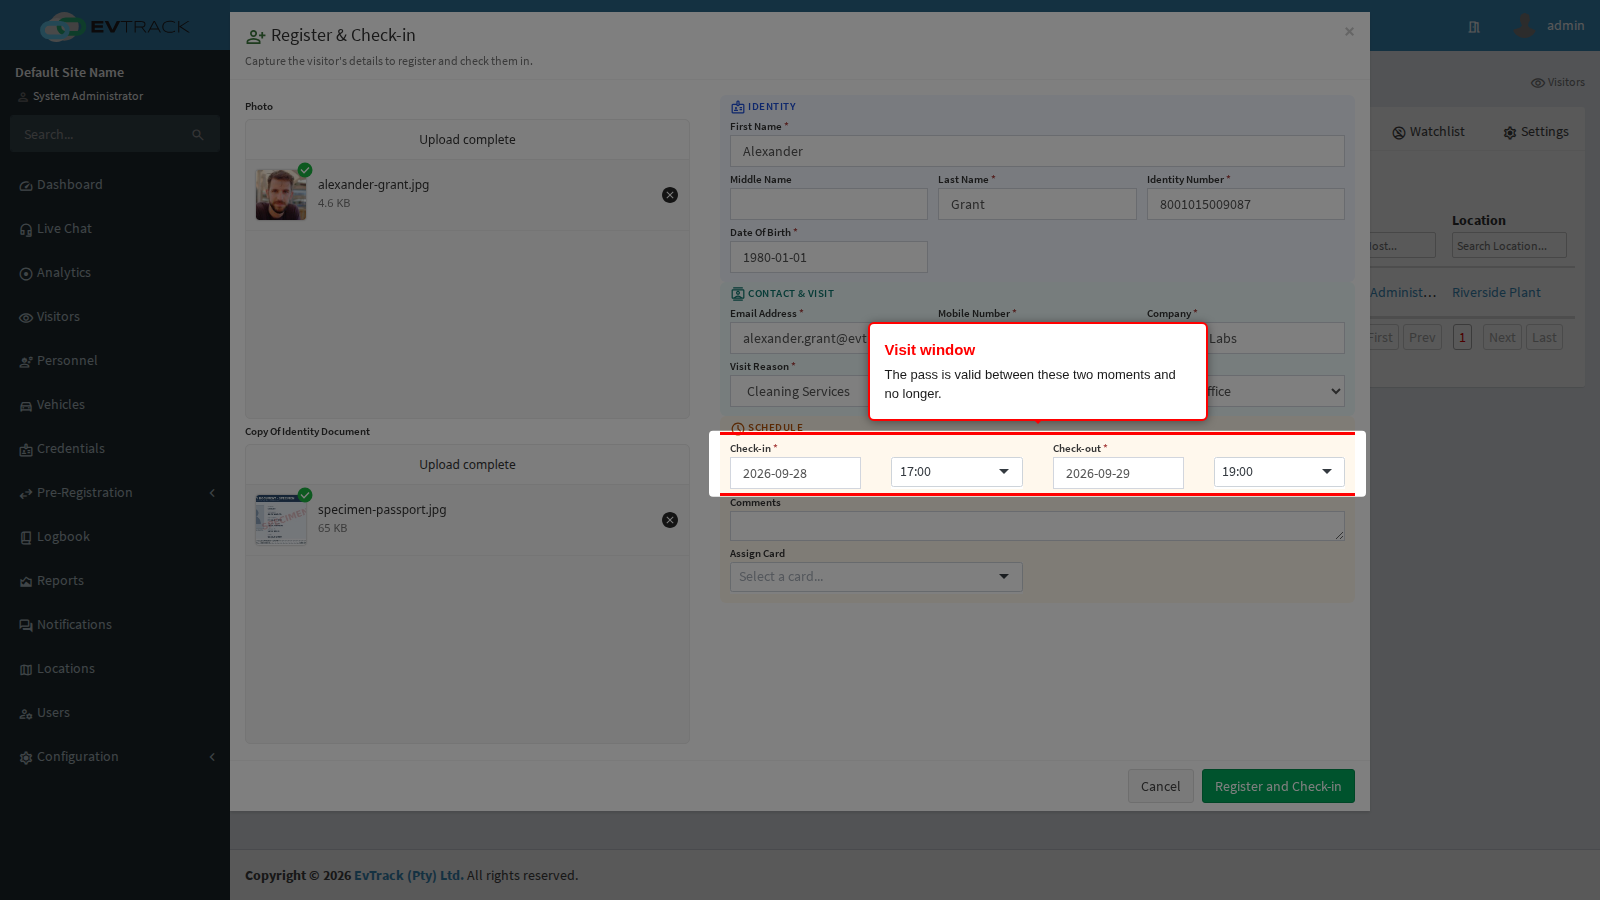
Both are pre-filled for you: now, until the default visit length your system uses. Points to know:
- Times are chosen in half-hour steps.
- The end must be after the start.
- You cannot pick a check-in date in the past, and a check-in time that has already gone is refused when you submit. There is a short grace period, so a dialog that has been sitting open across a half hour is not rejected for that alone.
- The whole visit may not be longer than the maximum stay configured under Visit Pass Settings. Ask for more than that and the form says the visit is too long.
Step 11: Issue a card from the pool
When your system issues loan cards, the Assign Card picker lists every free card in every pool marked as assignable to visitors, with the pool name beside each one so you can tell the reception badges from the contractor badges.
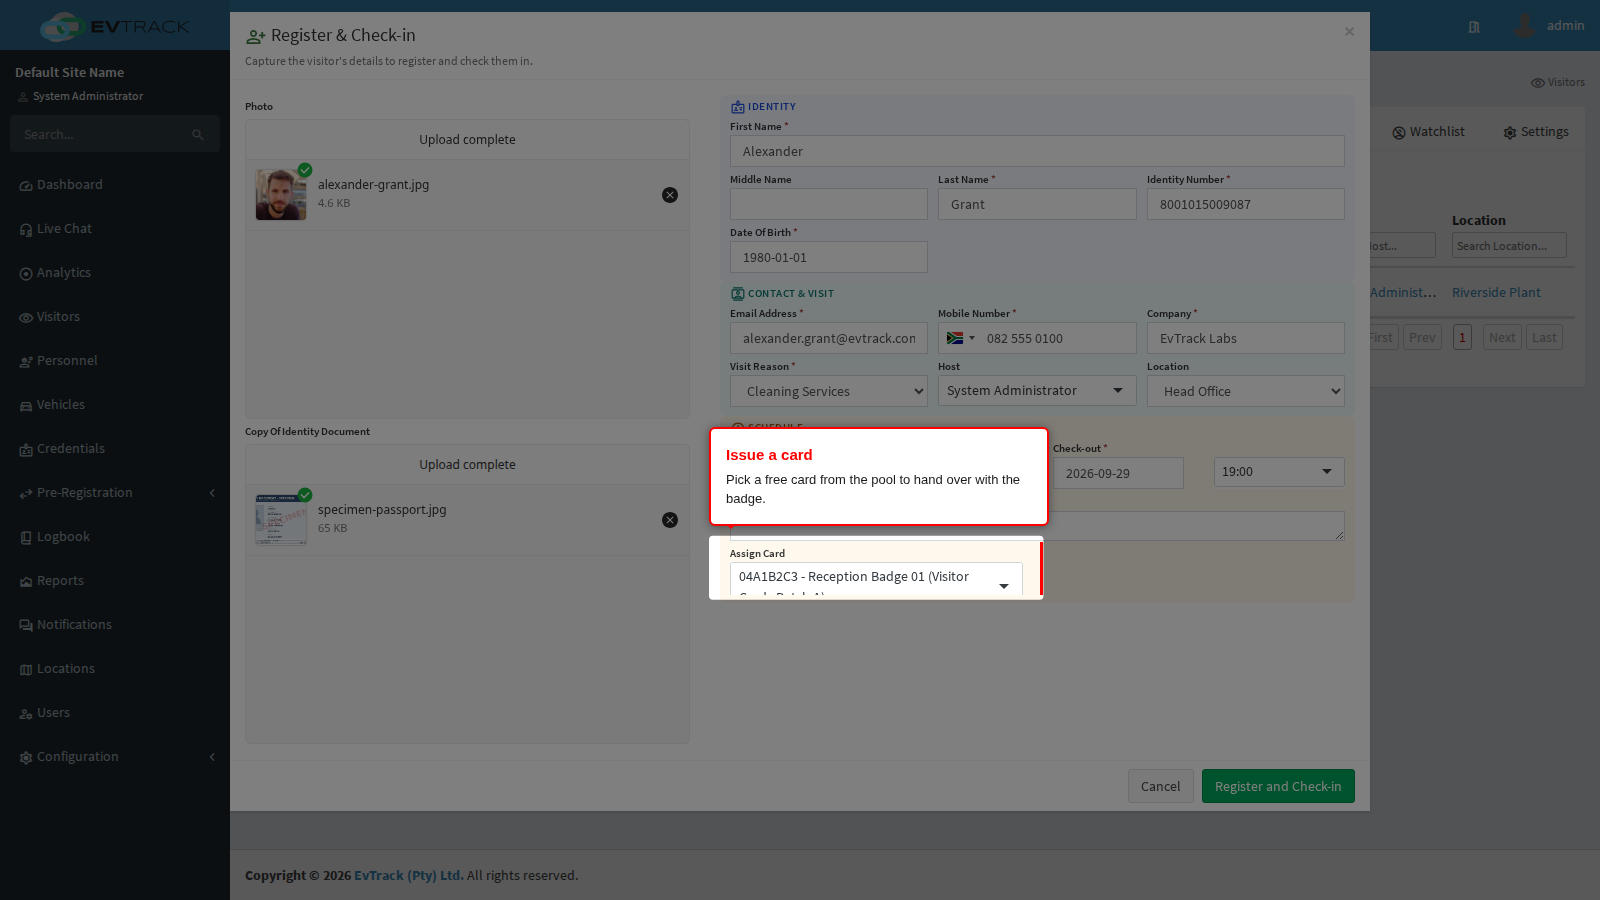
- Only cards that are Available are offered. A card somebody else is holding is never in the list.
- Choosing a card checks it out to this visitor and issues it as their credential for this visit, so the same badge both identifies them and opens what the visit allows.
- The card is not handed back automatically when the visit ends. Returning it is part of checking the visitor out: see Quick Check-out and Card Return.
- If Assign Card from Pool is set to Required, the check-in will not go through without a card.
Full details of the batches themselves, including how card numbers are stored and what a disabled pool does, are in Card Pools.
Step 12: Register and Check-in
One button does the whole job: it creates the visitor, opens the visit, issues the pass, checks the visitor in, and hands out the card if you picked one.
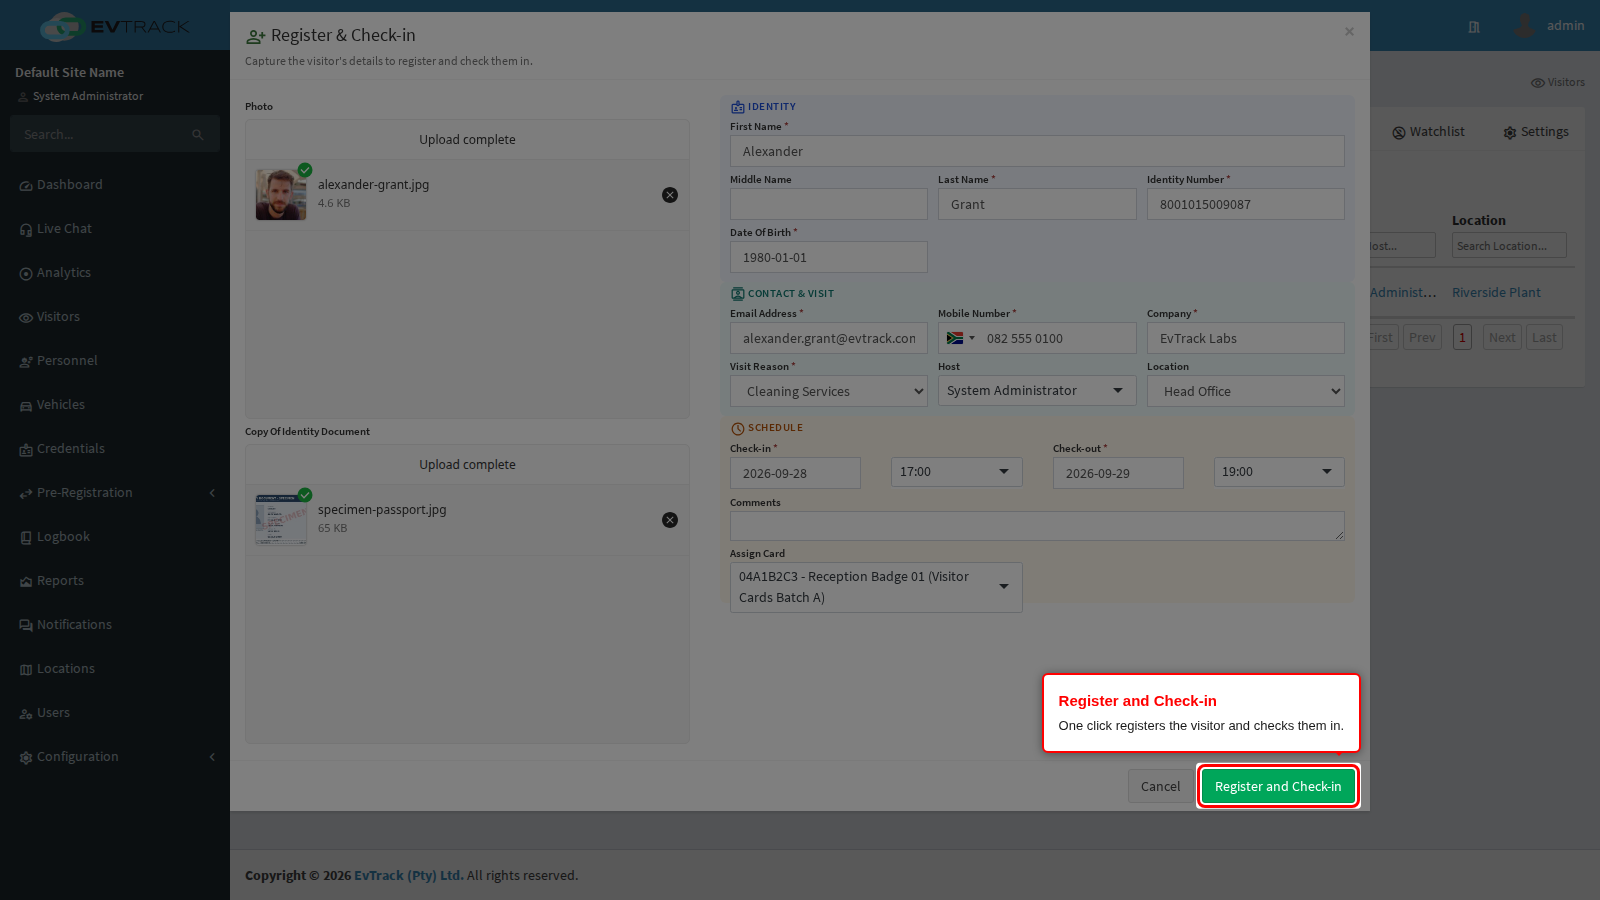
Anything the form itself can check is checked before the request leaves: compulsory fields, the shape of the phone number, the visit window. Failures are marked in red on the fields concerned and nothing is sent.
Beyond that, three answers can come back, and each has its own section below: similar visitors were found, the visitor is on a watchlist, or the check-in succeeded.
Step 13: Similar visitors found
Before creating anything, the system looks for people who are probably already on file. If it finds any, nothing is created and you are shown the matches instead.
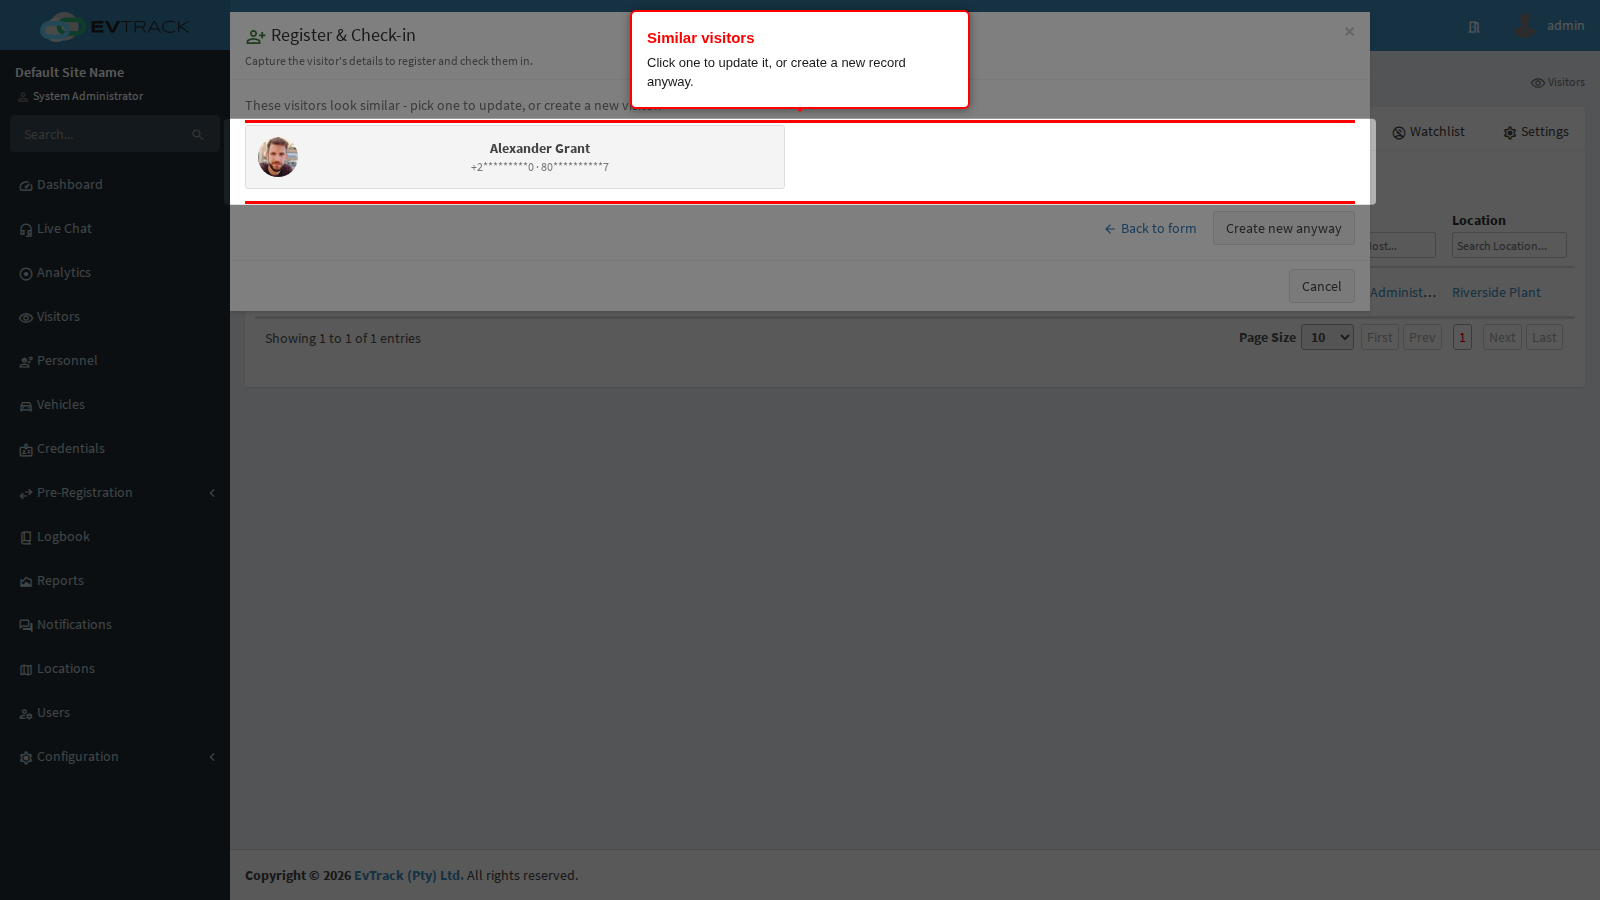
Out of the box a match means: the same identity number, or - when either side has no identity number - the same first name, last name and date of birth. A matching email address on its own, or a matching mobile number on its own, also counts. Which of those signals are used is configurable under Validation, which is also where the “sounds like” name matching is switched on.
You have two ways forward:
- Click one of the cards to continue as an update of that visitor. This is almost always the right answer.
- Create new anyway to insist on a second, separate record. This needs its own permission; without it the attempt is refused with a message telling you to pick an existing visitor. Every use is recorded, because it is how a visitor database fills up with duplicates.
Back to form returns you to what you typed, unchanged.
Step 14: Updating an existing visitor
Picking a card turns the form into an update. A banner appears at the top, the fields you changed are tinted green, empty fields are filled in from the stored record, and the button now reads Update and Check-in.
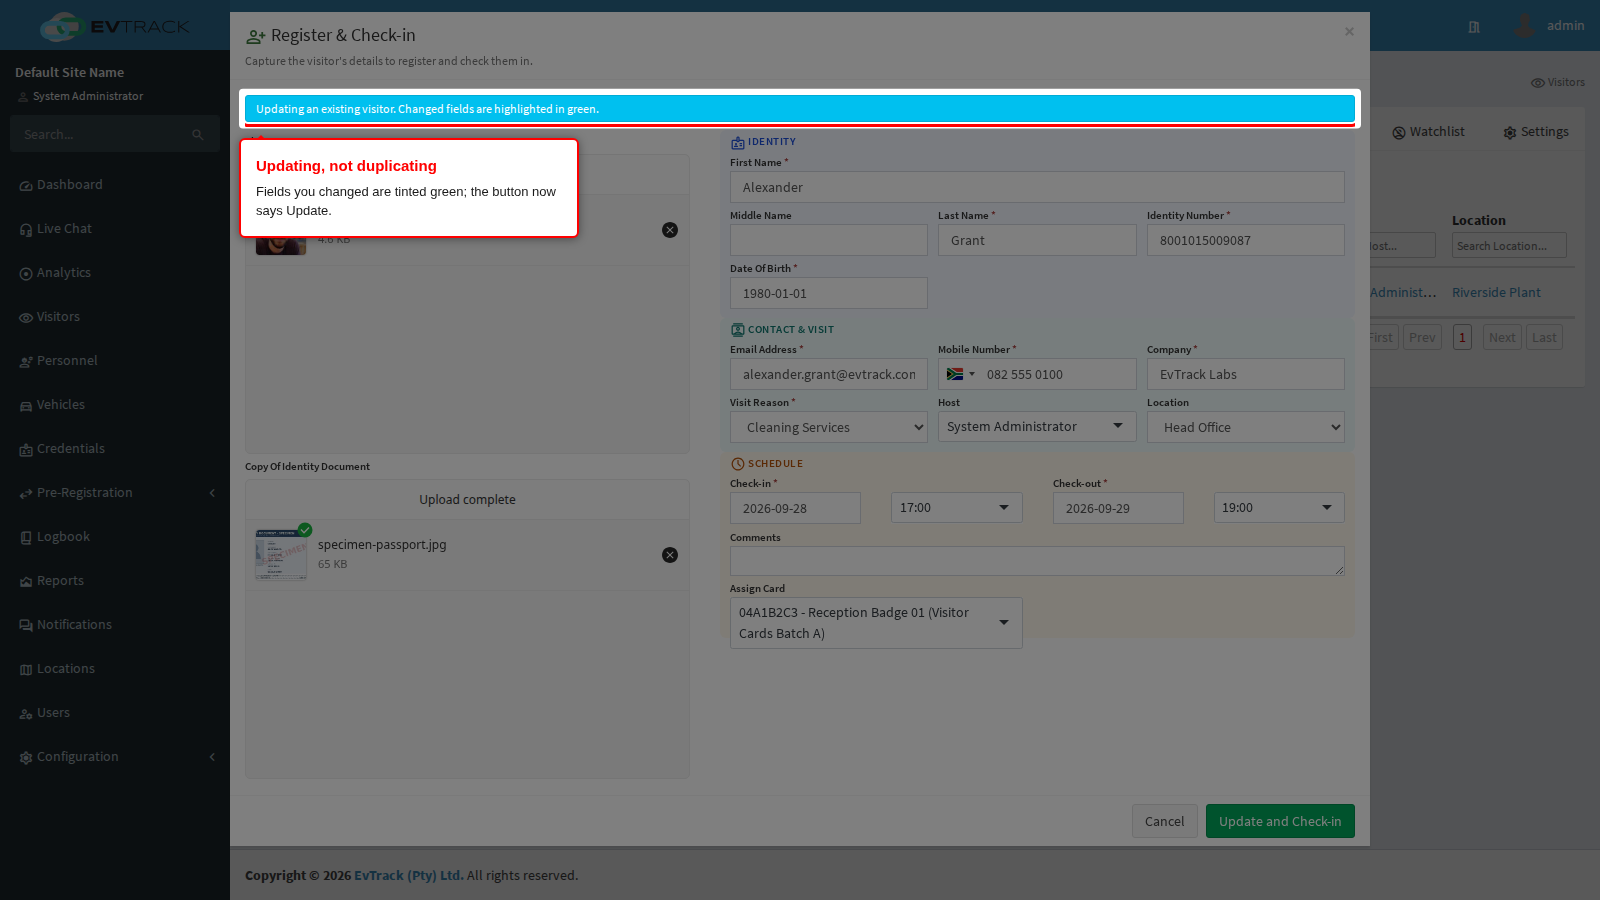
What that means in practice:
- The existing visitor record is updated with what is on the form. Nothing is duplicated.
- Images you did not touch are kept. A new photo replaces the old one.
- The visit is opened against the existing record, so this arrival joins the visitor’s history instead of starting a new one.
- If the visitor you picked is not one you are allowed to see, or has been deleted in the meantime, you get a short message asking you to search again.
Click Update and Check-in to finish.
Step 15: The visitor is on site
The dialog closes and you land back on the dashboard. The visit is at the top of the list, already Checked-in, with the check-in time set to the moment you submitted.
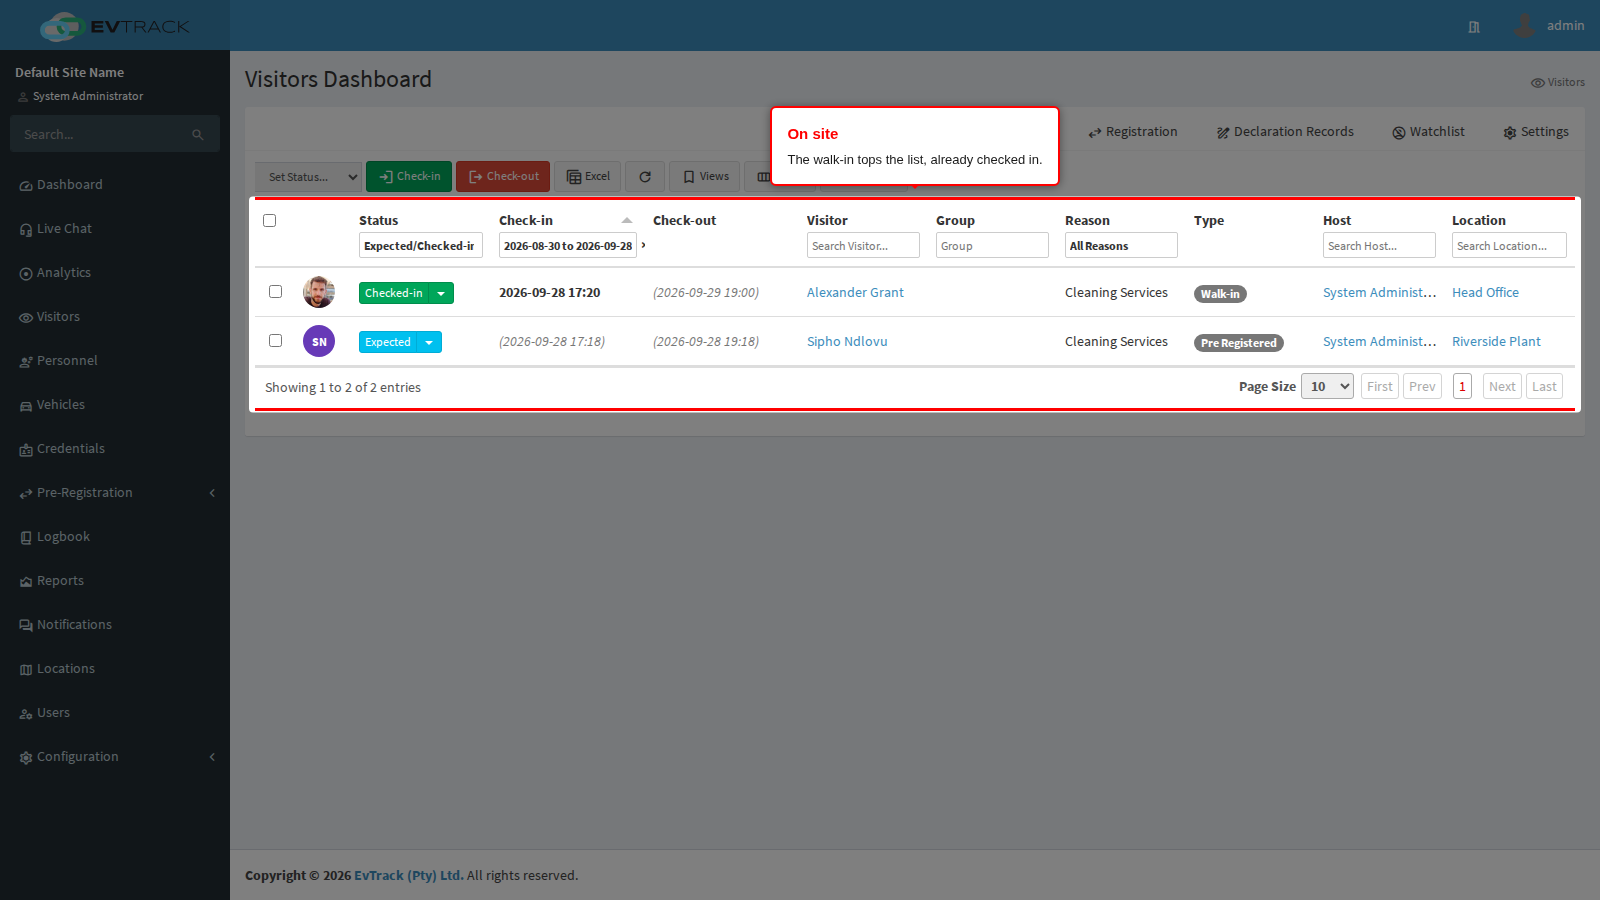
From here the pass can be printed or emailed like any other, the visit can be moved through the remaining statuses, and the visitor can be checked out again from the same toolbar. Add the Card Number column from Fields in the toolbar if you want to see at a glance who is holding which badge.
When the visitor is on a watchlist
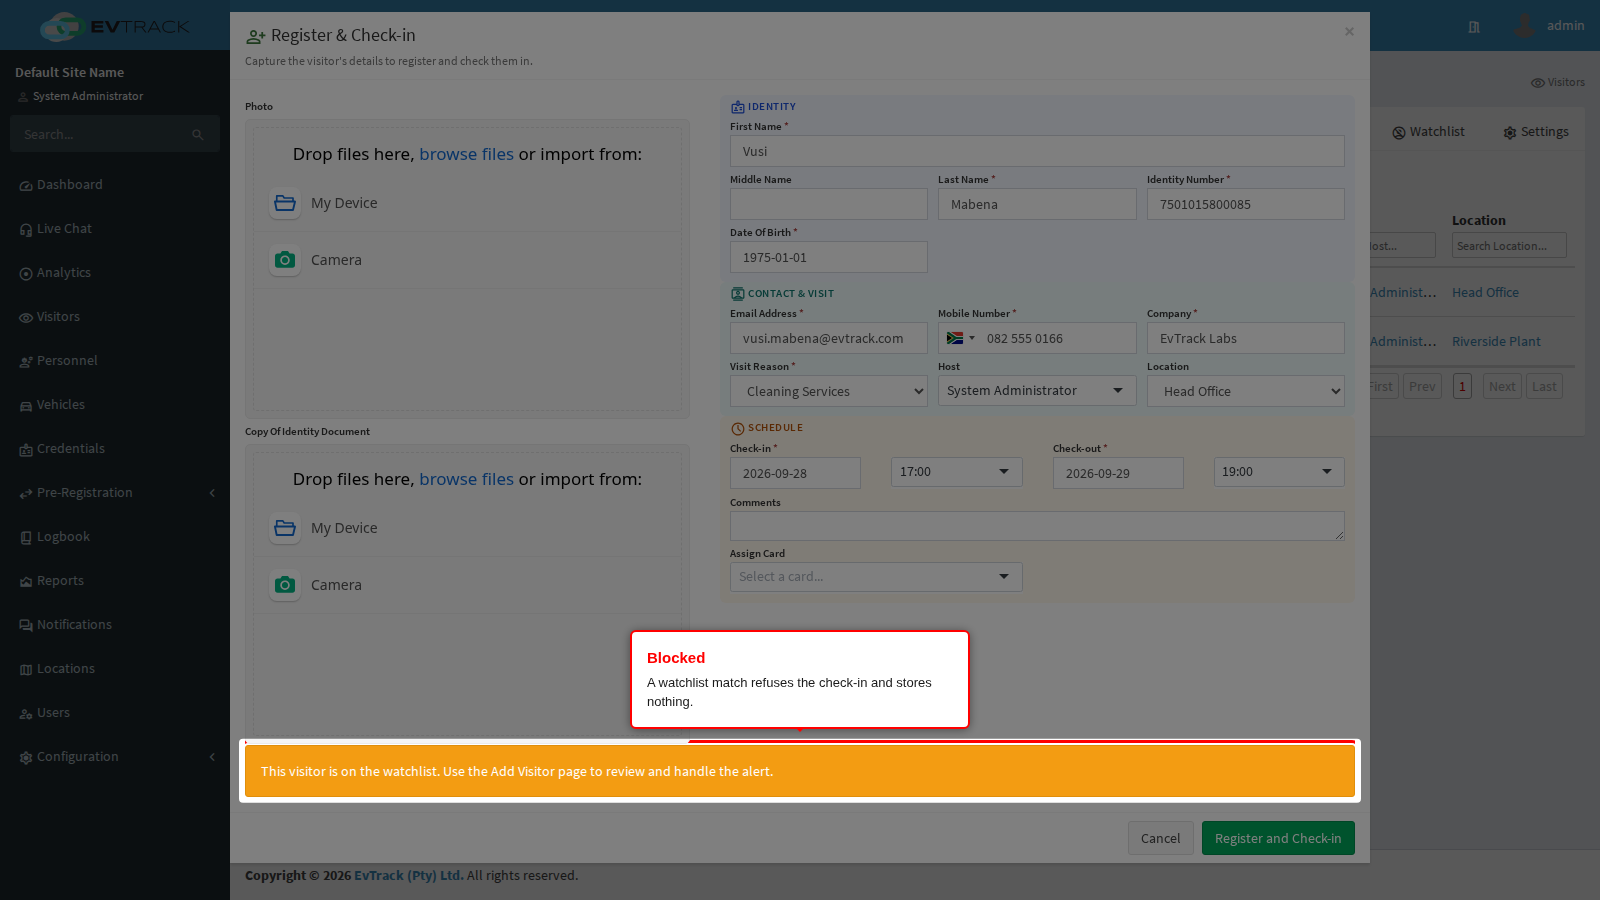
If the identity matches an entry on an enabled watchlist, the check-in is refused. The message is shown across the form and the visitor is neither registered nor checked in - nothing at all is stored.
Points to be clear about:
- The check runs on the name, the identity or passport number and the mobile number, before anything is written.
- There is no override on this screen, for anybody. A flagged visitor who genuinely has to be let in must be handled through Add Visitor, where the match is shown with the entry behind it and can be dealt with deliberately.
- If you were updating an existing visitor when the block happened, your edits are discarded as well.
How the lists are built and what they match on is in Watchlist.
When the check-in has to wait for the host
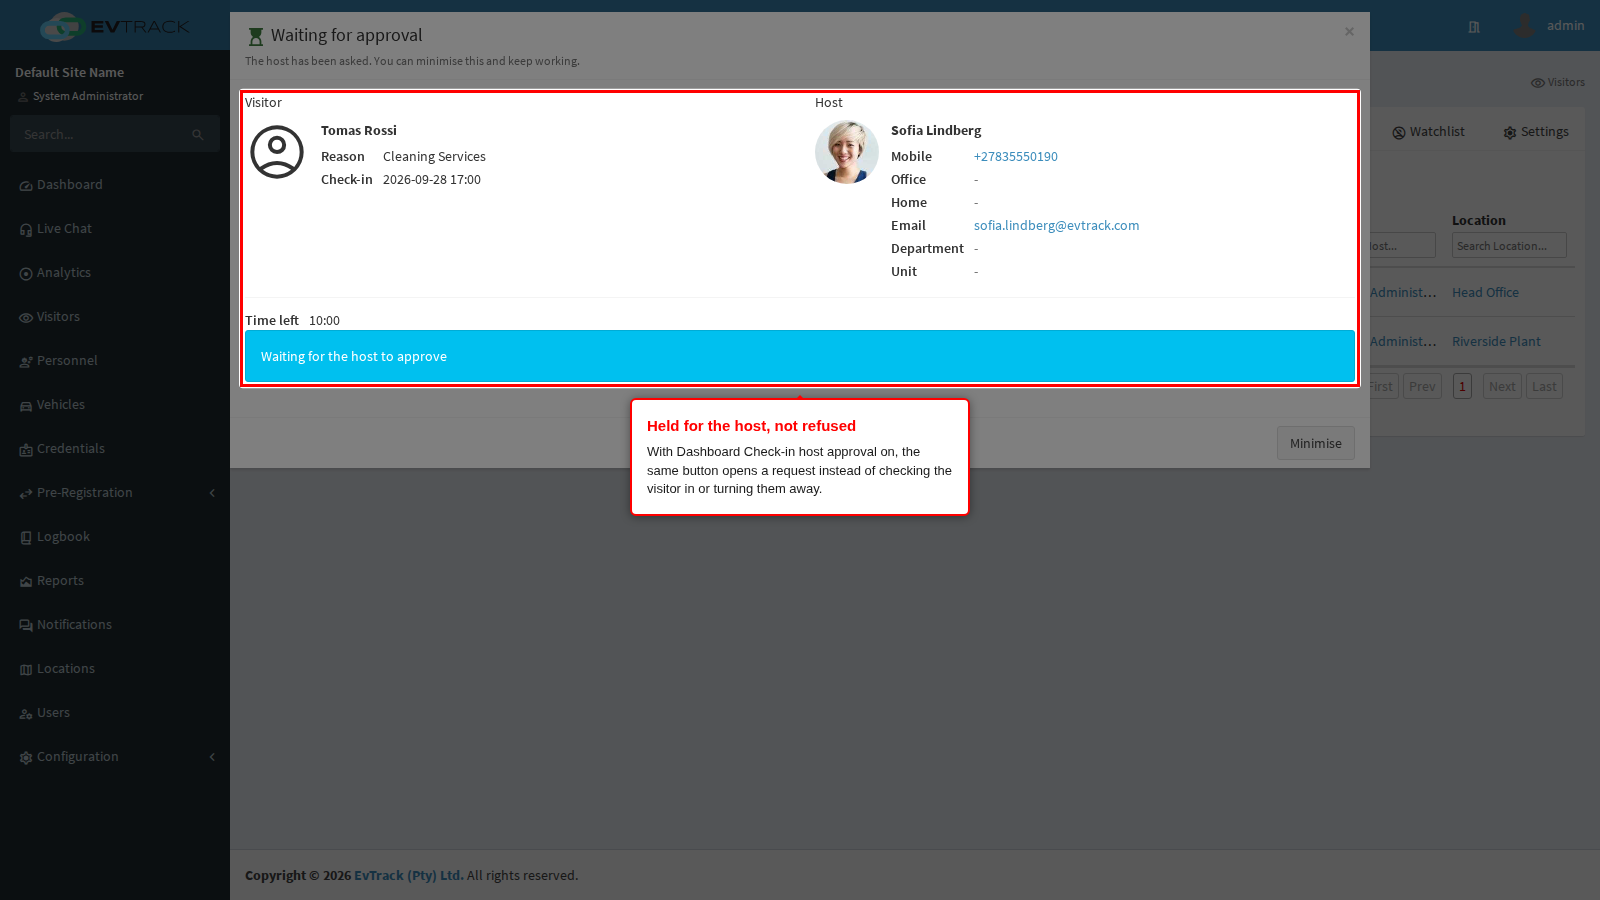
Where Require Host Approval for Dashboard Check-ins is switched on, submitting does not refuse the walk-in the way the cases below do. The dialog holds it instead: the form is replaced by a waiting panel naming the visitor and their host, with a running clock, and the visitor remains at the desk until the host answers.
Full walkthrough, including the per-location override and what the host sees: Reception Host Approval.
What else can hold a walk-in check-in
This dialog handles the simple case. Where a visit has to be approved by somebody, it is no longer turned away: the dialog holds the walk-in at whichever stage applies and shows you the same waiting panel, because approval has to happen before the visitor is let in, not after. You wait with the visitor at the desk, and the moment the approver answers the panel tells you the outcome:
- Require Host Approval for Dashboard Check-ins is switched on. The walk-in is held for the host, as described above. See Reception Host Approval.
- The site you picked requires manager approval. Those sites are grouped under Requires Manager Review in the location list; choosing one holds the check-in for that site’s manager. See Approval Workflow.
- Compliance review is switched on. The walk-in is held for a compliance officer to approve. See Compliance.
Where more than one applies, the first one in that list wins: the host stage is asked first, then the site’s manager, then compliance. Only the host stage runs on a clock - if the host has not answered by the time it runs out, the panel says so and offers to ask again.
Two refusals are still worth knowing:
- The card could not be issued. The card was taken by somebody else a moment earlier, or its pool has been disabled or removed. The message appears on the card field. The visitor’s details have already been saved at that point, but no visit was opened, so pick another card and check them in again: the duplicate step will offer that saved record for you to update rather than create a second one.
- The host could not be found. The host you picked has been removed. Choose another one.
Field limits
The form enforces the same limits as Add Visitor:
| Field | Limit |
|---|---|
| Initials | 10 characters |
| First Name, Middle Name, Last Name | 50 characters each |
| Identity Number | 20 characters, and it must match your document rules |
| Country of Issue | 20 characters |
| Nationality | a three-letter country code |
| 100 characters | |
| Mobile Number, Alternative Number | 50 characters, country code required |
| Company | 50 characters |
| Address | 2000 characters |
| Comments | 5000 characters |
| Date of Birth | must be a plausible date of birth |
Related pages
- Quick Check-out and Card Return - the same dialog on the way out
- Check-in and Check-out - the visit statuses and the single-visit flow
- The Visitors Dashboard - filters, columns, saved views and bulk actions
- Add Visitor - the full registration form, and the route for anything that needs approval
- Reception Host Approval - holding this dialog’s walk-in for the host instead of checking it in directly
- Required Fields - which fields this form shows and enforces
- Card Pools - the batches the card picker draws from
- Watchlist - the lists that block a check-in